


Quick Overview: What Building a Roof Under a Deck Involves
Building a functional under deck ceiling is a multi-phase project that turns wasted space beneath an elevated deck into a dry, usable room. Homeowners researching how to build a roof under a deck often expect a weekend of panel installation, but the real work happens before a single fastener goes in.
- Structural assessment: check joist spacing, condition, and load capacity of the existing deck framing
- Design phase: calculate pitch, plan gutter runs, and choose a drainage path for water shed off the deck boards above
- Material selection: compare corrugated fiberglass, polycarbonate, metal, and solid panel systems
- Code and permit check: confirm local requirements for structural modifications and drainage attachments
- Framing and purlin installation: install horizontal support members across the joist bays
- Panel and drainage installation: attach panels on the calculated pitch, then run gutters and downspouts
- Sealing and finishing: seal fastener points and joist transitions to prevent leaks and condensation
An under deck roof system does more than keep rain off a patio table. It reclaims an entire zone of the yard, protects the joists above it from years of standing moisture, and creates a dry space under the deck that can host a grill, a sitting area, or storage that would otherwise rot within a decade. This guide walks through assessment, material selection, and the installation logic that determines whether the system holds up for twenty years or fails at the first hard rain.
Can I put a ceiling under my deck? Yes, in most cases. Any elevated wood deck with joists spaced at standard residential intervals can support an under-deck ceiling system, provided the framing is sound and the joists are not already compromised by rot or undersized for the added load of purlins and drainage troughs.
Homeowners tackling this project themselves generally get through the panel installation without trouble. Where projects run into problems is the structural check and the drainage math before materials get ordered. If a deck's condition or configuration raises questions at that stage, Ace Handyman Services can step in for an assessment or handle the full build, without restarting the planning from zero.
Assessing Your Deck's Structural Readiness for a Roof System
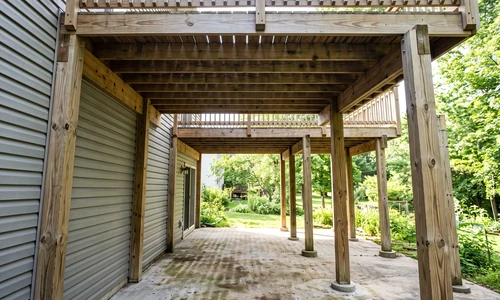
Before buying panels or gutters, confirm the deck itself can carry the additional load. An under deck roof system adds weight in framing, panels, standing water during storms, and in snow regions, accumulated snow load pressing up against the underside. Skipping this step is the single most common cause of sagging or failed installations.
Joist Spacing and Condition
Most residential decks are framed with joists at 16 inches on-center, though some older or wider-span decks use 24-inch spacing. Wider spacing means less support for the purlins and panels, which may require additional blocking. Inspect joists for soft spots, discoloration, or fastener corrosion. Any joist showing signs of rot or insect damage needs repair or sistering before it carries new load.
Attachment Points and Load Capacity
The ledger board connecting the deck to the house, along with the beam and post system supporting the deck, all need to handle the added dead load of the roof system. A deck built to current residential code typically has margin for a lightweight roof system, but decks older than 15-20 years or those with visible sag warrant a closer look before committing.
Essential Equipment and Materials for an Under Deck Ceiling
Material choice drives everything downstream: pitch requirements, fastener type, gutter sizing, and long-term maintenance. Getting this decision right up front prevents having to redo drainage work later.
Material Comparison: Fiberglass, Polycarbonate, Metal, and Solid Roofing
What options exist for under-deck roofing materials? The four common systems are corrugated fiberglass panels, polycarbonate sheeting, standing-seam metal panels, and solid tongue-and-groove vinyl or aluminum ceiling systems. Each trades off differently on weight, light transmission, maintenance, and expected service life.
Corrugated fiberglass panels are lightweight, translucent, and easy for one or two people to handle, but they are prone to UV yellowing and surface degradation over time, particularly in high-sun climates. Polycarbonate sheeting resists impact better and holds up longer under UV exposure, though it costs more and can develop condensation issues if ventilation is not planned carefully. Standing-seam metal panels offer the longest service life and the least maintenance, but they add weight to the load calculation and eliminate any natural light transmission.
Climate-Specific Design Considerations
Material selection should reflect regional weather patterns, not just aesthetic preference. In humid or coastal climates, algae and mildew accumulate faster on fiberglass and require more frequent cleaning, while metal systems shed moisture without staining. In regions with heavy freeze-thaw cycles, rigid panel systems handle expansion and contraction better than flexible fiberglass, which can crack at fastener points after repeated seasonal movement.
Other Materials You Will Need
- Pressure-treated purlins or aluminum support channels
- Stainless steel or galvanized fasteners rated for exterior exposure
- Butyl or silicone sealant for joist transitions and fastener points
- Integrated gutter troughs sized to the deck's square footage
- Downspouts and extensions to direct water away from the foundation
- End caps and trim pieces specific to the panel system chosen
Scoping the right material system for a specific deck, climate, and load profile is where many DIY plans stall before the first purlin goes up. If that decision feels uncertain, a conversation with a deck and patio specialist can clarify which system fits the structure without committing to materials that end up wrong for the space.
Step-by-Step Under Deck Roof Installation
Step 1: Confirm Pitch and Plan the Drainage Path
What is the recommended slope for under-deck roofing? Most under-deck ceiling systems perform best with a pitch between 2:12 and 4:12 (roughly 2 to 4 inches of drop for every 12 inches of horizontal run). This slope moves water quickly enough to prevent pooling without requiring dramatic changes to the deck's existing framing height.
Mark the high and low points of the ceiling run based on the direction water needs to travel, typically toward the house's downspout system or an existing drainage path away from the foundation. Snap chalk lines across the joists to establish the pitch before any purlins go up, since every subsequent measurement references this line.
Step 2: Install Purlins Across the Joist Bays
Purlin spacing determines how well the panel system distributes load. Purlins are horizontal support members that run perpendicular to the deck joists, typically spaced 16 to 24 inches on-center depending on the panel manufacturer's specifications. Attach purlins with structural screws driven into solid joist material, following the pitch line established in Step 1. Verify each purlin is level across its run and consistent with the ones before it, since an uneven purlin layout telegraphs through the finished panel surface as visible waviness.
Step 3: Attach the Roofing Panels or Ceiling System
Starting from the low end of the pitch, install the first row of panels so that water flows over each subsequent overlap rather than against it. Follow the manufacturer's overlap specification, typically one to two corrugations or a specified lap distance for solid systems. Pre-drill fastener holes to avoid cracking rigid panels, and use fastener spacing tight enough to prevent wind uplift without over-tightening, which can distort thinner panel materials.
Step 4: Seal Fastener Points and Joist Transitions
Fastener placement affects long-term water resistance as much as the roofing material itself. Apply sealant at every fastener penetration, at panel end laps, and where the ceiling system meets the house ledger board. These transition points are where the vast majority of leaks originate over the life of the system, so this step should not be rushed even when the panels themselves look finished.
Step 5: Install Gutters and Downspouts
Size the integrated gutter trough to the total square footage of deck above it and the expected rainfall intensity for the region. Slope the gutter slightly toward the downspout location, and extend downspouts far enough from the house foundation to prevent water from pooling back toward the structure. In heavy rainfall regions, oversized gutter capacity prevents overflow during intense storms that a standard trough would not handle.
Drainage System Design and Moisture Management
Ventilation and Condensation Beneath the Ceiling
Water shedding from above is only half the moisture equation. The sealed cavity between the deck boards and the new ceiling can trap humid air, leading to condensation on the underside of panels even when no leak exists. Building in small ventilation gaps at the perimeter, or using a vented ridge detail where the system meets the house, allows trapped moisture to escape rather than accumulating and encouraging mold growth on the framing above.
Building Codes, Permits, and Structural Approval
Most jurisdictions treat an under-deck roof system as a structural modification, which typically requires a permit and inspection, particularly in regions with defined snow load or wind resistance requirements under the International Residential Code (IRC). Permit review generally checks joist reinforcement, attachment security to the house, and drainage sufficiency. Before purchasing materials, contact the local building department to confirm whether a permit applies to the specific scope of work, since requirements vary significantly between simple retrofits and installations that add reinforcement to the existing frame.
Full Under Deck Ceiling vs. Simplified Drainage Solutions
Not every deck needs a complete under deck roof system with integrated gutters and finished panels. A simplified approach, sometimes just a sloped tarp system or a partial coverage zone over a single seating area, can address the core problem of keeping one section dry without the full structural and drainage investment.
- The lighter approach makes sense when: the space below the deck sees occasional use, the deck is smaller than 200 square feet, or the household is not ready to commit to permit review and full material investment
- The full system makes sense when: the underdeck ceiling installation is intended as a permanent living space, the deck is large enough to justify integrated drainage, or wood rot prevention above is a primary concern due to an aging deck structure
Special Considerations for Challenging Decks
Vintage decks built before current residential codes often use undersized joists or non-standard spacing that complicates purlin layout. Decks with visible sag, soft framing, or a history of water damage need repair before any roof system installation, since building over compromised structure locks in problems that get progressively harder and more expensive to fix. Multi-level decks or those with irregular shapes may require custom pitch calculations at each section rather than a single continuous slope, adding complexity to both the drainage design and the gutter routing.
When a deck's age, configuration, or condition raises more questions than a homeowner can confidently answer, bringing in a professional for the structural portion of the project, even while handling panel installation independently, keeps the investment protected without requiring a full handoff of the project.
Maintenance and Long-Term Care
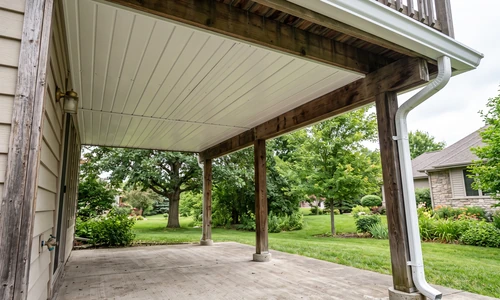
How to cover the underside of a deck for the long term? Covering the underside effectively is not a one-time installation but an ongoing maintenance relationship. Gutters need periodic clearing of debris, sealant at fastener points and transitions should be inspected annually, and panel surfaces benefit from a seasonal rinse to prevent algae or mildew buildup, particularly on fiberglass systems in humid climates.
- Clear integrated gutters of leaves and debris at least twice a year
- Inspect sealant at joist transitions and fastener points annually for cracking
- Rinse panel surfaces seasonally to prevent algae accumulation, especially on fiberglass
- Check for signs of condensation or staining on the deck joists above the ceiling each spring
- Replace UV-degraded panels before cracking allows water infiltration, typically within 10-15 years depending on material and climate
Things to Consider Before You Start
- Is the existing deck structurally sound enough to carry added load? Rot, sag, or undersized joists need addressing before any roof system goes up.
- Does the local jurisdiction require a permit for this modification? Skipping this step risks costly rework if an inspector later flags the installation.
- Is the goal a fully finished living space or basic dry storage? This determines whether the full system or a simplified approach fits the budget and use case.
- Does the household have the tools and comfort level for structural work overhead? Installing purlins and panels from below is physically demanding and awkward compared to ground-level carpentry.
Whichever side of that line a homeowner falls on, the planning and structural assessment stage is where the project either sets up for success or invites problems later.
Why Homeowners Bring in Ace Handyman Services
- Peace of mind knowing an irreplaceable structural element, the deck itself, isn't compromised by a miscalculated load
- A one-year labor warranty backing the installation
- No need to source, learn to operate, or return specialized panel-cutting and fastening equipment
- Background-checked, multi-skilled W-2 craftsmen rather than unvetted subcontractors
- A predictable weekday timeline that doesn't consume every weekend of the season
- Honest scoping that recommends the simplified drainage approach when a full system isn't the right call
- Cleanup included once the panels, gutters, and finish work are complete
If the structural assessment, material selection, or permit navigation feels like more than a weekend project should require, reach out to your local Ace Handyman Services office to talk through the scope before committing to materials.
Frequently Asked Questions
Can I put a roof over my deck?
Yes, most elevated wood decks can support an under-deck roof system, provided the joists, beams, and attachment points are structurally sound. A load capacity check and, in most jurisdictions, a permit review are the two prerequisites before installation begins.
What is the recommended slope for under-deck roofing?
A pitch between 2:12 and 4:12 works for most under-deck ceiling systems, giving water enough slope to shed quickly toward the gutter trough without requiring major changes to the deck's existing joist height.
How long does an under deck ceiling system last?
Service life varies by material. Fiberglass panels typically last 10-15 years before UV degradation requires replacement, while metal panel systems can last 25 years or more with minimal maintenance beyond periodic gutter cleaning.
Do I need a permit to build a roof under my deck?
In most jurisdictions, yes. Under-deck roof systems are typically classified as structural modifications and reviewed for load capacity, attachment security, and drainage sufficiency under local residential building codes.
Can an under-deck roof be added to an existing deck without major reconstruction?
Often yes, provided the existing joists are in good condition and spaced at a standard interval. Decks with rot, sag, or non-standard framing may need joist reinforcement or sistering before the roof system can be added safely.
How do I prevent condensation under a deck ceiling?
Build small ventilation gaps at the ceiling's perimeter or use a vented detail where the system meets the house. This allows trapped humid air to escape the cavity between the deck boards and ceiling panels, preventing moisture buildup that can lead to mold on the framing above.