


A crack running across your basement or garage floor raises an immediate question: is this cosmetic, or is it a warning sign? The good news is that most concrete floor cracks are repairable with the right diagnosis, the right material, and proper prep work. This guide walks through how to identify what caused the crack, how to classify it, and how to fix cracked concrete floor damage so the repair actually holds.
Can a cracked concrete slab be repaired? Yes, in the vast majority of cases. Repairability depends on crack width, depth, and whether the crack is still moving. Hairline to two-inch cracks caused by settling, shrinkage, or thermal movement respond well to patching materials and sealants. Wider cracks or ones tied to structural settlement may need a professional assessment before any product goes into the slab.
Some homeowners handle a cracked concrete floor repair from start to finish over a weekend. Others get partway through prep work, realize the crack is more active or deeper than expected, and want a second opinion. Ace Handyman Services is an option at any stage of that process, whether you need a full repair or just want confirmation that your DIY plan is the right one.
Quick Overview: What a Concrete Crack Repair Actually Involves
Before picking up a chisel, it helps to see the whole arc of the project. Here is what a typical cracked concrete floor repair looks like from diagnosis to cured finish:
- Diagnose the cause - settling, thermal expansion, freeze-thaw cycling, or a structural issue tied to the foundation.
- Measure and classify the crack - hairline (under 1/8 inch), narrow (up to 1/4 inch), medium (1/4 inch to 2 inches), or wide (over 2 inches).
- Determine if the crack is active or stable - still moving with the seasons, or settled into its final shape.
- Clean and prep the crack - vacuum, wire brush, and compressed air to remove loose debris.
- Widen or undercut narrow cracks - so repair material can penetrate and mechanically lock in place.
- Choose the matching material - liquid sealant, patching compound, or backer rod plus sealant depending on width.
- Apply, finish, and cure - following the product's working time and cure window before foot traffic or heavy loads return.
- Monitor for recurrence - especially through the first freeze-thaw cycle or seasonal temperature swing after repair.
Assessing Cracked Concrete Floors Before You Begin
What Causes Concrete Floor Cracks
Every crack has a cause, and understanding it changes how you approach the repair. Settling cracks show up in newer slabs as the soil beneath compresses unevenly, often within the first few years after the pour. Thermal expansion cracks appear as concrete swells and contracts with temperature swings, typically running in straighter lines. Freeze-thaw cracking happens when water seeps into existing pores or micro-cracks, then expands as it freezes, widening the damage each winter.
A practical example: if your floor was poured two or three years ago and cracks appeared right after the first hard freeze, thermal or freeze-thaw movement is the likely driver. If a crack runs diagonally and appears to be widening month over month, settling or a structural issue deserves a closer look before you patch over it.
Measuring and Classifying Crack Size
Crack width is the single biggest factor in material selection. Hairline cracks under 1/8 inch typically need only a penetrating sealant. Narrow cracks up to 1/4 inch call for a flexible sealant or a thin patching compound. Medium cracks between 1/4 inch and 2 inches are the classic patching compound range, whether vinyl-based or fast-setting cement.
Distinguishing Active from Stable Cracks
This distinction gets skipped in most repair guides, but it determines whether your fix lasts one season or ten years. Stable cracks have finished moving; they resulted from a one-time event like initial curing shrinkage or a settling event that has run its course. Active cracks continue to widen or shift with temperature and moisture cycles. You can test this by measuring crack width at two points several weeks apart, ideally across a seasonal transition, or by comparing dated photos over a few months. Stable cracks accept rigid patching compounds and epoxy. Active cracks need a flexible sealant, such as polyurethane, that can move with the slab instead of cracking again alongside it.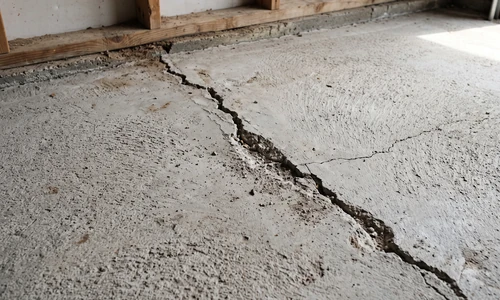
Essential Equipment and Materials for Concrete Crack Repair
Primary Equipment Decision: Rent vs Own
A basic hairline or narrow crack repair needs little more than a wire brush, a shop vacuum, and a caulking gun, all worth owning outright. Wider crack work involving mechanical undercutting benefits from an angle grinder with a diamond blade, which is worth renting for a single project unless you do concrete work regularly. A cold chisel and small sledgehammer round out the undercutting toolkit for cracks too narrow for a grinder blade to reach cleanly.
Choosing Your Repair Material by Crack Type
What is the best crack repair for concrete? It depends entirely on crack width. Hairline and narrow cracks respond best to liquid or gel polyurethane sealants. Medium cracks from 1/4 inch to 2 inches need a vinyl patching compound or fast-setting repair mortar. Wide cracks over 2 inches require a foam backer rod set into the gap first, followed by a self-leveling sealant on top.
Liquid sealants offer fast application with minimal prep, but they carry a shorter service life, often showing hairline dark edges after two to three years of weather cycling. Patching compounds take more prep work up front but hold up longer, generally five to ten years depending on exposure. Epoxy, reserved for cracks that need both structural bonding and a finished cosmetic look, can last ten years or more when the surface is properly cleaned and primed first.
Other Materials You Will Need
- Wire brush and shop vacuum for debris removal
- Compressed air canister or air compressor for fine dust clearing
- Concrete backer rod sized to crack width
- Vinyl patching compound or fast-setting cement mortar
- Polyurethane or epoxy sealant appropriate to crack activity
- Caulking gun or trowel depending on product form
- Safety glasses and dust mask for grinding or chiseling steps
If sourcing the right combination of tools and materials for your specific crack feels like the part where the project could go sideways, a floor services professional can scope the repair and confirm what the slab actually needs before you buy anything.
Step-by-Step Concrete Floor Crack Repair Process
Step 1: Clean Out Debris and Loose Material
Thorough cleaning determines whether your repair material actually bonds. Vacuum the crack first to pull out loose chips and dust, then run a wire brush along the length to knock loose any material still clinging to the crack walls. Finish with compressed air to clear fine dust from the deepest reaches of the crack. Trapped debris blocks adhesion and gives water a path to keep working underneath your repair.
Step 2: Widen and Undercut Narrow Cracks
Narrow cracks create a surface tension barrier that keeps repair material from penetrating fully. Widening the crack slightly, and undercutting the edges so the opening is narrower at the surface than at depth, gives the patching material a mechanical lock instead of relying on surface adhesion alone. Use a grinder with a diamond blade for longer cracks, or a cold chisel for shorter, narrower runs. Aim for a clean V-shaped or dovetail profile rather than a straight vertical cut.
Step 3: Wet the Surface (If Required by Your Product)
Many cement-based patching compounds need a damp substrate to cure properly and bond to existing concrete. Check your product's instructions; some fast-setting mortars specify a damp-not-wet surface, while polyurethane sealants and epoxies typically want a completely dry crack.
Step 4: Install Backer Rod for Wide Cracks
Is it ok to put cement over cracked concrete? No, not without proper preparation first. Cement or patching compound applied directly over an unprepared crack, especially a wide one, tends to fail quickly because it lacks anything to bond to at depth. For cracks over 2 inches, press a foam backer rod into the gap to the correct depth before applying any sealant on top. The backer rod controls the sealant's depth-to-width ratio and prevents wasted material sinking into the void below.
Step 5: Apply the Repair Material
How can I repair a cracked concrete floor? Assess the crack, clean out debris, widen it if narrow, apply the matching sealant or patching compound, then finish and cure it properly. Preparation matters more than the application step itself; a well-prepped crack with an average product outperforms a poorly prepped crack with premium material every time.
Apply patching compound with a trowel, pressing firmly into the crack to eliminate air pockets, then strike it level with the surrounding floor surface. Apply sealants with a caulking gun in a steady bead, tooling the surface smooth with a putty knife or your applicator's built-in tool before it skins over.
Step 6: Finish and Cure
Smooth the repair flush with the surrounding slab while the material is still workable. Most fast-setting mortars reach walkable strength within a few hours but need 24 to 48 hours before heavy loads return. Polyurethane sealants typically need 24 hours minimum before any moisture exposure and up to a week for full cure. Keep the repair area dry and undisturbed through the full cure window specified on your product.
Choosing and Applying the Right Finish
Application and Cure Window by Material
Vinyl patching compounds cure fast, often within a day, but stay slightly more flexible long-term, making them a solid match for garages with moderate seasonal movement. Fast-setting cement mortars reach higher compressive strength and suit medium cracks under vehicle traffic loads, but need careful surface wetting per the manufacturer's directions to avoid a chalky, weak bond. Epoxy repairs demand the longest prep, including full moisture testing of the slab, but deliver the most durable and cosmetically clean result, often exceeding ten years before any visible wear.
Sealant-Only Fix vs Full Crack Repair
Not every crack needs the full clean-widen-patch sequence. A lighter sealant-only approach works for hairline cracks that show no active movement and sit in low-traffic areas.
- A sealant-only fix is the right call when: the crack is under 1/8 inch, has been stable for at least one full season, and sits somewhere with light foot traffic only.
- A sealant-only fix is the right call when: the goal is primarily moisture control rather than structural repair, such as keeping water out of a basement slab hairline crack.
- Full repair is the right call when: the crack exceeds 1/4 inch, shows any sign of active movement, or sits in a garage floor bearing vehicle weight.
- Full repair is the right call when: you need a cosmetically finished surface, since sealant alone leaves a visible line while patching compound and epoxy can be leveled flush.
Special Considerations for Challenging Concrete Floors
Environment-Specific Repair Considerations
A basement concrete crack often involves moisture management as much as structural repair; poor drainage or a high water table can push moisture through even a well-patched crack, so consider whether a drainage fix needs to happen alongside the patch. A garage concrete crack under regular vehicle weight needs a higher-strength patching compound or epoxy rather than a flexible sealant alone. Freeze-thaw climates favor flexible polyurethane sealants over rigid compounds, since the repair needs to move with seasonal expansion and contraction rather than crack again at the same spot.
Vintage slabs, particularly ones poured before modern reinforcement standards, sometimes reveal weaker underlying concrete once you start undercutting a crack. If the material crumbles well beyond the visible crack line during prep work, stop and get a professional opinion before continuing; you may be looking at a slab-wide issue rather than a single crack. If your prep work uncovers wider structural concerns than expected, a concrete and masonry repair specialist can assess whether patching is still the right call or whether a larger section needs cutting and re-pouring.
Maintenance and Long-Term Care
How long does concrete crack repair last? It depends on the material and whether the underlying cause was addressed. Liquid sealants typically last two to five years before showing wear at the edges. Patching compounds hold five to ten years under normal conditions. Epoxy repairs with proper surface prep commonly exceed ten years.
- Inspect repaired cracks each season, especially after the first freeze-thaw cycle following repair.
- Watch for new hairline cracks branching off the original repair, a sign the cause was not fully resolved.
- Keep drainage clear around basement and garage slabs to reduce hydrostatic pressure against the concrete.
- Reapply sealant on hairline cracks proactively every few years rather than waiting for visible failure.
- Address expansion joints and control joints; cracked or missing joint material lets movement transfer into the slab body.
Preventing Future Cracks
Prevention strategies map directly back to cause. If thermal expansion drove the original crack, adding or maintaining expansion joints nearby reduces the chance of recurrence. If settling was the culprit, verifying proper soil compaction and drainage around the foundation limits future movement. Freeze-thaw damage slows down significantly once surface sealing keeps water from penetrating and expanding within the concrete. Load distribution matters too; parking heavy vehicles consistently in the same spot on a garage floor concentrates stress and can reopen a marginal repair.
Things to Consider Before You Start
- Do you know what caused the crack? Repairing without understanding cause risks the same crack reopening within a season or two.
- Is the crack still moving? Active cracks need flexible materials; guessing wrong here means redoing the work.
- Does the crack exceed 2 inches or show diagonal stair-stepping? That pattern suggests a structural conversation is needed before any product goes into the slab.
- Do you have the tools for proper undercutting? Skipping mechanical prep is the most common reason DIY concrete repairs fail early.
- Is this a commercial or food-handling space? Regulatory sanitation requirements may apply and change what counts as an acceptable repair.
If you can answer those five questions with confidence, you are likely on the DIY side of the line. If any of them give you pause, that is the signal to bring in a professional assessment before committing material to the slab.
Why Homeowners Bring in Ace Handyman Services
- Peace of mind on a slab you cannot easily undo once material is set into a crack.
- A one-year labor warranty backing the repair work performed.
- No need to source, learn to use, or return grinders, chisels, and specialty sealant applicators.
- Background-checked, multi-skilled W-2 craftsmen, not gig-based subcontractors.
- A predictable weekday timeline that does not eat into your weekend.
- Right-sized scope; if a sealant-only fix genuinely covers your crack, that is what gets recommended.
- Cleanup included, so grinding dust and debris do not become a second project.
Whether you have a single hairline basement concrete crack or a wider garage floor issue that raises structural questions, it helps to have an experienced set of eyes on the slab before committing to a repair plan. To schedule that assessment or the repair itself, reach out to your local Ace Handyman Services office.
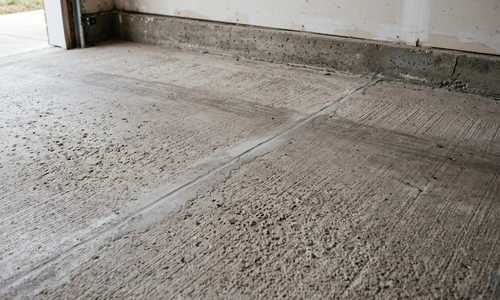
When a repair turns out to be bigger than a weekend, request an estimate from Ace Handyman Services and a local, background-checked craftsman will handle it from there.
Frequently Asked Questions
What is the cheapest way to fix a cracked concrete floor?
A liquid or gel polyurethane sealant is the lowest-cost option for hairline and narrow cracks, typically running a modest amount per tube for a small residential repair. It requires minimal tools and no undercutting, though it carries a shorter service life than patching compound or epoxy.
Can I use regular concrete mix to fill a crack?
Standard concrete mix is not ideal for crack repair because it shrinks as it cures and does not bond as reliably to existing concrete as purpose-made patching compounds or repair mortars. Products formulated specifically for crack repair include additives that improve adhesion and reduce shrinkage.
How do I know if a crack is a foundation problem?
Watch for diagonal cracks, stair-stepping through masonry joints, doors or windows that suddenly stick, or cracks wider than 2 inches that continue to grow. Any of these signs warrants a professional structural assessment before attempting a cosmetic repair.
Does epoxy concrete crack filler work for garage floors?
Yes, epoxy is a strong choice for garage floors because it bonds well, resists vehicle load and chemical exposure like oil drips, and can be finished flush with the surrounding slab. It requires more thorough surface prep than sealants or standard patching compounds.
Should I fix a hairline crack or leave it alone?
Sealing a hairline crack proactively is generally worthwhile, especially in basements, because it prevents moisture infiltration that can widen the crack over time. Left untreated, hairline cracks in areas exposed to freeze-thaw cycling tend to grow.
Why did my concrete crack come back after I repaired it?
Recurrence usually means the underlying cause, whether thermal movement, settling, or an active crack treated with a rigid material, was not addressed. Matching the repair material to whether the crack is active or stable is the most common factor that determines whether a fix holds.