


Water pooling in your gutters instead of flowing toward the downspout is more than a cosmetic nuisance. It signals a slope problem that, left unaddressed, invites fascia rot, foundation saturation, and ice dams in cold climates. This guide walks you through diagnosing why your gutters lost their pitch, deciding whether the fix is safe to tackle yourself, and executing a repair that actually holds.
How do you fix improperly sloped gutters? Improperly sloped gutters get fixed by first diagnosing the root cause, whether that's loose hangers, a bent bracket, or structural settling, then repositioning the brackets to restore a consistent downward pitch toward the downspout. Skipping the diagnostic step often means the same section sags again within a season.
Some homeowners handle this repair solo with a level and a few hand tools. Others get partway up the ladder, realize the fascia is compromised or the run is longer than expected, and decide the smarter move is bringing in a professional. Ace Handyman Services is a reasonable option at any point in that process, whether you want a second opinion before you start or a crew to finish what you began.
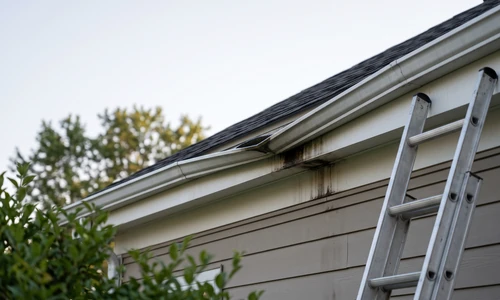
Quick Overview: What Fixing Gutter Slope Actually Involves
Before you climb a ladder, understand the shape of the project. Here is the stage-by-stage breakdown:
- Inspect and identify symptoms: standing water, backward flow, sagging sightlines, or overflow at the downspout entry.
- Diagnose the root cause: recent installation error, gradual settling, damaged hangers, or fascia deterioration.
- Assess safety and scope: ladder height, roof pitch, run length, and whether it's a one-person or two-person job.
- Measure current slope: using a level, string line, or laser level to confirm how far off the pitch actually is.
- Reposition brackets: loosen fasteners, adjust bracket height along the run, and re-mark the new slope line.
- Reattach and tension fasteners: working in sequence to avoid binding or uneven pull.
- Test drainage: run water through the section and watch for standing pools or backward flow.
- Set a monitoring schedule: seasonal inspections to catch slope loss before it becomes a repeat repair.
Assessing Your Gutter Slope Before You Begin
Understanding Proper Gutter Slope and Why It Matters
Gutter pitch is the intentional downward angle that moves water from the high point of a run toward the downspout. The widely referenced standard is a 1:500 ratio, roughly 18mm of drop for every 9 meters of gutter (about half an inch per 10 feet). That ratio isn't arbitrary. It's the minimum slope needed to overcome surface tension and friction inside the trough so water keeps moving rather than sitting still. Steeper roof pitches, heavier regional rainfall, and cold-climate ice formation can all push that number higher.
Signs Your Gutters Have Lost Slope
What are the signs of improper gutter slope? Watch for standing water in sections after rain stops, water flowing backward toward the fascia instead of the downspout, visible gaps between the gutter and its hangers, overflow pooling near the downspout inlet, sagging sightlines along the run, and moss or algae growth in stagnant low spots. Corrosion accelerating near fastener points is another quiet giveaway. Forum reports document slope losses as small as 30mm over a 9-meter run producing 1.5cm of standing water, which is enough to accelerate fascia damage over a single wet season.
Root Cause Diagnosis Before You Begin Repair
How do you adjust the slope of gutters? You adjust gutter slope by loosening the fasteners at the high end of the run, repositioning the brackets to reset the pitch line, remeasuring to confirm the new angle, reattaching with even fastener tension, and testing with water before calling the section done. That sequence only works, though, once you know why the slope failed in the first place.
Run through this before touching a bracket. Did the slope loss happen right after an installation or gutter replacement, or has it crept in gradually over years? Recent failure usually points to installation error, an under-tensioned fastener, or a bracket spaced too far from its neighbor. Gradual sag usually means settling, corrosion, or fascia softening from long-term moisture exposure. Is the problem isolated to one section or spread across the whole run? Isolated sag often means a single failed hanger. System-wide sag can point to a fascia board that's lost its structural integrity across its full length, which is a different repair entirely.
Essential Equipment and Materials for Gutter Slope Repair
Ladder Setup and Primary Tools
An extension ladder rated for the height of your fascia, positioned on stable, level ground, is the foundation of this job. A stabilizer bar that spreads the ladder's contact points across the gutter face prevents the ladder itself from denting soft aluminum. Beyond the ladder, you'll need a 4-foot level or a laser level, a tape measure, a bracket wrench or drill with the correct driver bit, and a chalk line or painter's tape for marking the new slope line.
Fasteners and Bracket Selection
Match your replacement fasteners to your existing hanger type. Hidden hangers, spike-and-ferrule systems, and strap hangers each use different attachment hardware, and mixing systems mid-run creates uneven load distribution. If more than a few hangers in a section show corrosion or bent arms, plan to replace the whole cluster rather than patching one and leaving weaker neighbors in place.
Other Materials You Will Need
- Replacement hangers or brackets matched to your gutter profile
- Corrosion-resistant screws or fasteners appropriate to your gutter material
- A wood block or scrap 2x4 for protecting soft metal during adjustment
- Garden hose for the post-repair drainage test
- Work gloves and safety glasses
If scoping the ladder work, the fastener type, or the extent of fascia damage feels like the part where this project could go sideways, that's a reasonable point to loop in a gutter repair crew rather than guess your way through it.
Safety Considerations and When to Call a Professional
Gutter work happens at height, and that alone changes the risk calculus. A single-story home with a stable ladder setup and a short run is a reasonable solo DIY project for someone comfortable on a ladder. A two-story home, a steep roof pitch, or a run longer than one ladder repositioning away is a different situation, and a second person on the ground holding the ladder is not optional at that point.
Call a professional if you find severely corroded hangers that crumble under hand pressure, a cracked or spongy fascia board, visible roof structural issues, or a height that exceeds what your ladder can safely reach with three points of contact maintained. Brittle, aged gutter material that flexes or cracks when you press on it is another signal that DIY adjustment risks making things worse. If you've identified structural damage or have concerns about safety, consulting a professional is the appropriate next step, and it's far cheaper than a fall or a second repair.
Step-by-Step Gutter Slope Repair Process
For homeowners confident in their assessment and ability, the following steps outline the repair process.
Step 1: Measure Your Current Slope
Confirm the problem before you commit to a fix. Use a 4-foot level with a shim to establish a reference line, or run a string line taut from the high end of the gutter to the downspout end and measure the gap at intervals. A laser level mounted at one end gives the most precise read across a long run. Convert your findings to the 1:500 ratio (roughly half an inch of drop per 10 feet) to see how far off you actually are. Common measurement errors include checking only one point instead of the full run and forgetting to account for existing intentional pitch when eyeballing the gutter.
Step 2: Loosen Fasteners at the High End
Work from the point closest to where water enters the run. Loosen the screws or spikes holding the bracket in place without fully removing them yet. This lets you shift the bracket's height without losing your reference point on the fascia.
Step 3: Reposition the Bracket
Bracket height at the mounting point is what creates the tilt. Raising the bracket slightly at the high end, or lowering it slightly toward the downspout, resets the pitch. For multi-bracket sections, calculate even spacing so the slope descends gradually rather than in one dramatic drop near the end, which causes turbulence and splash-back instead of smooth flow.
Step 4: Mark the New Slope Line
A visual reference keeps every bracket consistent. Snap a chalk line or run painter's tape along your calculated new pitch before you reattach anything. This prevents the common mistake of adjusting each bracket by feel and ending up with a wavy, inconsistent line.
Step 5: Reattach with Proper Fastener Tension
Tighten in an alternating sequence, not straight down the line. Alternating sides as you tighten prevents the gutter from binding or twisting out of true. If you're working with soft aluminum, place a wood block behind the gutter face where the ladder or your hand applies pressure. This community-tested technique prevents dents that create new low spots exactly where you just fixed one.
Step 6: Test Drainage
Run a hose at the high end of the section and watch the water's path for several minutes. Success looks like steady, uninterrupted flow toward the downspout with no standing water remaining after five minutes and no backward pooling toward the fascia. If water lingers in a specific spot, that bracket likely needs a further quarter-inch adjustment. Repeat the test after any correction until the run drains clean.
Choosing and Applying the Right Fastening Approach
Once slope is corrected, the fasteners you choose determine how long the fix holds. Hidden hangers spaced every 24 to 36 inches generally outperform spike-and-ferrule systems over time, since spikes tend to back out as wood fascia expands and contracts seasonally. After reattachment, give the repair a full rain cycle before considering it finished. Watch the first heavy storm closely, since that's when marginal adjustments reveal themselves.
Spot Bracket Fix vs Full Gutter Slope Correction
Not every slope problem requires reworking an entire run. A single failed hanger in an otherwise sound system is a spot fix. A run with multiple bowed sections, widespread corrosion, or a fascia board that's lost integrity along its length calls for full correction.
Spot fix is the right call when:
- Only one or two hangers show looseness or minor bending
- The rest of the run tests within acceptable slope
- The fascia beneath the affected section is solid and dry
Full correction is the right call when:
- Multiple sections show sag or standing water
- Hangers throughout the run are original and aging
- You've already replaced one section this year and another is failing
Special Considerations for Challenging Gutter Systems
Older homes with wood fascia that's absorbed decades of moisture present a different challenge than newer construction. Fasteners may not hold reliably no matter how carefully you position them, because the wood itself has softened. Seamless gutter systems installed by a previous owner or contractor can also be harder to adjust without specialized tools, since factory-formed runs don't always accommodate standard bracket repositioning the way sectional gutters do. Homes in regions with heavy snow load need a steeper effective pitch than the baseline standard to prevent ice dams from forming at the low point, since trapped meltwater refreezing at night can crack seams and pull hangers loose again within a single winter.
If the fascia itself needs replacing alongside the slope correction, that's a project that pairs gutter work with broader exterior repair, and a exterior home repair team can address both in the same visit rather than treating them as separate jobs.
Maintenance and Long-Term Care
Gutter systems settle naturally, typically half an inch to an inch in the first year after installation and more slowly after that. Build a seasonal habit around it.
- Inspect gutters each spring after the last freeze and again each fall before leaves accumulate
- Recheck slope with a level any time you notice pooling return, even briefly
- Watch for stress marks or slight separation at hanger points, which often precede visible sagging
- Clean debris regularly, since clogged sections mask slope problems by holding water regardless of pitch
- Address fastener corrosion early rather than waiting for a hanger to fail completely
Things to Consider Before You Start
Can you safely reach every section of the run? If any part requires a ladder height beyond your comfort or your ladder's rated reach, that's a hard stop.
Is this a one-person job or does it need a second set of hands? Longer runs and taller homes shift this from solo-manageable to a two-person requirement.
Have you ruled out fascia damage? Adjusting brackets on a compromised fascia board just delays a bigger repair.
Do you have the right fasteners on hand? Mismatched hardware creates uneven load distribution that undoes your slope correction within months.
Weigh those honestly. If you land on the confident side of every question, this is a workable weekend project. If any answer gives you pause, that's the line between DIY and professional help.
Why Homeowners Bring in Ace Handyman Services
Gutter slope work sits at the intersection of height, water damage risk, and structural judgment calls that aren't always obvious from the ground. Homeowners bring in Ace Handyman Services for reasons that go beyond simply not wanting to climb a ladder.
- Peace of mind when fascia damage or structural concerns turn a simple adjustment into a bigger question
- A one-year labor warranty backing the repair, not just a handshake
- No ladder, laser level, or bracket wrench to buy, learn to use, or return afterward
- Background-checked, multi-skilled W-2 craftsmen, not a rotating cast of subcontractors
- A predictable weekday appointment window instead of losing a weekend to a project that runs long
- Honest scoping that tells you when a spot fix is enough and when full correction is worth the investment
- Cleanup included, so ladder marks, old fasteners, and debris don't become your Sunday afternoon
If a diagnostic walk-through, a full slope correction, or anything in between sounds like the right next move, reach out to your local Ace Handyman Services office and get a craftsman scheduled who has seen this exact problem before.
Frequently Asked Questions
How do you know if your gutters need reslopeing or just cleaning?
Clear the debris first and run water through the section. If it still pools or flows backward after cleaning, the problem is pitch, not blockage. Standing water in a clean, empty gutter is the clearest sign that slope, not debris, is the actual cause.
Can you fix gutter slope without removing the entire gutter system?
Yes, in most cases. Bracket repositioning works with the gutter still hung, since you're loosening and adjusting the hanger height rather than detaching the trough itself. Full removal is only necessary when the fascia beneath needs repair or the gutter material is too damaged to reuse.
What causes gutter slope problems right after a new installation?
Recent slope failure after installation usually points to hangers spaced too far apart, fasteners that weren't fully tensioned, or brackets set to an inconsistent pitch line during the original install. This is different from settling, which develops gradually over years rather than showing up within weeks.
How often should gutter slope be checked?
Twice a year works for most homes: once in spring after the last hard freeze and once in fall before leaves start falling. Homes in regions with heavy snow or frequent freeze-thaw cycles benefit from an additional check after the first major winter storm.
Does gutter material affect how easy it is to adjust slope?
Yes. Aluminum is relatively forgiving and takes adjustment well, though it dents easily under direct ladder pressure. Steel holds its shape better but resists reshaping if a section is bent. Vinyl and older galvanized systems tend to be more brittle with age, and both require more caution during adjustment.
What tools do you actually need for a basic gutter slope fix?
At minimum, a properly rated extension ladder with a stabilizer, a 4-foot level or laser level, a tape measure, a bracket wrench or drill, replacement fasteners matched to your hanger type, and a garden hose for testing. A wood block for protecting soft metal during adjustment rounds out the basic kit.