


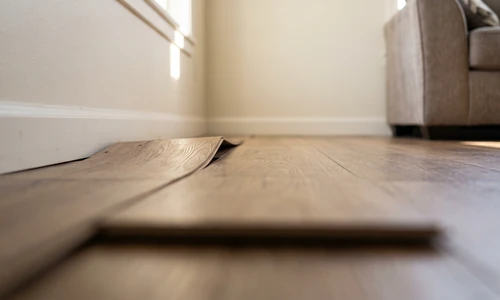
A scratched laminate floor is annoying. A lifting, buckling laminate floor is a different problem entirely, one that usually points to something happening underneath the surface you cannot see. Knowing which situation you are in changes everything about how you approach the fix, and getting that diagnosis wrong is how a simple repair turns into a bigger job.
Can laminate flooring be repaired? Yes, in most cases. Minor damage like scratches, small gouges, and isolated lifted boards responds well to DIY repair methods using kits, fillers, or board replacement. Extensive water damage, widespread cupping, or subfloor failure usually means repair is temporary at best and full replacement is the more durable answer.
This guide walks through how to identify what is actually wrong with your laminate floor, what tools and techniques address each type of damage, and where the line sits between a weekend fix and a job that calls for professional eyes.
Quick Overview: What Laminate Floor Repair Actually Involves
Laminate repair breaks into a handful of distinct workflows depending on what is actually wrong. Here is the general shape of the process:
- Identify the problem type: surface scratch, lifted board, seam separation, edging damage, or water intrusion
- Determine the root cause, since moisture and acclimation issues often masquerade as simple mechanical failures
- Assess severity to decide between cosmetic repair, board-level replacement, or full section replacement
- Gather the right tools for the specific damage type rather than a generic all-purpose kit
- Execute the repair, starting with debris removal and ending with a moisture and fit check
- Address the underlying cause so the same damage does not reappear in six months
- Put a maintenance routine in place to protect the repair and the rest of the floor
Common Laminate Floor Problems and What Causes Them
Laminate is a floating floor system, meaning the boards are not fixed to the subfloor. They lock together and expand or contract as a single connected surface in response to temperature and humidity. That mechanical reality explains almost every problem you will encounter.
Moisture Sensitivity and Expansion
Laminate's core layer is engineered wood fiber, and wood fiber absorbs humidity like a sponge absorbs water. When moisture gets into the core, either from ambient humidity, a spill left too long, or moisture wicking up from the subfloor, the boards swell. Swelling shows up as lifting, cupping (edges higher than the center of the board), or seams pushing apart.
Improper Acclimation and Installation
Laminate needs to sit in the room where it will be installed for a period before installation so it adjusts to that room's temperature and humidity. Skip that step, or install without leaving the manufacturer-recommended expansion gap at the walls, and the floor has nowhere to go when it expands. That pressure translates into buckling, popping sounds underfoot, and boards forcing themselves apart at the seams.
Subfloor Issues and Installation Errors
An uneven subfloor, debris trapped under the flooring during installation, or a subfloor with its own moisture problem will all telegraph up through the laminate over time. Localized lifting in one specific spot, rather than a general pattern across the room, often points to a subfloor issue rather than a humidity issue.
Assessing Your Damage: When to DIY vs. When to Call for Help
How do you know if your laminate floor damage requires professional assessment? Cosmetic damage such as scratches, small gouges, and minor discoloration is safe DIY territory. Moderate damage like a few lifted boards or localized seam separation is DIY-repairable with the right tools. Widespread cupping, staining, soft spots, or a musty odor signal water damage that likely warrants professional evaluation before you touch anything.
Walk your floor and check these signs before deciding on a repair path:
- Is the damage isolated to one board or spread across a room? Isolated damage is usually mechanical (impact, a dropped object). Spread-out damage usually points to a moisture or acclimation issue.
- Does the floor feel soft or spongy underfoot? That indicates subfloor damage beneath the laminate, not just a surface problem.
- Is there a musty smell near the damaged area? This suggests moisture has been present long enough to support mold growth beneath the surface.
- Are boards higher at the edges than in the middle (cupping)? Cupping is a moisture signature and rarely resolves with a cosmetic repair alone.
Identify your specific damage type using the sections below before deciding on a repair method.
How to Fix Laminate Floor Scratches and Surface Damage
How do you fix laminate floor scratches? Light surface scratches respond well to a wax pencil or repair marker matched to your floor's color, filled and buffed smooth in minutes. Medium scratches and small gouges need a laminate repair kit with a hardening filler compound. Deep gouges that expose the core layer typically require replacing the individual board.
Light Surface Scratches
For hairline scratches, clean the area, then apply a wax pencil or laminate repair marker matched as closely as possible to your floor's color and grain pattern. Color matching is the single biggest factor in whether this repair is visible or invisible, so bring the marker to the actual floor in daylight before committing to a shade.
Medium Scratches and Gouges
A laminate repair kit typically includes a color-matched filler compound that hardens after application. Clean the damaged area thoroughly, apply the filler according to the kit instructions, let it cure fully, then sand and buff level with the surrounding surface. These kits work reliably for cosmetic damage but do nothing for structural issues underneath.
Deep Damage Requiring Board Replacement
If a gouge has broken through the wear layer into the core, filler will not hold up to foot traffic long-term. At that point, replacing the individual plank is the more durable fix, and the process is covered in the seam and edging section below.
Fixing Lifted Laminate Flooring: Step-by-Step Process
How do you fix laminate flooring that is lifting? First identify whether the lifting is localized or spread across the room, then check the subfloor for moisture or debris, clean the affected area, reattach or replace the board using adhesive or fresh locking mechanisms, and verify moisture levels before closing the repair back up.
Step 1: Determine the Pattern
Lifting confined to one board near a spill or a door threshold often traces back to a specific moisture event. Lifting distributed across a room, especially along an entire wall, more often points to a missing expansion gap or a humidity swing affecting the whole floor at once.
Step 2: Access and Inspect the Subfloor
Carefully lift the affected board using a pry bar, working from an edge or a nearby seam. Check the subfloor underneath for moisture, staining, or debris. A moisture meter reading here tells you whether you are dealing with an active leak or residual dampness from a one-time event.
Step 3: Clean and Address the Cause
Remove any debris or residue from the subfloor. If moisture is present, let the area dry completely, potentially with a fan or dehumidifier running, before reinstalling anything. Reinstalling over a damp subfloor guarantees the same problem returns.
Step 4: Reattach or Replace
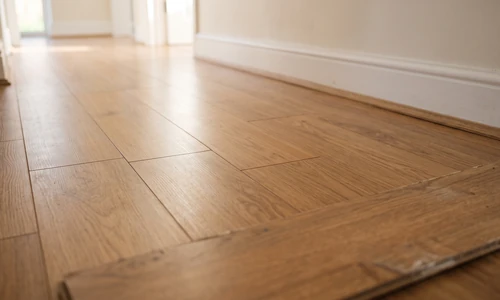
If the board itself is undamaged, reseat it into its locking mechanism using a tapping block to gently persuade it back into place without cracking the edge. If the board has swollen or warped, replace it rather than forcing a damaged plank back into a tight seam.
Step 5: Verify and Monitor
After the repair, check that the expansion gap at the nearest wall is intact and unobstructed by baseboards, trim, or furniture. Monitor the area over the following weeks for signs that lifting is recurring, which would point to an unresolved moisture source.
Once repairs are complete, review the prevention section below to keep the fix from needing a repeat visit.
Repairing Laminate Floor Seams and Edging Damage
Seam separation is not usually its own defect; it is a symptom of the same expansion and moisture dynamics that cause lifting. Two boards that were snugly locked together at installation pull apart when one or both have swelled, shrunk unevenly, or lost their grip in the locking profile.
Seam Separation
For minor seam gaps, a laminate seam filler or color-matched caulk formulated for flooring can close small gaps and prevent debris and moisture from working into the joint. For wider separations, the boards need to be pulled and relocked, which usually means removing and reinstalling from the nearest wall to that section, since laminate locks in sequence.
Edging Damage
Edge damage near thresholds, stair nosings, or transition strips is often caused by impact or repeated moisture exposure at a vulnerable point. Reseating the edge with a compatible adhesive can address minor chipping, but damage that compromises the locking profile itself generally requires replacing the plank so the floor stays structurally connected.
Choosing and Using Laminate Repair Kits and Tools
Do laminate floor repair kits work? Yes, for cosmetic damage. Repair kits with wax pencils, markers, and filler compounds handle scratches, small gouges, and minor color touch-ups reliably. They have limited or no effect on structural issues like lifting, cupping, or subfloor damage, where success depends far more on fixing the underlying moisture or installation problem than on any product.
Matching Tools to the Job
Cosmetic repairs call for a wax pencil, a repair marker, or a filler kit, all aimed at color and surface texture matching. Board-level repairs call for a pry bar to lift damaged planks, a tapping block to reseat replacement boards without cracking the edge profile, and clamps to hold sections in place while adhesive sets.
Other Materials You Will Need
- Replacement planks matched to your existing floor's color, texture, and lock profile
- Laminate-compatible adhesive for edge and seam repairs
- A pull bar for removing the final board along a wall
- Painter's tape to protect adjacent flooring during filler application
- A shop vacuum for thorough debris removal before any repair step
Sourcing the right replacement plank that matches an older laminate floor's discontinued pattern can be the hardest part of the whole project. If tracking down a match or handling the demolition and reinstall sounds like more trouble than it is worth, a laminate floor installation and repair specialist can take that off your plate.
Preventing Future Laminate Damage: Moisture and Maintenance
Because laminate's core problem is moisture sensitivity, prevention centers almost entirely on humidity and water control.
Acclimation and Humidity Control
New laminate should acclimate in the installation room for the manufacturer's recommended period, typically 48 to 72 hours, before it goes down. Once installed, keeping indoor humidity in the 30 to 50 percent range with a humidifier or dehumidifier as seasons shift reduces the expansion and contraction cycles that lead to lifting and gapping.
Spill and Water Management
Wipe up spills promptly rather than letting standing water sit on a seam, and use moisture-resistant floor mats at entryways and near sinks. In rooms with higher moisture exposure, confirm the laminate installed there is rated for that use before assuming standard product will hold up.
Treat these habits as ongoing floor stewardship rather than a one-time fix. A little humidity discipline does more to prevent repeat repairs than any product on the shelf.
When Laminate Repair Isn't the Right Solution
Some damage is past the point where repair, even careful and well-executed repair, is a durable answer.
Signs Water Damage Has Compromised Your Floor
Watch for cupping across multiple boards, dark staining that spreads rather than staying contained, soft or spongy spots underfoot, and any musty or mildew odor. These signs often mean water damage extends into the subfloor, beyond what is visible on the surface, and patching individual boards will not resolve the underlying problem.
Widespread cupping, structural subfloor failure, or contamination from extended water exposure usually means full section replacement is more cost-effective and durable than repeated repair attempts. Trying to patch around a systemic moisture problem tends to produce a cycle of repairs rather than a lasting fix.
Special Considerations for Older or Discontinued Laminate Floors
Laminate installed more than a few years ago may use a discontinued color or pattern, making an exact match for replacement boards difficult or impossible. In these cases, sourcing planks from a less visible area of the home (a closet, under an appliance) to patch a visible spot, while installing new material in the hidden area, is a workable compromise. A flooring repair professional can also help track down close matches through supplier networks not always accessible to individual homeowners.
Maintenance and Long-Term Care
How do you maintain a laminate floor after repair? Keep humidity between 30 and 50 percent, wipe up spills immediately, use furniture pads to prevent impact damage, and avoid wet mopping in favor of a damp microfiber approach. These habits protect both the repaired section and the rest of the floor from repeat damage.
- Sweep or vacuum regularly to prevent grit from scratching the surface underfoot
- Use a damp, not wet, mop and dry the surface afterward
- Place mats at exterior doors to reduce moisture and debris tracked indoors
- Check expansion gaps at walls periodically to confirm they remain unobstructed
- Address any new spill or leak immediately rather than letting moisture sit
Things to Consider Before You Start
- Can you accurately identify the cause of the damage? A repair that does not address the root cause is a temporary fix at best.
- Do you have access to a matching replacement plank? A mismatched board is often more noticeable than the damage it replaces.
- Is the damage isolated, or does it suggest a broader moisture problem? Widespread symptoms deserve a broader inspection before you commit to a single-board repair.
- Are you comfortable working with a pry bar and tapping block without damaging surrounding boards? Floating floors interlock, and disturbing one board affects its neighbors.
If your answers point toward uncertainty rather than confidence, that is the line between a confident DIY repair and a job better handed to a professional.
Why Homeowners Bring in Ace Handyman Services
Laminate repair looks simple until the wrong board comes up, the replacement plank does not match, or the "isolated" damage turns out to trace back to a moisture source you cannot see. That is where a professional set of hands changes the outcome.
- Peace of mind on a floor that is expensive to replace entirely if a repair attempt goes wrong
- A one-year labor warranty backing the work, not just a one-time fix and a goodbye
- No need to source, learn to use, or return specialty tools like tapping blocks and moisture meters
- Background-checked, multi-skilled W-2 craftsmen, not a rotating cast of subcontractors
- A predictable weekday appointment window instead of losing a weekend to trial and error
- Honest scoping that recommends a cosmetic fix when that is genuinely all the floor needs
- Cleanup included, so you are not left sweeping sawdust and packaging out of the room
If your laminate floor damage has you second-guessing whether this is a repair or a replacement, reach out to your local Ace Handyman Services office to get a craftsman's eyes on it before you start pulling up boards.
Frequently Asked Questions
Can you fix laminate flooring without replacing the whole floor?
Yes. Most laminate damage, including scratches, isolated lifted boards, and localized seam separation, can be addressed by repairing or replacing individual planks rather than the entire floor. Full replacement only becomes necessary when damage is widespread or moisture has compromised the subfloor beneath multiple boards.
Why does my laminate floor keep lifting in the same spot?
Recurring lifting in one location usually means the root cause was never resolved. Common culprits include an ongoing moisture source, such as a nearby appliance leak, or a missing expansion gap that keeps putting pressure on that section every time humidity shifts.
How long does laminate floor repair take?
A cosmetic scratch repair takes under an hour, including cure time for the filler. Board replacement for lifting or seam damage typically takes a few hours per affected area, depending on how many connected boards need to come up to reach the damaged one.
Can water-damaged laminate flooring be saved?
Sometimes. If water exposure was brief and limited to one or two boards, drying the subfloor and replacing the affected planks can resolve it. Extended exposure that causes widespread cupping, staining, or a musty smell usually means the affected section needs full replacement rather than repair.
What is the difference between a laminate repair kit and buying replacement boards?
A repair kit fixes cosmetic surface damage like scratches and small gouges using color-matched filler. Replacement boards address structural damage, such as a warped, cracked, or water-damaged plank, by physically removing and swapping out the affected piece of flooring.
Does homeowners insurance cover laminate floor repair?
It depends on the cause. Sudden, accidental water damage, like a burst pipe, is often covered under standard homeowners policies, while gradual damage from humidity, poor maintenance, or slow leaks typically is not. Check your specific policy language before assuming coverage either way.