


A scratch across a laminate floor catches the eye every time the light hits it wrong, and once you notice it, it is hard to unsee. The good news is most laminate scratches respond well to the right repair approach, provided you match the method to the damage and the finish. This guide walks through assessing scratch severity, choosing between wax pencils, markers, and full repair kits, and applying a color-matched fix that holds up over time.
Can scratches on laminate flooring be repaired? Yes, in most cases. Laminate scratches can be repaired if they affect the surface finish or the wear layer only. Hairline and moderate scratches respond well to wax pencils, repair markers, or laminate repair kits. Scratches that reach the plank's core or cause structural gouging generally cannot be fully concealed and may call for plank replacement instead.
Some homeowners handle this repair in an afternoon with a repair pen and a steady hand. Others discover multiple planks with deeper damage, mismatched color, or scratches tied to a larger issue like water exposure at seams.
Quick Overview: What Laminate Scratch Repair Actually Involves
Most laminate scratch repairs follow a predictable arc from diagnosis to finished touch-up. Here is what the process looks like stage by stage:
- Assessment: Examine the scratch under direct and angled light to determine whether it is surface-only, wear-layer, or core damage.
- Finish check: Identify whether the plank has a gloss, matte, textured, or hand-scraped finish, since this changes which repair product will blend best.
- Cleaning: Vacuum the area and wipe it with a wax and grease remover to strip residue that would block adhesion.
- Method selection: Choose a wax pencil for hairline scratches, a repair marker for broader light scratches, or a full repair kit for moderate damage across multiple planks.
- Color matching: Test the product on an inconspicuous scratch or an offcut plank before applying it to a visible area.
- Application and buffing: Apply the repair material, work it into the scratch, and buff the surface smooth with a microfiber cloth.
- Cure and evaluation: Allow the manufacturer's recommended cure time, then inspect the repair in both natural and artificial light.
- Ongoing care: Add furniture pads and adjust cleaning habits to protect the repair and prevent new scratches.
Assessing Laminate Scratch Severity Before You Begin
Not every scratch belongs in the same repair category, and treating a deep gouge like a hairline mark wastes product and leaves a visible failure. Run your fingernail lightly across the scratch and look at it from a low angle under a lamp. If you feel a clean surface with no catch, you are likely dealing with a minor scratch.
Minor Scratches: Surface-Only Damage
Minor scratches are visible mainly at certain light angles and are confined to the top finish layer. They do not extend into the printed wear layer beneath. These are the highest-probability repairs and typically respond well to a wax pencil or a light pass with a repair marker.
Moderate Scratches: Wear-Layer Damage
Moderate scratches expose the printed wear layer but do not reach the plank's core. Repair success varies by finish: matte finishes tend to hide the repair well, while high-gloss finishes reveal color mismatch more readily. Expect a repaired-but-slightly-visible result rather than a perfect disappearance.
Deep Scratches and Gouges: When Repair Is Not Recommended
Deep damage reaches or passes through the plank's core, often from furniture drags, dropped tools, or water infiltration at a seam. Repair products cannot fill or conceal structural damage of this kind. If you see the core material, splintering, or swelling around the scratch, plank-level replacement is the more realistic path forward.
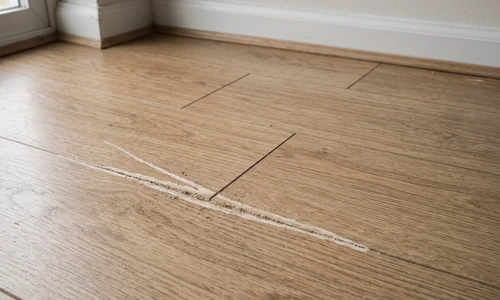
Laminate Finish Types and Repair Method Compatibility
Laminate flooring comes in several finish types, and the finish affects how forgiving a repair will look once it cures. Gloss finishes reflect light directly, which makes color mismatch and any texture difference in the repair stand out immediately. Matte finishes diffuse light and tend to camouflage minor imperfections far better. Textured or hand-scraped finishes hide the concealment itself well but make matching the surface texture with a smooth repair product harder.
Before applying any product, identify your plank's finish type and test the repair material on a spare plank or an inconspicuous area first. A repair that looks flawless on a matte sample can look chalky or streaked on a glossy floor, and the reverse is also true.
Essential Equipment and Materials for Laminate Scratch Repair
Choosing Between Wax Pencils, Markers, and Repair Kits
Three repair methods handle the bulk of laminate scratch damage, and each fits a different scenario. Wax pencils suit hairline scratches and budget-conscious repairs, work by filling the groove with a solid pigmented wax, and require only gentle pressure and a buffing pass. Repair markers deliver a liquid pigment through a fine tip, making them well suited to broader, light scratches where precise line control matters more than bulk fill.
Consumables and Selection Criteria
Color range matters more than brand name when selecting a product. Look for kits or pencils offered in a range close to your plank's undertone, not just its dominant shade, since laminate color often shifts subtly across a room depending on light exposure. Check whether the finish option is gloss or matte, since applying a glossy wax pencil to a matte floor will create a visible sheen mismatch even with a perfect color match.
Other Materials You Will Need
- Wax and grease remover or isopropyl alcohol for surface prep
- Microfiber cloths, at least two, for cleaning and buffing
- A soft-bristle vacuum attachment
- A putty knife or plastic scraper for excess wax removal
- Painter's tape to protect surrounding planks during application
- A bright, adjustable work light for color matching
If the scratch assessment turns up more damage than expected, or the color match proves difficult across several planks, a laminate floor installation and repair professional can confirm whether a full plank swap makes more sense than an extended DIY repair.
Step-by-Step Laminate Scratch Repair Process
Step 1: Clean the Damaged Area Thoroughly
Surface cleaning determines adhesion. Vacuum the scratch and surrounding area to remove grit, then wipe with a wax and grease remover to strip any polish, oil, or cleaning residue that would prevent the repair material from bonding. Let the area dry completely before moving forward.
Step 2: Confirm Scratch Severity and Finish Type
Revisit your assessment under the work light. Confirm the scratch falls into the minor or moderate category and note the finish type, since both decisions determine which repair product you reach for next.
Step 3: Select and Test Your Repair Method
Choose a wax pencil, marker, or kit based on the scratch width and finish. Test the color on a hidden area, such as inside a closet or under an appliance, before applying it anywhere visible.
Step 4: Apply the Repair Material
Work with the grain of the scratch, not against it. Apply wax pencils with light, even pressure along the length of the scratch, filling the groove without overloading the surrounding surface. Markers should be applied in thin, controlled passes, building up pigment gradually rather than in one heavy stroke.
Step 5: Buff the Repair Smooth
Once the material has been applied, buff the area with a clean microfiber cloth in small circular motions. This blends the repair edge into the surrounding finish and removes any excess wax sitting proud of the surface.
Step 6: Allow Cure Time and Evaluate the Result
Give the repair the cure time listed on the product packaging, typically a few hours for wax and up to 24 hours for some marker formulas. Inspect the area in both natural daylight and artificial light, since a repair that blends under one light source can stand out under the other.
Choosing and Applying Color-Matched Repair Products
Color matching is the single factor with the greatest impact on whether a repair reads as invisible or obvious. Pull a sample plank from any leftover flooring stored after installation, or check the manufacturer's color code, often printed on the plank's back edge or original packaging. Bring a scrap plank or photo to a flooring retailer for an in-person match under flooring-specific lighting rather than relying on a screen photo.
Light angle, surrounding plank variation, and finish sheen all affect perceived match quality even with the correct pigment. Always test on an inconspicuous scratch first. Once cured, a wax pencil repair typically holds for six to twelve months before it needs a light touch-up from foot traffic and cleaning, while a properly applied kit repair with a finish coat can last two to three years under normal use.
Touch-Up Pen vs Full Repair Kit
Not every scratch justifies the cost and time of a full repair kit. A touch-up pen or wax pencil alone is often the right call for isolated, minor damage, while a kit earns its keep when damage is spread across multiple planks or finish matching is proving difficult with a single product.
- Touch-up pen is the right call when: you have one or two hairline scratches, the floor has a matte or satin finish that forgives minor mismatch, and you want a five-minute fix without buying additional tools.
- Full kit is the right call when: scratches appear on several planks with varying color, the finish is high-gloss and demands precise blending, or you want backup color options and applicator tools on hand for future repairs.
Special Considerations for Challenging Laminate Floors
Discontinued laminate lines present a real matching challenge, since manufacturers frequently retire color runs and current stock may not match a floor installed years earlier. In these cases, testing multiple wax shades and blending two colors together often gets closer than relying on a single stock pencil.
Scratches near seams deserve extra scrutiny, since seam separation combined with scratching can signal water intrusion beneath the flooring rather than simple surface wear. Do not apply a cosmetic repair over a seam issue without confirming the subfloor is dry and stable first. High-traffic hallways and entryways also wear differently than low-traffic rooms, so a repair that looks good today may need a touch-up sooner in these zones.
When a floor has value tied to a home sale or holds sentimental weight, an uncertain color match is not worth the risk of making the damage more noticeable. A floor repair specialist can evaluate whether the existing product line is still available and whether a professional-grade color-matching process will outperform a retail repair kit.
Maintenance and Long-Term Care
How long does a laminate scratch repair last, and how should it be maintained? Wax pencil repairs typically last six to twelve months before fading or wearing away, while kit repairs with a proper finish coat can last two to three years. Gentle cleaning, soft-bristle brooms, and pH-neutral cleaners help preserve the repair and the surrounding finish.
- Sweep or vacuum with a soft-bristle attachment regularly to remove the grit that causes new scratches.
- Use pH-neutral, laminate-safe cleaners and avoid excess standing water, which can dull repairs and warp seams.
- Add felt or rubber furniture pads to every chair leg, table foot, and appliance base.
- Place area rugs or runners in high-traffic zones and entryways.
- Plan for periodic touch-ups in busy rooms rather than expecting a single repair to last indefinitely.
Things to Consider Before You Start
A repair kit is inexpensive, but a mismatched or poorly blended attempt can make a small scratch more noticeable than it was before. Ask yourself a few honest questions first.
- Is the scratch actually repairable, or does it reach the core? Confirm this before purchasing any product.
- Do you have a steady hand and patience for color testing? Rushing the color-match step is the most common cause of a failed repair.
- Is the damage isolated, or spread across multiple planks? Widespread damage may point toward replacement instead of repeated spot repairs.
- Is this floor tied to a home sale or a discontinued product line? A miscalculated repair on either can cost more to fix than it would have to hire out from the start.
If your answers point toward confidence and low risk, proceed with the DIY repair. If they point toward uncertainty on color, scope, or underlying damage, that is the line where bringing in a professional protects the floor rather than gambling on it.
Why Homeowners Bring in Ace Handyman Services
Laminate scratch repair looks simple until the color match fails or the damage turns out to run deeper than expected. Ace Handyman Services supports homeowners at any point in that process.
- Peace of mind on a floor that cannot be undone once the wrong product is applied to a visible area.
- A one-year labor warranty backing any repair or installation work performed.
- No need to source, test, or return repair kits, wax pencils, or markers that turn out to be the wrong shade.
- Background-checked, multi-skilled W-2 craftsmen, not gig contractors pulled from an app.
- A predictable weekday appointment window instead of losing a weekend to trial and error.
- Honest scope assessment, including when a simple touch-up pen is genuinely enough and a full service call is not needed.
- Cleanup included, so there is no leftover wax residue, packaging, or dust left behind.
If a scratch assessment turns up plank-level damage, a seam issue, or a color match that will not cooperate, reach out to your local Ace Handyman Services office to get a second opinion before the repair becomes a bigger project.
Frequently Asked Questions
Can all laminate floor scratches be repaired?
No. Minor and moderate scratches that stay within the finish or wear layer respond well to wax pencils, markers, or repair kits. Deep scratches that reach the plank's core or involve structural gouging cannot be fully concealed and typically require plank replacement instead.
What is the best product for fixing laminate floor scratches?
It depends on the damage and the finish. Wax pencils suit hairline scratches and budget repairs, markers work well on broader light scratches needing precision, and full repair kits handle moderate damage spread across multiple planks with varying color needs.
How do I color-match a laminate repair to my existing floor?
Pull a leftover sample plank if you have one, or check the manufacturer's color code on the plank's back edge. Test the repair product on an inconspicuous scratch first, and evaluate the match under both natural and artificial light before committing to a visible area.
Can I fix laminate floor scratches without buying a commercial repair kit?
Yes, with limitations. Some homeowners use oil-based products like walnut oil on darker laminate to reduce a scratch's visibility, though results are less durable and less color-precise than a purpose-made wax or marker product. These alternatives work best on minor, hard-to-see scratches rather than anything moderate or deep.
Is a laminate scratch repair permanent?
No. Repairs are cosmetic rather than structural. Wax pencil repairs typically last six to twelve months, while kit repairs with a finish coat can last two to three years before a touch-up is needed, depending on foot traffic and cleaning habits.
When should I consider replacing a laminate plank instead of repairing a scratch?
Replacement makes more sense when a scratch reaches the plank's core, when multiple deep gouges affect one area, or when scratching appears alongside seam separation or water damage. In those cases, a repair product cannot restore structural integrity and a plank-level swap is the more reliable fix.