


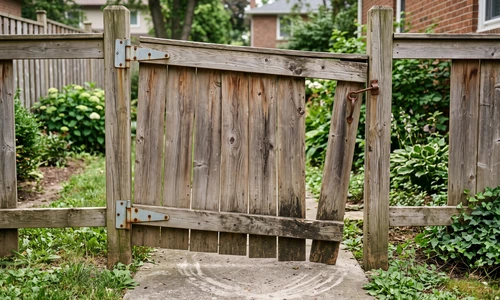
A gate that drags across the pavers or hangs crooked in its frame is one of the most common fence problems homeowners face, and it rarely fixes itself. Left alone, a sagging fence gate wears its hinges harder, scrapes paint or coating off the bottom rail, and eventually strains the post it hangs from.
How do I adjust a gate that has dropped? Start with the hinges: tighten loose screws and check for bent hinge plates, since a few turns of a screwdriver often lift a dropped gate back into alignment. If the gate still droops after tightening, install a turnbuckle and cable system, adjusting tension gradually until the gate hangs square again.
Some homeowners handle this repair start to finish with a drill, a level, and an afternoon. Others get partway through diagnosing the sag, realize the post itself is moving, and decide the smarter move is to bring in help. Ace Handyman Services works with homeowners at either point, whether that means installing the hardware for you or assessing whether the post needs to come out entirely.
Quick Overview: What Fixing a Sagging Gate Involves
Before pulling out tools, it helps to see the whole arc of the project. Most sagging fence gate repairs follow this general sequence:
- Diagnose the failure mode: hinge wear, post settling, weight imbalance, or material degradation
- Try quick fixes first: tighten hinge hardware, adjust or add a turnbuckle
- If quick fixes don't hold, install a full anti-sag kit with corner brackets, steel cable, and a turnbuckle
- Select hardware based on gate material: wood, chain link, or metal/aluminum
- Check post stability before finishing, since a loose post undoes any hardware fix
- Set a maintenance schedule so the sag doesn't return within a season
- Escalate to professional assessment if the post itself is settling or leaning
What Causes Fence Gates to Sag: A Diagnostic Framework
What causes a gate to sag? Gate sag typically traces to one of four failure modes: worn or loosened hinges, a settling or shifting gate post, uneven weight distribution across the gate frame, or material degradation from sun and moisture exposure. Identifying which one applies determines whether you need a screwdriver, a cable kit, or a post reset.
Guessing at the fix before diagnosing the cause wastes time and hardware. A gate that sags because of a worn hinge responds well to tightening or hinge replacement. A gate that sags because the post is leaning will keep sagging no matter how many anti-sag kits you install, because the whole frame is moving, not just the gate.
How Hinge Failure Manifests in Sagging Gates
Hinge-related sag usually shows up as a gate that droops only on the latch side, with the hinge side staying relatively level. Look for visible rust on the hinge plates, bent or warped metal, grinding resistance when you swing the gate, or a gap that widens unevenly as the gate opens. If the post stays plumb and only the gate itself tilts, hinges are the likely culprit.
When Gate Posts Fail: Recognizing Structural Settling
Post settling looks and behaves differently. Instead of the gate drooping on one side, the entire frame shifts, and the sag tends to be uniform across the gate's height rather than concentrated at the latch corner. A visible tilt or lean in the post itself, along with a widening gap between the post and the ground or surrounding fence line, points to a foundation issue rather than a hardware one. This distinction matters because no amount of cable tensioning corrects a post that's moving.
Essential Equipment and Materials for Fence Gate Repair
Anti-Sag Kit vs. Individual Hardware
For minor sag, individual pieces (a turnbuckle, a spare hinge, some lag screws) may be all you need. For chronic sag or heavier gates, a packaged anti-sag kit combines corner brackets, steel cable, cable clamps, and a turnbuckle engineered to work together, typically rated for gates up to about 6 feet wide and 4 feet tall. Buying the kit as a set avoids mismatched hardware and ensures the cable gauge matches the bracket load rating.
Selecting Anti-Sag Kits by Gate Type and Material
Wood fence gates generally do best with bracket-and-cable systems bolted through the rails, since wood holds screws and lag bolts securely. Chain link gates often need attention to the tension wire and frame corners in addition to cable bracing, since the mesh itself can deform under weight. Metal or aluminum gates call for rust-resistant or galvanized hardware, since mixing dissimilar metals accelerates corrosion at the contact points.
Other Materials You Will Need
- Cordless drill with driver bits
- Adjustable wrench or socket set
- 4-foot carpenter's level
- Replacement hinge screws or lag bolts (stainless or galvanized)
- Corner brackets (2), steel cable, cable clamps, and a turnbuckle if installing a full kit
- Tape measure and pencil
- Rust-inhibiting lubricant for hinge pins
If sourcing and sizing the right hardware for your specific gate feels like more guesswork than you want to take on, a fence installation and repair specialist can match the kit to your gate on the first visit instead of the second.
Step-by-Step Fence Gate Repair Process
Step 1: Confirm the Diagnosis
Match symptoms to cause before touching hardware. Swing the gate open and closed slowly, watching whether the sag is concentrated at the latch corner (hinge issue) or uniform across the whole frame (post issue). Press against the post near ground level to check for give, and run a level along the post face to check for lean.
Step 2: Tighten Gate Hinges and Hardware
Start with the cheapest, fastest fix. Remove each hinge screw one at a time, inspect the hole for stripping, and reinstall with a slightly longer or thicker screw if the original threads are worn out. Check hinge plates for bends while you're at it. Snug each screw fully without overtightening, since stripped threads or cracked wood at the screw hole make the fix worse, not better.
Step 3: Use a Turnbuckle to Lift a Sagging Gate
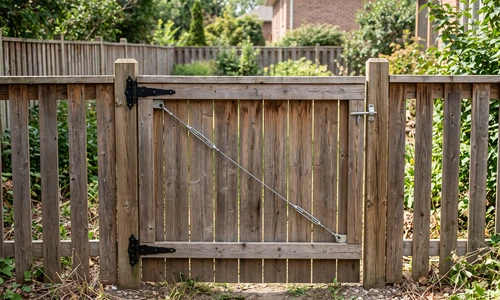
How to brace a gate to keep it from sagging? The most common bracing method runs a diagonal steel cable from the top hinge corner to the bottom latch corner, tensioned by a turnbuckle. Turning the turnbuckle clockwise shortens the cable and lifts the latch corner. Adjust gradually, checking the gate with a level after each quarter turn, and stop once the gate hangs square rather than over-tensioning the frame.
Step 4: How to Tighten Up a Fence Gate With a Full Anti-Sag Kit
Install the complete bracket-and-cable system for chronic or heavy-gate sag. Measure and mark bracket placement at the top hinge corner and bottom latch corner, then attach the corner brackets with lag screws or through-bolts. Route the steel cable diagonally between brackets, securing it with cable clamps spaced roughly every 12 inches. Connect the turnbuckle at the cable's midpoint and tighten in small increments, verifying square with a level between adjustments. Stop tightening once the gate swings freely without binding.
Step 5: Check Post Stability Before You Finish
Confirm the post isn't undoing your work. Press on the post above ground level and watch for movement at the base, and check for a light gap forming where the post meets the ground. If the post shifts or leans under hand pressure, no cable system will hold the fix permanently.
Choosing and Applying Anti-Sag Hardware
Once the anti-sag kit is installed, give the gate a break-in period of about a week before final tensioning. Wood swells and settles slightly after new hardware is torqued down, and cable systems stretch marginally under initial load. Recheck the turnbuckle tension after that week and make one final adjustment if needed. From there, a light coat of rust-inhibiting lubricant on the hinge pins and cable ends every six months keeps corrosion from undoing the repair.
Quick Fixes vs. Full Anti-Sag Kit Installation
Not every sagging gate needs a full cable system. Knowing which category your gate falls into saves both time and money.
Quick fixes (hinge tightening, single turnbuckle adjustment) make sense when:
- The sag is minor, a half-inch drop or less at the latch corner
- The gate is lightweight, under roughly 100 pounds
- The sag is recent and hasn't returned after a previous adjustment
- Hinges show wear but the post itself is plumb and stable
A full anti-sag kit is the right call when:
- The gate is heavier than 200 pounds or wider than 4 feet
- Sag returns within weeks of tightening hinges
- The gate sees high-traffic daily use
- You want a permanent, engineered solution rather than a repeated adjustment chore
Special Considerations for Challenging Gates
Chain link gates introduce a variable wood and metal gates don't: tension wire degradation. If the mesh itself has stretched or deformed, an anti-sag kit on the frame won't correct sag caused by loose tension wire, and that wire needs re-tensioning or replacement separately. Vintage wood gates with original hardware are worth inspecting closely before drilling new bracket holes, since old-growth lumber can split under new lag bolts in ways modern dimensional lumber won't.
If your gate falls into any of these categories, a walk-through with a fence services specialist before you buy hardware can save a wasted trip to return the wrong kit.
Permanent Gate Reinforcement: Steel Frame and Structural Solutions
When anti-sag kits aren't enough, welding or bolting a steel frame to the back of the gate provides a permanent structural fix. This approach suits gates wider than 4 feet, heavier than 250 pounds, or gates that keep sagging despite repeated cable adjustments. Steel frame reinforcement typically requires fabrication to match the gate's exact dimensions and is usually a professional installation rather than a weekend DIY task.
Preventing Gate Sag: Maintenance and Inspection Protocol
A gate that's been properly repaired still needs periodic attention. Set a seasonal rhythm rather than waiting for the next sag to show up.
Seasonal Gate Maintenance Checklist
- Spring: inspect hinges for winter rust, lubricate pins, verify all hardware is seated tightly
- Summer: check tension after months of heavy use, tighten any hardware that's worked loose
- Fall: assess weather exposure damage, touch up paint or coating on exposed steel before winter moisture sets in
- Anytime: press-test the post for movement whenever you notice new resistance in the swing
Common DIY Installation Mistakes and How to Avoid Them
- Overtightening hinge screws or turnbuckles, which strips threads or bends brackets
- Routing the cable off the true diagonal, which creates uneven tension across the frame
- Skipping the level check mid-installation and only discovering misalignment at the end
- Installing brackets off-center, which shifts load distribution unevenly
- Mixing steel and aluminum hardware without matching finishes, which speeds up corrosion
- Treating post movement as a hardware problem and installing a kit that can't fix it
When to Call a Professional: Red Flags and Scope Boundaries
Can I fix a severely sagging gate myself, or do I need to hire a professional? A visible post tilt, a gap that widens between the post and the ground, sag that worsens even after adjustment, or a post that gives under hand pressure all point to structural settling rather than a hardware problem, and these conditions call for professional assessment of the post and footing before any gate hardware is touched.
Things to Consider Before You Start
- Do you know which failure mode is causing the sag? Guessing wastes hardware and time if the real problem is the post.
- Is the gate under 100 pounds or over 200? Weight class determines whether a quick fix or a full kit is the right scope.
- Have you checked the post for movement? No cable system corrects a post that's actively settling.
- Do you have the tools and the time for a multi-hour install? A full anti-sag kit installation typically takes two to three hours done carefully.
- Is this a gate you can afford to get wrong? A misaligned or overtightened repair can strain hinges further and shorten the gate's remaining life.
If you've worked through these and you're confident in the diagnosis and the install, the project is well within DIY range. If the post is moving or the gate is heavier and more valuable than the tools in your garage can comfortably handle, that's the signal to bring in help.
Why Homeowners Bring in Ace Handyman Services
- Peace of mind on a gate that protects pets, kids, or a pool area, where a miscalculated repair carries real consequences
- A one-year labor warranty backing the repair, not just the hardware
- No need to source, learn, or return specialty anti-sag hardware that didn't fit
- Background-checked, multi-skilled W-2 craftsmen, not a rotating cast of subcontractors
- A predictable weekday appointment window instead of losing a weekend to trial and error
- Honest scope assessment, including when a simple hinge tightening is genuinely all that's needed
- Cleanup included, down to the old hardware and packaging
Whether your gate needs a quick hinge adjustment or a full post reset, it's worth having a second set of eyes on the diagnosis before you commit to a fix. Reach out to your local Ace Handyman Services office to get the sag assessed and corrected right the first time.
Frequently Asked Questions
How do I know if my gate sag is from a failing hinge versus a weak post?
Hinge failure usually causes sag concentrated at the latch corner while the post stays plumb, whereas post problems create a uniform tilt across the whole gate along with visible movement at the post base. Testing both independently, hinge tightness and post stability, separates the two before you buy hardware.
How long does it take to install an anti-sag gate kit?
A standard anti-sag kit installation, including bracket mounting, cable routing, and tensioning, typically takes two to three hours for a single gate. Add extra time if hinge hardware also needs replacing or if the post requires reinforcement first.
Can a sagging gate be fixed without buying a full anti-sag kit?
Yes, if the sag is minor and traced to worn hinges rather than post movement. Tightening or replacing hinge screws, or adding a single turnbuckle-and-cable brace, often resolves early-stage sag without the cost or labor of a complete kit.
What size gates work with standard anti-sag kits?
Most standard anti-sag kits are engineered for gates up to about 6 feet wide and 4 feet tall. Gates larger or heavier than that spec typically need custom steel frame reinforcement rather than an off-the-shelf kit.
How much does gate hardware for a sag repair typically cost?
Individual hinges and turnbuckles run modestly, often well under fifty dollars combined, while a complete anti-sag kit with brackets, cable, and clamps generally costs somewhat more depending on gate size and hardware finish. Steel frame reinforcement for oversized gates costs considerably more due to fabrication.
Will fixing a sagging gate prevent it from sagging again?
A properly diagnosed and installed fix, paired with seasonal hinge lubrication and hardware checks, generally holds for years. Sag returns most often when the original cause, usually post movement or unresolved weight imbalance, wasn't fully addressed during the repair.