


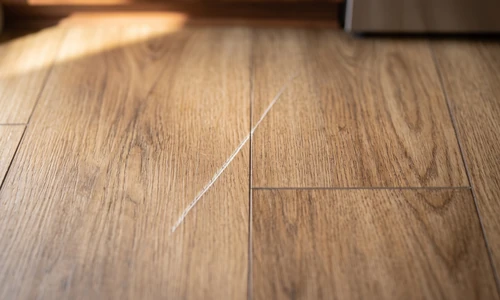
A fresh scratch across a vinyl plank floor can feel like a small disaster, especially if the floor is new or the scratch sits in a high-visibility spot like a kitchen walkway or living room sightline. The good news is that most vinyl floor scratches respond well to the right repair method, and the process rarely requires special skills or expensive tools. This guide walks through how to diagnose scratch severity, choose the correct repair path for your specific vinyl type, and execute the fix without damaging the surrounding finish or voiding your manufacturer warranty.
Is it possible to get scratches out of vinyl flooring? Yes, in most cases. Surface-level scratches and light-to-medium scratches typically respond to buffing, sanding, or filler products and can be made nearly invisible. Deep gouges that penetrate into the wear layer or expose the substrate are harder to fully remove and sometimes require plank replacement rather than surface repair.
If a scratch turns out deeper than expected, or the repair attempt exposes a bigger problem like a lifted seam or a spreading crack, Ace Handyman Services offers floor installation and repair support at any stage of the project, whether that means a second opinion on severity or a full plank swap.
Quick Overview: What Fixing a Vinyl Floor Scratch Actually Involves
Repairing a vinyl floor scratch is usually a short, contained project rather than a multi-day undertaking. Here is what the process looks like from start to finish:
- Inspect the scratch under raking light to judge depth and length
- Identify your flooring type (LVP, sheet vinyl, or hybrid) since repair methods differ
- Check your manufacturer warranty documentation before starting any repair method
- Clean the area with mild dish soap and water, then dry completely
- For micro-scratches, buff with a microfiber cloth or apply a warm soapy water treatment
- For light-to-medium scratches, sand with a grit progression and apply a wax stick or sealant
- For deep gouges, use a color-matched vinyl repair kit with resin filler, applied in thin layers
- Allow proper drying and cure time before walking on the repaired area or replacing furniture
- Apply preventive measures like felt pads and rugs to reduce future scratching
Assessing Your Vinyl Scratch Before You Begin
Diagnosing Scratch Severity: When Repair Is Possible
Not all scratches are created equal, and treating a deep gouge like a surface scuff wastes materials and time. Three categories cover almost every situation you will encounter. Micro-scratches sit entirely within the top wear layer and show no measurable depth; they often disappear with buffing alone. Light-to-medium scratches show visible depth, generally under 1/32 inch, and catch a fingernail when you run it across the surface. Deep gouges compromise the structure of the plank, showing visible wear into the underlying layer or, in severe cases, exposing the substrate itself.
Run your fingernail perpendicular across the scratch. If it catches and drags, you are dealing with at least a light-to-medium scratch. If you can see color variation, texture change, or a rough edge under angled light, treat it as deep. Certain conditions signal that repair will not fully resolve the damage: missing vinyl chunks, spider-webbing across a wide area, or any separation between the wear layer and the core material. These conditions point toward plank replacement rather than surface repair.
Understanding Your Flooring Type: Why Material Matters
Vinyl flooring is not one uniform product, and the repair method that works on one type can damage another. Luxury vinyl plank (LVP) is built in layers, with a printed design layer topped by a clear wear layer that provides scratch and moisture resistance. Sheet vinyl is a single continuous material, monolithic rather than layered, which makes sanding riskier since there is no distinct wear layer to target.
Sanding tends to work well on LVP because the wear layer has enough thickness to buff without breaking through to the print layer. Sanding on sheet vinyl is riskier and generally not recommended since there is no clear buffer zone. Wax sticks and fillers work across all three types but require color matching specific to each product line. Before starting any method, confirm which category your flooring falls into so you do not damage a floor while trying to fix it.
Essential Equipment and Materials for Vinyl Floor Scratch Repair
Choosing the Right Repair Method for Your Scratch Type
Your primary equipment decision comes down to matching the repair tool to the scratch category you identified. Micro-scratches need nothing more than a microfiber cloth and warm soapy water. Light-to-medium scratches call for sandpaper in a grit progression plus a wax stick or vinyl sealant. Deep gouges require a vinyl floor repair kit with resin-based filler and color-matching components. Buying a full repair kit when you only have a micro-scratch wastes money; attempting to buff out a deep gouge with soap and water wastes time.
Consumables and Sanding Progression
If sanding is part of your repair path, grit selection matters as much as technique. Start with medium-grit sandpaper (120-150) to break down the rough edges of the scratch. Move to fine-grit (220-400) to smooth the transition between the scratch and the surrounding finish. Finish with ultra-fine grit (800) to restore sheen and blend the repaired area into the surrounding floor. Skipping grit stages leaves visible sanding marks; rushing the finishing grit leaves a dull patch that stands out under direct light.
Other Materials You Will Need
- Mild dish soap and clean water for pre-repair cleaning
- Microfiber cloths (at least two, one for cleaning and one for buffing)
- Color-matched wax stick or vinyl filler pen for light-to-medium scratches
- Vinyl floor repair kit with resin filler for deep gouges
- Painter's tape to protect surrounding planks during sanding or filling
- Soft plastic putty knife or applicator card for filler application
- Manufacturer warranty documentation for reference before starting
If sourcing the right grit progression or matching a filler color feels like more trial and error than you want to invest, a laminate and vinyl floor repair professional can bring pre-matched materials and skip the guesswork entirely.
Checking Your Warranty Before You Begin
Most vinyl flooring products come with a manufacturer warranty that covers manufacturing defects, and some warranties include language about maintenance requirements or repair restrictions. Locate your warranty documentation, usually provided at purchase or available through the manufacturer's website using your product's model number. Look specifically for any clause addressing DIY repair, sanding, or the use of aftermarket sealants and fillers.
Some warranties permit minor DIY touch-ups like wax stick application without affecting coverage, while others consider any surface alteration, including sanding, a voiding action. If the language is ambiguous, contact the manufacturer directly before proceeding rather than guessing. Review your flooring documentation to confirm repair coverage before you pick up a single tool.
Step-by-Step Vinyl Floor Scratch Repair Process
Step 1: Clean and Assess
Clean before you diagnose, not after. Dirt and grime inside a scratch can make it look deeper or more severe than it actually is. Wash the area with mild dish soap diluted in warm water, wipe with a soft cloth in a circular motion, and dry completely. Once dry, inspect the scratch again under raking light (a light source held at a low angle) to get an accurate read on depth and length.
Step 2: Repair Minor Scratches with Buffing
Buffing restores appearance without altering the surface. For micro-scratches, apply gentle pressure with a dry microfiber cloth in a circular motion for 2-3 minutes. This redistributes surface residue and can significantly reduce scratch visibility. For scratches that remain faintly visible after buffing, a warm soapy water treatment applied with a soft cloth, followed by thorough drying, often finishes the job. Understand that this method works by temporarily restoring the finish's appearance rather than permanently altering the material, so the effect can fade slightly after the next deep cleaning.
Step 3: Sand and Seal Light-to-Medium Scratches
How do you buff scratches on vinyl flooring? Sand along the direction of the scratch using medium-grit (120-150) sandpaper, applying light, even pressure. Progress to fine-grit (220-400) to smooth the transition, then finish with 800-grit for sheen restoration. Wipe away dust between each grit change, then apply a color-matched wax stick or sealant to the sanded area using a soft applicator card.
Allow 24 to 48 hours of drying time before walking on the repaired section or replacing furniture, and increase that window in low-ventilation or high-humidity rooms since moisture in the air slows cure time. Do not sand sheet vinyl using this method; the lack of a distinct wear layer makes it too easy to sand through to the print layer.
Step 4: Fill Deep Gouges
Filling reduces visibility rather than erasing the damage entirely. For deep gouges, use a vinyl floor repair kit with resin-based filler. Compare the filler color against your floor under at least two different light sources (natural daylight and interior lighting) before committing, since color that matches under one light source can look off under another. Apply the filler in thin layers with a plastic putty knife, allowing each layer to cure before adding the next. Deep gouges often show some filler grain even after multiple applications, and the realistic goal is minimizing visibility and stopping the damage from spreading, not achieving invisibility. If the gouge exposes the substrate or spans a wide area, filling will not hold up long-term, and plank replacement becomes the more durable option.
Using WD-40 and Other Products: What Works and What Doesn't
Does WD-40 really remove scratches? No, not permanently. WD-40 is a penetrating oil that temporarily masks scratches by filling micro-gaps in the surface and darkening the area to match surrounding flooring. The effect washes away with the next cleaning and is not recommended by flooring manufacturers. It also leaves a slippery residue and attracts dust, creating both a safety hazard and a maintenance headache.
What is the best scratch remover for vinyl flooring? The right product depends on scratch severity: buffing or warm soapy water suits minor surface marks, wax sticks and sealants handle light-to-medium scratches with visible depth, and resin-based repair kits address deep gouges that need structural filling. Baking soda paste works only on very light surface scratches as a gentle abrasive; commercial scratch-remover sprays vary widely in effectiveness depending on formulation, so match the product category to your damage tier rather than choosing based on marketing claims.
Sanding and Sealing vs. Full Plank Replacement
Not every scratch justifies a repair attempt, and knowing when to stop sanding and start planning a replacement saves time and material cost. Sanding and sealing makes sense when the scratch is contained to a single plank, sits within the wear layer, and the surrounding flooring is otherwise in good condition. Full plank replacement becomes the better call when the damage spans multiple planks, exposes the substrate, or sits in a high-traffic area where a repaired surface would wear through again quickly.
- Sand and seal when: the scratch is under 1/32 inch deep, confined to one plank, and the surrounding wear layer is intact
- Sand and seal when: the flooring type is LVP or hybrid with a workable wear layer thickness
- Replace the plank when: the substrate is visible or the core material shows through
- Replace the plank when: spider-webbing or multiple overlapping scratches cover a wide area
- Replace the plank when: the damage sits in a spot where repeated repair attempts would be needed within a year
Special Considerations for Challenging Vinyl Floors
Older vinyl floors, particularly those installed more than a decade ago, sometimes use discontinued color patterns that make finding a matching wax stick or filler difficult. In these cases, testing filler on an inconspicuous section first, like inside a closet or under an appliance, prevents a mismatched patch in a visible area. Floors with existing water damage or subfloor issues near the scratch site need that underlying problem addressed first, since filling a scratch over compromised material only delays a bigger repair.
If a scratch repair reveals a larger problem, like a section of flooring that flexes underfoot or shows moisture beneath the surface, a floor installation and repair specialist can assess whether the issue is isolated or affects a broader section of the room.
Preventing Future Scratches: Long-Term Floor Protection
Prevention costs less in time and materials than repeated repair. Felt pads under furniture legs, area rugs in high-traffic zones, and protective floor film during moves or renovation projects all reduce scratch frequency significantly. Regular gentle cleaning, using a soft microfiber mop rather than abrasive scrub pads, keeps grit from grinding into the surface over time. Some manufacturer warranties require specific maintenance steps to remain valid, so following the prevention guidelines in your warranty documentation protects both the floor and your coverage.
- Use felt pads on all furniture legs, replacing them every 6-12 months as they wear down
- Place area rugs or runners in entryways and high-traffic pathways
- Trim pet nails regularly in homes with dogs or cats on vinyl flooring
- Sweep or vacuum before mopping to remove grit that causes scratching during cleaning
- Increase prevention intensity in commercial spaces or heavy-use rooms compared to formal, low-traffic areas
Maintenance and Long-Term Care
Consistent care after a repair extends the life of both the fix and the surrounding floor. Clean spills promptly to prevent moisture from working into any repaired seams, and avoid dragging furniture or appliances across the floor without furniture sliders. Reapply wax stick touch-ups as needed in high-traffic zones, since minor surface wear accumulates gradually even on well-maintained floors. Schedule a periodic inspection under raking light every few months in busy rooms to catch new scratches while they are still in the micro category and easiest to address.
Things to Consider Before You Start
Do you know your exact flooring type? Sanding sheet vinyl the same way you would sand LVP can cause more damage than the original scratch.
Have you confirmed your warranty status? Some DIY methods, particularly sanding, may void coverage that a wax stick touch-up would not.
Is the scratch isolated, or part of a larger pattern? Repeated scratching in the same zone points toward a prevention fix, not just a repair.
Can you color-match confidently? Testing filler in an inconspicuous spot first avoids a mismatched patch in a visible area.
If the answers leave you uncertain, that uncertainty is the line between a confident DIY fix and a project better handed to a professional.
Why Homeowners Bring in Ace Handyman Services
Ace Handyman Services offers a straightforward path when a scratch repair turns out more complicated than expected, or when the floor itself is too valuable to risk a misjudged fix.
- Peace of mind on flooring that would be costly or difficult to replace if a DIY attempt goes wrong
- A one-year labor warranty backing every completed repair
- No need to source, learn, or return specialized sanding or filling equipment
- Background-checked, multi-skilled W-2 craftsmen, not gig-based contractors
- A predictable weekday appointment window that does not eat into your weekend
- Honest scoping that recommends a lighter fix when a lighter fix is genuinely the right call
- Cleanup included as part of the completed job, not left for you to handle
Whether the scratch turns out to be a five-minute buffing job or a sign of a bigger flooring issue, reach out to your local Ace Handyman Services office at https://www.acehandymanservices.com/#GetEstimateLink to schedule an assessment.
Frequently Asked Questions
How long does a vinyl floor scratch repair take?
Most single-scratch repairs take 15 minutes to an hour of hands-on work, not counting drying or cure time. Sanding and sealing projects need an additional 24-48 hours before the area can handle foot traffic or furniture.
Can I use the same repair method on LVP and sheet vinyl?
No. Sanding works reasonably well on LVP because of its distinct wear layer, but sanding sheet vinyl risks breaking through to the print layer since there is no equivalent buffer. Wax sticks and fillers work across both types with proper color matching.
Will a repaired scratch be completely invisible?
Micro-scratches and light scratches often become nearly invisible after buffing or sealing. Deep gouges rarely disappear completely, even with a well-matched filler, since some grain or texture difference typically remains visible under close inspection.
How much does a vinyl floor repair kit cost?
Basic wax stick kits generally run in the 15 to 30 dollar range, while full resin-based repair kits with color-matching components typically cost 25 to 60 dollars depending on the number of colors included.
What if the scratch keeps coming back in the same spot?
Repeated scratching in one location usually points to a prevention gap rather than a repair failure. Check for missing felt pads, pet activity, or grit tracked in from outside, and address that root cause alongside any repair.
Does a professional floor repair typically cost less than a full plank replacement?
Yes, in most cases. Surface repair addressing scratches or minor gouges generally costs less than removing and replacing an entire plank, which involves matching discontinued patterns and disturbing surrounding flooring.