


Warped vinyl siding does not fix itself, and every season you leave it alone gives heat, moisture, and wind another chance to make the damage worse. This guide walks through what actually causes vinyl siding to buckle, how to tell if your specific warping is a weekend fix or a signal that panels need to come off the house, and what the repair process looks like from diagnosis through the final inspection.
Can you unwarp vinyl siding? Yes, in many cases. If the warping is minor (roughly a quarter inch or less) and traced to tight nailing or short-term heat exposure, a heat gun or fastener adjustment can often restore the panel to its original shape. Warping tied to moisture infiltration or heat-melted material usually cannot be reversed and calls for panel replacement instead.
Some homeowners get through the diagnosis, look at the heat gun step, and decide the risk of scorching a panel or making the problem worse is not worth it. That is a reasonable call, and Ace Handyman Services is a straightforward option to bring in at any point in this process, whether you want a second opinion on severity or want the whole repair handled start to finish.
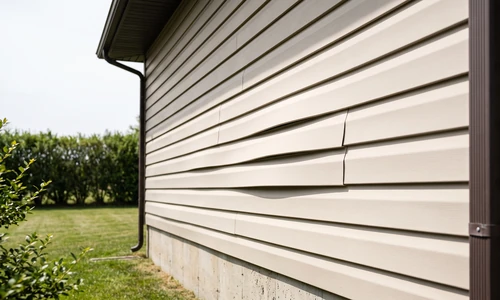
Quick Overview: What Fixing Warped Vinyl Siding Involves
Before you grab a heat gun or start pulling panels, it helps to see the whole arc of the project. Here is what the process typically looks like from start to finish:
- Diagnose the cause. Walk the affected wall and identify whether tight nailing, heat exposure, or moisture is driving the warping.
- Measure the severity. Check how far the panel bows out from the wall and how many panels are affected.
- Decide repair vs. replace. Match your measurements against clear thresholds before you touch a tool.
- Gather equipment. A heat gun, a flat pry tool (zip tool), a hammer, and replacement fasteners cover most minor repairs.
- Perform the repair. Heat-soften and reshape the panel, or unlock and re-nail it with proper spacing.
- Inspect for moisture behind the panel once it is loose, before closing everything back up.
- Set a maintenance rhythm so new warping gets caught early instead of spreading across the wall.
Assessing Your Warped Vinyl Siding Before You Begin
Not all warping looks alike, and the cause dictates whether a DIY fix has any real chance of holding.
Identifying the Cause of the Warping
Start by looking at where the damage sits on the house. Warping concentrated on panels facing south or west, especially near windows or grills, points to heat exposure. Vinyl siding softens starting around 160 degrees Fahrenheit and can bubble or ripple long before it visibly melts. If you run a straightedge along a panel and find nail heads pushed flush against or through the nailing flange, the panel has been fastened too tightly and has nowhere to go as it expands and contracts with temperature swings.
Checking Severity and Scope
Measure how far the panel bows away from the wall at its worst point. A gap you can slide a coin into (roughly 1/16 to 1/4 inch) is minor. A gap wider than 1/2 inch, or a panel visibly pulling away from the house, is a different category of problem. Also count how many panels are affected and where. Two or three warped panels clustered near a heat source is a contained issue.
Essential Equipment and Materials for Vinyl Siding Repair
Heat Gun vs. Fastener Tools
Your repair method depends on your diagnosis. A heat gun (not a hair dryer, which does not get hot enough) is the tool for reshaping panels softened or distorted by tight nailing, as long as the vinyl itself has not discolored or gone brittle. A zip tool (also called a siding removal tool or cat's paw) is what you need to unlock panels from the course above and below them without cracking the material, so you can access fasteners and reposition the panel.
Fasteners and Replacement Panels
If you are re-nailing, use roofing nails or siding nails with a wide head, and buy a few extra in case any bend during removal. If severity assessment points to replacement, bring a sample of your existing panel (or a clear photo showing the profile and color) to a siding supplier, since sun exposure fades vinyl over years and an exact color match on an older wall is unlikely without blending panels across a full elevation.
Other Materials You Will Need
- Heat gun with adjustable temperature settings
- Zip tool / siding removal tool
- Hammer and pry bar
- Replacement siding nails or roofing nails
- Tape measure and a straightedge
- Work gloves and safety glasses
- Caulk rated for exterior vinyl trim (if resealing joints)
If sourcing the right tools or matching panels starts to feel like more scoping work than the repair itself, that is exactly the point where siding repair professionals earn their keep, since they already carry the tools and know which fastener spacing your siding profile needs.
Step-by-Step Vinyl Siding Repair Process
Step 1: Remove Fixtures and Prep the Work Area
Clear the surface before you apply any heat. Take down shutters, house numbers, or hose bibs mounted near the warped panel, and clear grills, fire pits, or other heat sources at least several feet away permanently if they contributed to the problem in the first place.
Step 2: Heat Gun Technique for Minor Warping
Work the heat gun in slow, sweeping motions, never holding it in one spot. Set the gun to a low-to-medium heat setting, hold it 6 to 8 inches from the panel, and sweep back and forth across the warped section for 20 to 30 seconds at a time. Check softness with a gloved hand, never bare skin, and gently press the panel back toward the wall as it softens. Let it cool fully in that position before releasing pressure. If you see no improvement after two passes, or you notice any discoloration, shine, or bubbling on the surface, stop immediately. That is a sign of overheating, and continuing risks permanently damaging the panel.
Step 3: Loosening and Realigning Fasteners
Vinyl siding needs room to move, so nails should sit loose enough to slide a coin behind the nail head. Use the zip tool to unlock the panel above the warped one, exposing the fasteners. Remove nails that are driven flush or angled tight against the flange. Reposition the panel, then re-nail through the center of the nail slot (never at the edge) leaving roughly 1/16 inch of play so the panel can still expand and contract with temperature changes.
Step 4: Inspect Behind the Panel
Once a panel is unlocked, look before you close it back up. Check the house wrap or sheathing behind it for staining, soft spots, or mold odor. This is your one clear window to catch moisture problems before they spread further, and finding damage here should pause the cosmetic repair in favor of addressing the water source first.
Step 5: Relock and Reseal
Snap the panel back into the course below it and confirm it locks fully along its length. Re-caulk any trim joints you disturbed during the repair, using an exterior-rated caulk that matches your siding color, and let it cure per the product's instructions before considering the section finished.
Choosing and Applying Replacement Panels
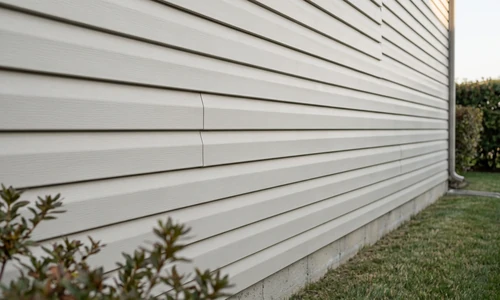
When severity assessment points to replacement rather than repair, work one panel at a time starting from the top course down, using the zip tool to unlock each course above your target panel. Slide the damaged panel out, slide the new one into place, and lock each course back down in sequence. Give any fresh caulk at trim intersections 24 to 48 hours to cure before heavy rain or pressure washing, and avoid touching or leaning on freshly locked panels while the material settles into place over the following days.
Panel Adjustment vs. Full Section Replacement
Severity Assessment: When Can Warped Vinyl Siding Be Repaired? Warping under 1/4 inch caused by tight nailing is generally DIY-repairable with a heat gun or fastener adjustment. Warping over 1/2 inch, visible gaps to the sheathing, discoloration, or brittleness usually means the panel needs replacing rather than reshaping, since the material has passed the point of safe reforming.
A lighter touch (heat and reposition) makes sense when:
- Only one or two panels show minor bowing
- The cause is clearly tight nailing, not heat damage or moisture
- The vinyl still looks glossy and flexible, not chalky or brittle
Full replacement is the right call when:
- Warping exceeds 1/2 inch or the panel has visibly pulled from the wall
- You find discoloration, melting, or brittleness on the surface
- Multiple panels across a wall face are affected, not an isolated spot
- Moisture staining or soft sheathing turns up during inspection
When Replacement Is the Right Choice
Replacement becomes necessary once warping exceeds roughly 1/2 inch, the material shows heat discoloration or brittleness, several panels are affected across a wall, or moisture behind the siding has already caused staining. Attempting to reheat or reshape panels in these conditions risks cracking the vinyl outright, turning a repair into a bigger, more expensive replacement job.
Special Considerations for Challenging Siding Repairs
Older siding presents a color-matching problem that newer installations do not. Vinyl fades gradually under UV exposure, so a panel bought today to replace a 15-year-old warped one will likely stand out, even if the profile matches exactly. Some manufacturers offer weathered or faded color lines specifically for this reason, but an exact match across a full elevation is not guaranteed. If the warping affects a highly visible section, like the front-facing wall near an entry, cosmetic consistency may push the decision toward replacing a full elevation rather than patching a couple of panels.
Homes with siding installed under a manufacturer warranty deserve a closer look before any DIY work begins. Warping tied to a manufacturer defect or an installer's workmanship error may be covered, but cutting into panels yourself can complicate a claim. Check your paperwork or contact the original installer before reaching for the heat gun if the siding is under 10 years old and warping has appeared without an obvious cause like a nearby grill or extreme heat exposure.
When a wall's cosmetic condition, warranty status, and structural concerns all intersect, an exterior home repair professional can sort through those variables faster than a homeowner working through it panel by panel.
Maintenance and Long-Term Care
Set a simple inspection rhythm rather than waiting for visible problems to force your hand. Walk the exterior each spring after winter freeze-thaw cycles and again in late summer after peak heat exposure, looking specifically for early rippling, gaps opening between panels, or nail heads beginning to show through the surface.
- Check caulk and flashing annually around windows, doors, and corner trim
- Keep grills, fire pits, and reflective surfaces (like new energy-efficient windows) at a safe distance from siding
- Clean gutters regularly so overflow does not run down behind siding panels
- Address minor warping as soon as you spot it, since a small fix today prevents a multi-panel replacement later
Things to Consider Before You Start
Before you buy a heat gun or pull your first panel, run through a few honest questions.
- Do you know your actual cause, or are you guessing? Heat-treating a panel that is warped from moisture damage will not fix the underlying problem and wastes your time.
- Are you comfortable working with a heat gun near a flammable material? Vinyl siding can scorch, bubble, or catch fire if overheated, and there is no undo button once that happens.
- Is your siding still under warranty? DIY repair work can affect a manufacturer or installer warranty claim.
- Does the affected area involve more than a panel or two? Wider damage often means a bigger underlying issue worth a professional look before you start patching.
If your answers point toward confidence and a contained, clearly-diagnosed repair, you are on solid ground to proceed. If they raise more questions than they answer, that is the line where bringing in help makes more sense than pushing forward alone.
Why Homeowners Bring in Ace Handyman Services
Vinyl siding sits on the outside of your home for everyone to see, and a miscalculated heat gun pass or a poorly matched replacement panel is a mistake that stays visible for years. That is why many homeowners weigh their options before picking up the tools:
- Peace of mind on an exterior surface that is expensive to replace outright if a DIY attempt goes wrong
- A one-year labor warranty backing the repair work
- No need to source, learn, or return a heat gun and specialty siding tools
- Background-checked, multi-skilled W-2 craftsmen, not gig contractors pulled from an app
- A predictable weekday timeline that does not eat into your weekend
- Right-sized scope, including an honest recommendation for a minor fastener fix when that is genuinely all the wall needs
- Cleanup included once the repair or replacement panels are locked in place
If you have measured your warping, weighed the causes, and still are not sure which side of the repair-or-replace line your siding falls on, reach out to your local Ace Handyman Services office for a straightforward assessment.
Frequently Asked Questions
Can you unwarp vinyl siding?
Yes, in many cases where the warping is minor and caused by tight nailing or short-term heat exposure. A heat gun or fastener adjustment can often reshape the panel. Warping from moisture damage or heat-melted vinyl usually cannot be reversed and needs a replacement panel instead.
How do I fix a bulge in vinyl siding?
Identify whether the bulge comes from over-tight nailing or heat exposure, then either loosen and re-nail the fasteners with proper spacing, or use a heat gun on a low setting to soften the panel and press it flat before it cools. Always check behind the panel for moisture first.
Does warped siding need to be replaced?
Not always. Minor warping under 1/4 inch tied to tight nailing is often repairable. Replacement becomes necessary once warping exceeds roughly 1/2 inch, the panel shows discoloration or brittleness, multiple panels are affected, or moisture has already gotten behind the siding.
What causes vinyl siding to warp in the first place?
The most common causes are fasteners driven too tightly (which prevents the panel from expanding and contracting with temperature changes), direct heat exposure from sun or nearby grills, and moisture that gets trapped behind the panel from gaps, failed caulk, or flashing issues.
Is warped vinyl siding covered under warranty?
It depends on the cause. Manufacturer defects or installer workmanship errors are often covered, especially on siding under 10 years old, but heat and moisture damage from external sources typically are not. Check your original paperwork or contact the installer before attempting a DIY repair on newer siding.
What happens if I ignore warped vinyl siding?
Small gaps from warping tend to widen over one to two seasons, letting in water that can lead to mold, soft drywall, and framing rot behind the wall. What starts as a cosmetic fix on one or two panels can turn into a much larger repair if left unaddressed.