


Cedar siding ages the way most exterior wood does: unevenly, and often worse than it looks from the driveway. A hairline crack near a window trim can mean nothing, or it can mean water has been working behind the board for two seasons. Getting the diagnosis right matters more than the repair itself, and this guide walks through both.
Can damaged cedar siding actually be repaired, or does it always need replacing? Yes, most cedar siding damage is repairable if the wood retains structural integrity and the rot or cracking hasn't spread through the full thickness of the board. Surface damage, small holes, and isolated cracks respond well to filler-based repair. Deep rot or widespread failure across multiple boards usually points toward replacement instead.
Some homeowners handle cedar repair themselves through the full process, from diagnosis to finish coat. Others get partway into an assessment and realize the damage is more extensive than a weekend project should absorb. Ace Handyman Services works with homeowners at either point, whether that means walking through a repair plan or taking over the work entirely.
Quick Overview: What Cedar Siding Repair Actually Involves
Before picking up a tool, it helps to see the whole arc of the project. Cedar repair moves through distinct phases, and skipping ahead usually costs time later.
- Inspect every affected board and the surrounding area for hidden rot, not just the visible crack or hole
- Test wood moisture content before deciding on filler versus board replacement
- Remove damaged material with a chisel or wire brush without gouging sound wood
- Select a repair material matched to the damage type (surface crack, deep rot, hole, warping)
- Apply filler or epoxy in the correct temperature and humidity window
- Sand, prime, and finish once the material has fully cured
- Reinspect the repair on a set schedule for the first year to confirm it's holding
Diagnosing Cedar Siding Damage: What You're Actually Looking At
How do you know if cedar siding damage is repairable or needs full replacement? Identify the damage type first (crack, rot pocket, hole, or warping), then assess depth and scope with a moisture meter or screwdriver probe. Surface-level damage on structurally sound wood is repairable; rot that penetrates the board's full thickness or spans multiple adjacent boards usually signals replacement.
Reading the Damage Type
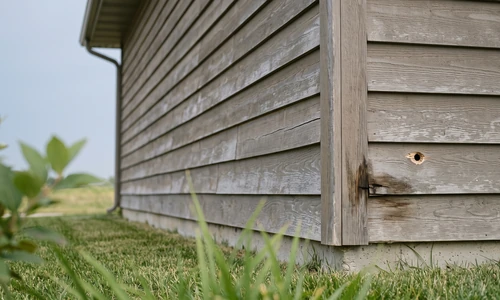
Surface cracks appear as thin splits running with the grain, usually from sun exposure and repeated wet-dry cycles. Rot pockets feel soft or spongy under light pressure and often show darker discoloration. Holes, whether from woodpecker activity or physical impact, expose interior wood that may or may not be compromised beyond the entry point. Warping shows up as boards pulling away from the wall plane, frequently near ground level or under downspouts where moisture sits longest.
Checking Depth and Root Cause
Press a screwdriver or awl into suspect areas. Sound cedar resists with a firm push; rotted wood gives way with little resistance. A moisture meter reading above 20 percent in the wood indicates active moisture intrusion, which means the repair needs to address the water source, not just the cosmetic damage. Look uphill from the damaged board for the actual entry point: failed caulking, a gap in flashing, or a splash zone from a nearby gutter downspout.
How Cedar Siding Fails: Prevention Through Understanding Installation and Maintenance
Cedar siding fails predictably when the same conditions repeat: water finds a way in, and nothing dries it out fast enough. Tight installations, especially where boards meet horizontal trim or roof lines, trap moisture against the wood instead of letting it shed. Caulking at joints and seams degrades on a fairly short cycle, often five to seven years, and once it cracks, water gets behind the siding without any visible warning on the surface.
Paint and stain aren't cosmetic extras on cedar; they're the primary barrier against moisture absorption. A protective coat that's thinning or chalking has stopped doing its job even if it still looks presentable from a distance. Manufacturer guidance for cedar siding typically calls for stain refresh every three to five years and paint refresh every five to eight, depending on sun exposure and climate. Skipping that cycle is the single most common reason repairable damage becomes replacement-level damage.
Essential Equipment and Materials for Cedar Siding Repair
Filler-Based Repair vs. Board Replacement Tools
Small to moderate damage calls for a basic kit: wire brush, chisel, moisture meter, exterior-grade filler, sandpaper in graduating grits, and a putty knife. Board-level replacement requires a pry bar, reciprocating saw or hand saw for clean cuts, replacement cedar matched in profile, and galvanized or stainless siding nails. Renting a moisture meter for a single project usually makes more sense than buying one outright unless you own an older home with a history of cedar issues.
Matching Filler to Damage Pattern
Not all wood fillers behave the same way on cedar. One-part polyester fillers cure fast and sand easily but can crack over time on surfaces that flex with temperature swings. Two-part epoxy systems cost more and take longer to work with but bond deeper and resist moisture better, making them the better call for rot pockets and structural gaps. Flexible, paintable exterior fillers work well for surface cracks that need to move slightly with the wood's natural seasonal expansion.
Other Materials You Will Need
- Exterior-grade primer compatible with the finish coat
- Matching stain or paint for the final finish
- Paintable, flexible exterior caulk for seams and joints
- Drop cloths and painter's tape for surrounding trim
- Safety glasses and a dust mask for sanding and chiseling
If sourcing the right filler for a rot pocket versus a surface crack feels like guesswork, that's usually the point where a siding repair crew earns its keep. Matching material to damage type is where a lot of DIY repairs go sideways.
Step-by-Step Cedar Siding Repair Process
How do you repair damaged cedar siding? Diagnose the damage type and confirm repair is viable, prepare the surface by cleaning and checking moisture content, select a filler or epoxy matched to the damage, apply it within recommended temperature and humidity ranges, let it fully cure, then sand and finish to match the surrounding siding.
Step 1: Confirm the Damage Is Repair-Viable
Before opening a tub of filler, revisit the diagnostic step. If the moisture meter reads high or the rot extends beyond a localized pocket, stop and reconsider board replacement instead of pushing forward with a cosmetic fix that won't hold.
Step 2: Preparing the Surface and Assessing Moisture
Clean the damaged area with a wire brush to remove loose debris, flaking paint, and soft wood fibers. A light pressure wash can help but avoid saturating the area since excess water delays drying and skews moisture readings. Wood moisture content should read below 15 percent before filler application; anything higher means the area needs more drying time or the water source needs to be addressed first.
Step 3: Choosing the Right Repair Material for Your Damage Pattern
Which wood filler should you use for cedar siding repair? Use two-part epoxy for deep rot pockets and structural gaps because it bonds through the full damage depth. Use flexible, paintable exterior filler for surface cracks and small holes that need to move slightly with the wood. Match cure time and paint compatibility to your project timeline before buying.
Step 4: Removing Damaged Material
Chisel away rotted or split wood carefully, following the grain and stopping the moment you hit sound wood. Over-removal thins the board and creates a new structural weak point, so work in small passes rather than gouging deep on the first pass.
Step 5: Application and Curing: Timing Considerations for Success
Most exterior fillers and epoxies perform best between 50 and 90 degrees Fahrenheit with moderate humidity. Cold slows curing dramatically and can prevent proper hardening; high humidity extends dry time and risks trapping moisture under the surface. Spring and fall generally offer the most reliable repair windows in most climates. Follow the product's stated cure time exactly before sanding, since sanding uncured filler creates a soft, uneven surface that won't hold paint properly.
Step 6: Sanding and Finishing
Sand in graduating grits, starting coarse to level the filler and finishing fine to blend the edges into the surrounding wood. Prime the repaired area before applying the final stain or paint coat, matching sheen and color as closely as possible.
Replacing Individual Boards vs. Patching: When Full Replacement Makes Sense
Can you replace just one piece of cedar siding instead of patching it? Yes. Board replacement works well when damage is large but localized to one or two boards with sound structure around them. Patching with filler suits small cracks or holes in otherwise healthy siding where removing the whole board would be unnecessary.
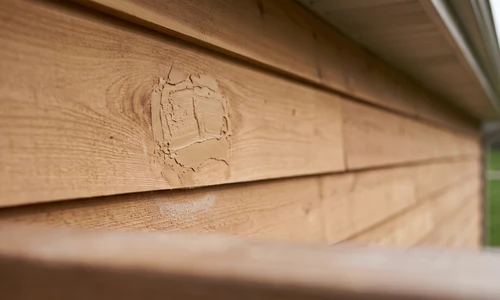
Board replacement carries its own challenge: matching grain pattern, weathering color, and profile so the new board doesn't stand out as an obvious patch. Freshly milled cedar looks noticeably lighter than weathered siding until it ages in, and a finish coat helps close that gap faster.
- Choose board replacement when a single plank shows rot, warping, or damage across most of its length
- Choose board replacement when the damage sits at a structural point, like near a window or door frame
- Choose patching when the damage is small, isolated, and the surrounding wood tests sound and dry
- Choose patching when color and grain matching for a full board would be more visually disruptive than a filled repair
Special Considerations for Challenging Cedar Siding
Historic homes with original cedar shake or clapboard siding raise the stakes on every decision. Matching profile and reveal on older cedar shake repair can be difficult when the original milling specs are no longer standard, and irreplaceable original material deserves a more conservative repair approach than a modern build would need.
When the damage touches a historic facade or spans more square footage than a single afternoon project should cover, a siding repair specialist can assess whether the underlying structure needs attention beyond what's visible on the surface.
Maintenance and Long-Term Care
How do you maintain cedar siding after a repair to prevent it from failing again? Inspect the repaired area at the two-week, three-month, and one-year marks for filler cracking or new moisture intrusion. Reapply caulk at seams every five to seven years and refresh stain or paint on schedule, since the finish coat is the primary barrier against future rot.
- Walk the exterior each spring and fall looking for new cracks, soft spots, or paint failure
- Keep gutters and downspouts clear so splash-back doesn't saturate siding at ground level
- Trim vegetation back from siding to allow airflow and faster drying after rain
- Recaulk seams and joints proactively rather than waiting for visible gaps
Things to Consider Before You Start
- Do you have a way to accurately test moisture content? Guessing at dryness is how repairs fail within a year.
- Is the damage isolated, or does it show up in multiple spots across the same wall? Scattered damage often points to a systemic moisture issue, not a one-off problem.
- Can you match the existing finish closely enough that the repair won't stand out? Color and sheen mismatches are common and hard to fix after the fact.
- Do you have a repair window with the right temperature and humidity? Rushing the cure stage undermines everything done correctly before it.
Weigh those honestly against the scope of what you're looking at. Small, isolated, well-diagnosed damage sits comfortably on the DIY side of the line. Widespread, deep, or structurally connected damage sits on the other side.
Why Homeowners Bring in Ace Handyman Services
Cedar siding sits on the front of the house where every mismatch is visible for years, and that's exactly why some homeowners choose to bring in Ace Handyman Services once diagnosis reveals more than expected.
- Peace of mind on a highly visible, hard-to-replace exterior surface
- A one-year labor warranty on completed repair work
- No need to source, learn, or return specialty tools like moisture meters or epoxy injection systems
- Background-checked, multi-skilled W-2 craftsmen, not gig-based subcontractors
- A predictable weekday timeline that doesn't consume every weekend of a season
- Honest scoping that recommends patching over full replacement when patching is the right call
- Cleanup included once the repair and finish work is complete
To talk through a cedar siding repair or get a professional assessment of damage that looks more extensive than expected, reach out to your local Ace Handyman Services office.
Frequently Asked Questions
How much does cedar siding repair typically cost?
Small filler-based repairs often run in the range of materials cost alone if done as a DIY project, while professional board replacement or larger rot remediation varies widely based on square footage, board matching difficulty, and whether underlying moisture issues need correcting first.
Can rotted cedar siding be saved without full replacement?
Often, yes, if the rot is localized and hasn't compromised structural framing behind the siding. Epoxy consolidation and filler can restore sound repair on moderate rot, but rot that's spread through the full board thickness usually requires replacement of that section.
How long does a cedar siding repair take to complete?
A single small repair including cure time typically spans a few days, since filler and epoxy need to fully cure before sanding and finishing. Larger projects involving multiple boards or extensive prep can extend to a full weekend or longer.
What's the difference between cedar shake repair and cedar clapboard repair?
The diagnostic and filler principles are the same, but shake shingles overlap in a way that traps moisture differently than flat clapboard, and replacing an individual shake often requires lifting surrounding courses rather than a straight board swap.
Is painted or stained cedar siding harder to repair than natural cedar?
Not harder, but matching the existing finish adds a step. Painted siding is more forgiving for color match; stained or natural cedar requires closer attention to grain and weathering to keep a repair from standing out.
How often should cedar siding be inspected to catch damage early?
Twice a year, ideally in spring and fall, walking the full exterior and checking seams, ground-level boards, and areas near downspouts where moisture problems start earliest.