


A gouge in the hallway runner or a cupped board by the back door does not automatically mean a full floor replacement. Most wood floor damage is repairable, and the right fix depends on what caused it, how deep it runs, and whether the subfloor underneath is still sound. This guide walks through diagnosing the damage first, then matches each scenario, scratches, gouges, warping, water intrusion, to the repair method that actually holds up.
Can damaged wood floors be repaired? Yes, in the large majority of cases. Surface scratches, gouges, minor dents, and even isolated warped boards can be repaired without replacing the whole floor. Only extensive water damage, widespread structural warping, or subfloor rot typically require a full section replacement or professional remediation.
Ace Handyman Services works with homeowners at every stage of a wood floor repair, whether that means talking through a damage assessment before you buy materials or stepping in to handle a board replacement once you decide the project is bigger than a weekend job.
Quick Overview: What Wood Floor Repair Actually Involves
- Assess the damage: identify type (impact, moisture, wear), severity, and root cause before choosing a repair method.
- Determine floor type: solid hardwood repairs differently than engineered hardwood with a thin veneer layer.
- Gather materials: wood filler, epoxy, or a pre-made kit depending on damage depth and location.
- Repair surface damage: clean, fill, sand, stain, and finish scratches, gouges, and shallow dents.
- Address warping: sand and refinish minor cupping, or replace boards where warping is severe.
- Replace damaged boards: remove, source matching replacement stock, install, and finish.
- Let repairs cure fully before returning the area to normal foot traffic or moisture exposure.
- Address the root cause (humidity, water source, impact point) so the same damage does not recur.
Assessing Wood Floor Damage Before You Begin
Assessing damage type, severity, and root cause is the step that determines whether your repair holds. Look at three things: what kind of damage you have (impact, moisture, wear, or staining), how deep and widespread it runs (cosmetic-only versus something touching the subfloor), and what caused it in the first place. Skipping this step is the most common reason DIY repairs fail within a year.
Distinguishing Impact Damage from Moisture-Related Damage
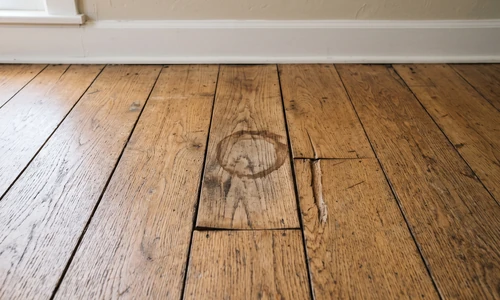
Impact damage shows up as localized dents or gouges with defined edges; the wood around the mark stays structurally sound. Moisture damage looks different: edges lift, the wood feels soft when pressed, discoloration spreads beyond the visible mark, and boards may cup (edges higher than center) or crown (center higher than edges). Misreading a moisture problem as simple impact damage means the repair will fail again once the underlying moisture issue resurfaces.
Identifying Structural vs. Cosmetic Floor Issues
Cosmetic damage, shallow scratches, minor stains, small gouges, can be repaired safely by most DIYers. Structural issues, significant warping across multiple boards, cupping that affects the walking surface, or soft spots underfoot, point to subfloor involvement and usually call for a closer look before you touch a sander. Walk the affected area slowly and note any give underfoot, then check for height variance with a straightedge laid across several boards.
Essential Equipment and Materials for Wood Floor Repair
Choosing Between Wood Filler, Epoxy, and Pre-Made Repair Kits
Wood filler works well for shallow scratches and dents in low-traffic, protected areas. It is fast to apply and sands smoothly, but it has limited durability where the floor takes heavy impact. Epoxy costs more time to cure but holds up far better in larger gouges or spots that see repeat wear, like a front entry or a spot under a rolling office chair.
Other Materials You Will Need
- Fine and medium grit sandpaper (120 to 220 grit) for leveling and finish blending
- Tack cloth or a vacuum with a brush attachment for surface prep
- Stain matched to your existing floor color, tested on a hidden spot first
- Polyurethane or oil-based finish matching your floor's current sheen
- Wood glue for board seams and minor structural joints
- Putty knife for filler and epoxy application
- Moisture meter if you suspect subfloor or board moisture content issues
- Replacement boards matched in species and mill run, if board replacement is needed
If sourcing matching boards or scoping out whether a repair calls for wood filler versus a full board swap feels like the part where things could go sideways, a wood floor installation and repair specialist can assess the damage on site and tell you exactly what the job needs before you buy anything.
Step-by-Step Wood Floor Repair Process
Step 1: Clean and Prep the Damaged Area
Clean prep prevents contamination that ruins adhesion. Vacuum debris from the gouge or scratch, then wipe with a slightly damp cloth to remove dust and oils. Let the area dry fully before applying any filler or epoxy. Skipping this step is a common reason fillers pop loose within months.
Step 2: Fill Shallow Scratches, Gouges, and Dents
Match the filler to the damage depth, not just the surface look. Press wood filler or epoxy into the damaged area with a putty knife, slightly overfilling since most products shrink as they cure. For gouges deeper than an eighth of an inch or in high-traffic zones, epoxy holds up better than standard wood filler over time.
Step 3: Sand the Repair Flush
Sanding levels the repair to the surrounding floor without creating a dip or a ridge. Once the filler or epoxy has fully cured (check the product label; times vary widely), sand starting with 120 grit and finishing with 220 grit, working in the direction of the wood grain. Feather the edges into the surrounding finish so the transition is not abrupt.
Step 4: Match Stain and Blend the Grain
Grain matching is a technique, not a guess. Test your stain choice on a hidden spot, like inside a closet, before applying it to the repair. Apply with a small brush or cloth, following the direction of the surrounding grain. Use a fine artist's brush to draw faint grain lines into the repaired area if the surrounding floor has visible variation, blending rather than duplicating an exact pattern. Minor color variance may remain visible under certain lighting even after a careful repair, and that is normal, not a failed job.
Step 5: Apply Finish and Let It Cure
Cure time determines when the floor is safe to use, not just when it feels dry. Apply a finish coat matching your floor's existing sheen (matte, satin, or gloss). Surface repairs typically need 24 to 48 hours before light foot traffic and longer before rugs or furniture return to the spot. Walkable is not the same as fully cured; avoid water contact and heavy use for at least 72 hours.
Repairing Warping and Moisture-Induced Damage
Warping and cupping trace back to moisture, whether from a spill, humidity swings, or moisture wicking up from the subfloor. Minor warping in one or two boards can sometimes be sanded down and refinished once the wood has fully dried out and humidity levels have stabilized. Significant warping across multiple boards, or cupping that has distorted the walking surface, usually means board replacement is the only repair that lasts. Addressing repair without addressing the moisture source, a leaking appliance, poor bathroom ventilation, or subfloor moisture, means the same damage returns.
Assessing and Addressing Subfloor Moisture
Signs of subfloor moisture include soft wood when probed, a musty odor, visible mold at board seams, or edges of the hardwood lifting away from the subfloor. Press on suspected areas and check for give beneath the surface. If you find evidence of moisture penetration, mold, or structural softness, that points to a professional moisture assessment rather than a straightforward repair, since remediation needs to happen before any new flooring goes down.
When to Replace a Board Instead of Repair
Deciding between repair and board replacement comes down to four factors. Board replacement is the better call when damage compromises the board's structural rigidity, sits in a highly visible area where repair blending will fall short, is actively spreading, or would require repeated surface repairs in a high-traffic zone. In those cases, replacing the board is often more durable and cost-effective long term than patching the same spot again.
Matching Replacement Boards: Species, Finish, and Grain Alignment
Identify your existing floor's wood species by grain pattern and hardness, or check any documentation from the original installation. Note the finish type (matte, satin, gloss, oil-based versus polyurethane) so the replacement board's finish coat matches once applied. Source replacement boards from the original supplier when possible; for older floors, reclaimed wood or a close species match may be the most realistic option, since modern production runs vary in color and grain from decades-old stock. Align grain direction and growth rings with neighboring boards for the most seamless visual result.
Solid Hardwood vs. Engineered Hardwood Repair Differences
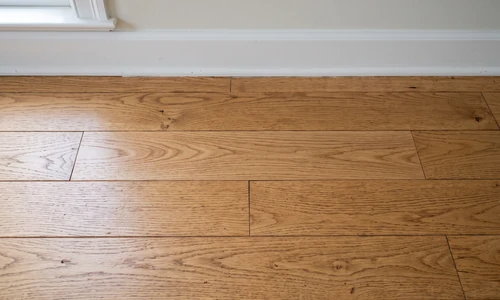
Solid hardwood runs the same wood species all the way through, so sanding, filling, and refinishing can happen multiple times over the floor's life. Engineered hardwood has a thin hardwood veneer layer over a plywood core, which limits how many times it can be sanded before you hit the core material. Deep damage on engineered flooring may reach past the veneer into the core, at which point the spot is not repairable and the board needs replacing.
Spot Repair vs. Full Refinishing
A spot repair, filling and blending a single damaged area, works when damage is isolated, cosmetic, and located away from high-visibility zones. Full refinishing, sanding the entire room down to bare wood and reapplying stain and finish, makes more sense when damage is widespread, when color variance from multiple past repairs has become distracting, or when you want a uniform look across the whole floor.
Spot repair is the right call when:
- Damage is limited to one or two boards or a small cluster of scratches
- The area sits in a low-visibility zone like under a rug or in a corner
- The surrounding finish is otherwise in good condition
Full refinishing is the right call when:
- Damage or wear is spread across multiple rooms or the majority of one room
- Previous spot repairs have left a patchwork of visible color variance
- The finish itself is worn thin, dull, or scratched throughout, not just at isolated points
Special Considerations for Challenging Wood Floors
Vintage hardwood floors, especially those with reclaimed or discontinued species, present a real matching challenge since exact replacement stock may not exist. In these cases, blending a slightly different board through stain adjustment often beats an obviously mismatched exact species swap. Floors in kitchens and bathrooms carry ongoing moisture exposure, so repairs there hold up better with a durable finish and consistent humidity control rather than a one-time fix. If you are dealing with an irreplaceable original floor, testing your approach on a hidden section before committing to the visible area protects you from a mistake you cannot undo. When a repair sits on a floor that cannot be replicated or replaced, bringing in a wood floor installation and repair professional to assess the damage before you start reduces the risk of an irreversible misstep.
Maintenance and Long-Term Care
Repairs last longer when the conditions that caused the original damage get addressed. Keep indoor humidity between 30 and 50 percent using a hygrometer to monitor levels, add furniture pads under chair and table legs to prevent new impact damage, place mats at entry points and near sinks or tubs to catch moisture before it reaches the floor, and clean regularly to prevent grit buildup that causes fine scratching over time.
- Monitor humidity with an inexpensive hygrometer, especially through seasonal changes
- Wipe up spills immediately rather than letting moisture sit on the finish
- Use furniture pads and area rugs in high-traffic or high-impact zones
- Reapply finish coats as wear patterns appear, rather than waiting for damage to return
- Avoid dragging furniture across the floor; lift and carry instead
Things to Consider Before You Start
Do you know the root cause of the damage, not just what it looks like? A repair that ignores an ongoing moisture source or structural issue will fail again. Is the damage cosmetic or does it involve the subfloor? Soft spots or spreading discoloration change the scope of the project. Do you have a realistic way to match your existing floor's species and finish? Older floors especially may require some compromise. Can you commit to the full cure time before returning the area to normal use? Rushing this step undoes careful work. Depending on your answers, you are either looking at a manageable weekend project or a repair that benefits from a second set of trained eyes.
Why Homeowners Bring in Ace Handyman Services
- Peace of mind on floors that cannot be replaced with an exact match, where a miscalculation is expensive and permanent
- A one-year labor warranty backing the repair work performed
- No need to source, learn to use, or return sanders, moisture meters, or specialty finishing tools
- Background-checked, multi-skilled W-2 craftsmen, not gig workers assembled for a single job
- A predictable weekday timeline that does not eat into your weekends
- Honest scoping, including when a simple spot repair is genuinely the right call instead of upselling a full refinish
- Cleanup included, so sawdust and old finish debris do not become your problem after the work is done
If a hardwood floor repair has moved past what feels manageable on your own, whether that is matching a discontinued board, assessing subfloor moisture, or simply wanting the job done right the first time, reach out to your local Ace Handyman Services office at https://www.acehandymanservices.com/#GetEstimateLink.
Frequently Asked Questions
Can damaged wood floors be repaired?
Yes, in most cases. Surface scratches, gouges, minor dents, and isolated warped boards are all repairable without replacing the entire floor. Only extensive water damage, widespread structural warping, or subfloor rot typically require a larger section replacement or professional remediation.
What should you not use on wood floors?
Avoid excessive standing water during cleaning, oil-based cleaners on floors finished with water-based polyurethane, and fillers that do not match the damage severity, like using a light surface filler on a deep structural gouge. Using the wrong sealer or applying finish over an improperly cured repair can also cause premature failure.
What is the most affordable way to restore hardwood floors?
Start with the least invasive repair that matches your damage: surface filler or epoxy for scratches and gouges, targeted board replacement for isolated structural damage, and full refinishing only when damage or wear is widespread. Letting damage severity dictate the repair method avoids over-scoping a project that a spot repair could resolve.
How do I repair a wood floor without replacing it?
Clean the damaged area, fill shallow scratches and gouges with wood filler or epoxy depending on depth, sand the repair flush with the surrounding floor, stain to match, and apply a finish coat. For warping limited to one or two boards, sanding and refinishing after the wood has fully dried can resolve the issue without replacement.
Can I repair hardwood floors in kitchens and bathrooms?
Yes, but repairs in these rooms need a durable finish and ongoing humidity control to last. Without addressing moisture exposure at the source, spills, condensation, or poor ventilation, repairs in these high-moisture zones tend to recur. Mats near sinks and consistent cleanup of standing water extend the life of any repair in these areas.
How do I know if I need a professional instead of doing this myself?
DIY-appropriate repairs include surface scratches, minor gouges in protected areas, and straightforward board replacement with proper tools and floor access. Professional assessment is worth bringing in for extensive water damage, widespread warping, subfloor softness, or engineered hardwood damage that may have reached the plywood core.