


A crack creeping across your ceiling or snaking down the corner of a wall is one of the most common complaints homeowners bring to any drywall specialist, and for good reason. What causes drywall cracks ranges from harmless seasonal expansion to early warning signs of foundation movement, and the difference matters because the fix, and the urgency, changes completely depending on the root cause. This guide walks through the five primary causes, gives you a location-and-pattern framework to diagnose your own crack, and explains why some cracks keep coming back no matter how many times you patch them.
When should you worry about a drywall crack? Worry when the crack is wider than a quarter inch, follows a diagonal or stair-step pattern, grows over a few weeks, or appears alongside doors that stick or windows that no longer close square. Hairline cracks that stay the same size and follow a straight vertical or horizontal line are almost always cosmetic and not urgent.
Some homeowners work through this diagnostic process on their own and patch the crack themselves once they understand the cause. Others reach a point where the pattern looks ambiguous or the crack keeps returning, and that is a reasonable moment to bring in Ace Handyman Services to confirm the diagnosis and handle the repair with the right materials and technique.
Quick Overview: How Drywall Crack Diagnosis Works
- Observe the crack's location relative to corners, openings, and ceiling joists
- Measure the width and note the angle (vertical, horizontal, or diagonal)
- Mark and date the crack to track growth over two to four weeks
- Match the pattern against the five primary causes below
- Decide whether the issue is cosmetic (patch and move on) or structural (needs assessment)
- Choose a repair method sized to the actual cause, not just the visible symptom
- Address the underlying condition, humidity, settlement, or joint failure, so the repair holds
Assessing Your Drywall Cracks Before You Begin
Not every crack needs the same diagnostic depth. A single hairline crack over a doorway calls for a five-minute inspection, while a network of diagonal cracks radiating from a corner deserves a slower, more deliberate look before you touch a putty knife.
Identifying Crack Types
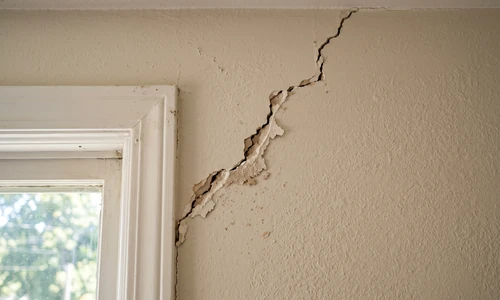
Cracks generally fall into a few visual families: hairline cracks (thin, straight, often less than 1/16 inch), stress cracks over openings (short, horizontal, at the top corners of doors and windows), diagonal cracks (running at roughly 45 degrees from a corner), and stair-step cracks (a jagged, staggered line that follows drywall seams or masonry joints). Each family points toward a different mechanism, and recognizing the family is the first real diagnostic step.
Pre-Work Checks, Measurements, and Conditions
Before assuming anything, check three things. First, measure the crack width at its widest point with a ruler or crack gauge. Second, check whether nearby doors or windows have started sticking, dragging, or gapping unevenly, since misaligned frames often confirm structural movement. Third, note the season and recent weather; cracks that appear right after a dry winter or a humid summer often trace back to moisture, not settlement.
Essential Equipment and Materials for Crack Diagnosis
Diagnosing a crack requires almost no specialized equipment, but the right basics make the difference between a guess and an informed decision.
Primary Equipment Decision: Monitoring vs. Immediate Repair
If a crack looks stable and cosmetic, you can move straight to repair with standard drywall tools. If it looks active or ambiguous, invest a few weeks in monitoring first: a strip of painter's tape across the crack, dated in marker on the tape itself, will tell you within a month whether the crack is growing, stable, or shrinking as humidity shifts.
Consumables and Selection Criteria
For cosmetic repairs you will use lightweight joint compound for hairline cracks, or a flexible acrylic caulk for cracks that move seasonally with temperature and humidity. For wider or recurring cracks, self-adhesive fiberglass mesh tape holds better than paper tape because it resists tearing when the substrate flexes slightly.
Other Materials You Will Need
- Putty knife or 6-inch taping knife
- 120-grit sanding sponge
- Primer and touch-up paint matched to the wall
- Flexible caulk rated for interior movement joints
- Fiberglass mesh tape (for anything wider than a hairline)
- Painter's tape and a fine-tip marker for monitoring
If scoping the right materials for your specific crack pattern feels like the part where things could go sideways, a drywall repair and texture specialist can confirm the diagnosis and match the repair to the actual cause before any compound goes on the wall.
The Five Primary Causes of Drywall Cracks
Nearly every crack you will encounter traces back to one of five mechanisms: foundation settlement, humidity and temperature cycling, drywall tape and joint compound failure, seismic or soil movement, or a construction defect introduced during the original build.
Foundation Settlement and Heave
Settlement happens as soil beneath a foundation compacts gradually under the weight of the structure, causing the foundation, and everything built on it, to shift slightly downward or unevenly. Heave works in the opposite direction: soil expands, often from moisture absorption or frost, and pushes upward against the foundation. Both create differential movement, meaning one part of the house shifts more than another, and that differential is what stresses drywall along its weakest points. Diagonal cracks radiating from a corner typically indicate shear stress from settlement, while vertical cracks concentrated near foundation walls often signal differential settlement rather than uniform sinking.
Humidity and Temperature Cycles
Can humidity alone cause permanent drywall cracks, or only temporary surface issues? In most cases humidity and temperature cycling causes reversible, cosmetic hairline cracks along seams and corners as the drywall and framing expand and contract. These cracks rarely widen beyond a hairline and typically stabilize once indoor humidity is controlled, unlike structural cracks tied to ongoing settlement.
Wood framing behind drywall absorbs and releases moisture with the seasons, swelling in humid months and shrinking in dry ones. That subtle movement transfers into the drywall through the joints and fasteners, and over years it can create a network of fine cracks concentrated at seams, corners, and around HVAC vents where temperature swings are most pronounced. This is the most common cause of recurring hairline cracks in homes with inconsistent indoor climate control.
Drywall Tape and Joint Compound Failure
One cause that gets overlooked in most cause-and-effect lists is failure within the drywall finishing system itself, separate from anything happening in the framing or foundation. If the original installer applied joint compound over tape that hadn't fully bonded, applied too few coats, or worked in a room with poor humidity control during installation, the tape bond weakens over time. This kind of failure tends to surface five to ten years after installation, shows up as an isolated crack along a single seam rather than a spreading network, and comes back after a cosmetic patch because the patch was applied over the same weak substrate rather than replacing it.
Seismic Activity and Soil Movement
In regions prone to seismic activity or unstable soils, ground movement transfers force directly into the foundation and framing. Seismic-related cracks tend to appear suddenly, often at a sharp 45-degree angle, and may appear in multiple rooms at once following a specific event. Soil movement from expansive clay, which swells when wet and shrinks when dry, produces a slower version of the same mechanism, generating stair-step cracks over months rather than instantly. Homes on poorly draining lots or with inconsistent gutter maintenance are more prone to this slow-moving soil cycle.
Construction Defects
New construction settles into its final position over its first one to three years as lumber dries out and the frame adjusts under load. Builders who use undersized fasteners, skip proper taping techniques, or rush the finishing schedule create weak points that surface as cracks earlier than they should. If a newer home develops cracks in a consistent pattern across multiple rooms within the first two years, a construction-quality issue is more likely than a slow-developing foundation problem.
How to Identify What's Causing Your Drywall Crack
Location, pattern, and dimension together point toward a probable cause faster than any single observation alone. Cracks over doors and windows usually reflect stress concentration and are often cosmetic; diagonal cracks from a corner usually indicate settlement shear; ceiling cracks in a straight line often trace to joist movement or HVAC stress; and isolated mid-wall cracks that return after patching usually point to joint compound failure rather than structural movement.
Location-Based Indicators
Cracks above door and window frames form where the drywall spans an opening and absorbs stress every time the frame flexes; these are usually shallow and stable. Diagonal cracks starting at a wall corner and running toward the center of the wall typically indicate settlement shear, since the corner is the stiffest point and the crack propagates from there. Ceiling cracks running in a straight line, especially parallel to joists, often point to joist movement, truss uplift, or HVAC ducting that expands and contracts the framing above the ceiling plane. Perimeter cracks running along where walls meet the foundation level are a stronger signal of foundation or soil movement than any other location.
Once you have identified the location, the next step is measuring and monitoring the pattern to confirm what the location is telling you.
Pattern and Dimension Red Flags
How can you tell if a drywall crack is structural? A structural crack is typically wider than 1/4 inch, runs diagonally or in a stair-step pattern, grows measurably over several weeks, and often appears alongside sticking doors or misaligned window frames. Hairline cracks under 1/8 inch that stay a consistent width are almost always cosmetic rather than structural.
Width is the clearest quantitative marker: hairline cracks under 1/8 inch are generally cosmetic, cracks between 1/8 and 1/4 inch warrant monitoring, and anything wider than 1/4 inch deserves a closer assessment. Angle matters too. Vertical cracks tend to track settlement, 45-degree diagonal cracks track shear stress from either settlement or seismic activity, and horizontal cracks, while less common, often connect to joist or truss issues. Pattern completes the picture: a single isolated crack usually means a material-level failure, while a clustered or stair-step pattern spanning multiple courses of drywall or masonry more strongly suggests structural movement.
Growth and Recurrence Behavior
Mark the crack with a strip of painter's tape across its width, date it with a marker, and check it every one to two weeks. A crack that grows past the tape indicates an active cause, whether that is ongoing settlement, continued moisture flux, or unresolved structural stress. A crack that stays exactly the same width after several weeks is more likely cosmetic, with the original cause already resolved or moving too slowly to notice.
Document your observations using this framework; that record becomes useful data if you ever need a professional assessment of the underlying cause.
Why Drywall Cracks Keep Returning After Repair
How do you fix cracks in drywall that keep coming back? Recurring cracks need root-cause treatment, not just a fresh patch. If the underlying settlement, moisture cycle, or joint failure is still active, apply flexible caulk instead of rigid joint compound, replace the failed tape section entirely rather than skimming over it, and address the environmental trigger, such as humidity control, before repainting.
Three distinct mechanisms explain recurrence. First, the original cause may still be active: a foundation that is still settling or humidity that continues to swing will reopen any rigid patch within a season or two. Second, the original cause may have resolved, but the patch was applied over a substrate that was already compromised, meaning the joint compound bonded to weak tape rather than solid drywall, so it fails again on its own timeline regardless of the building's stability. Third, stress may redistribute to a slightly different location as the original weak point strengthens, which can look like recurrence but actually represents the same underlying cause finding a new outlet.
Cosmetic Versus Structural: How to Know When Action Is Urgent
Cosmetic cracks are hairline, stable over several weeks of monitoring, limited to the finish coat rather than the drywall panel itself, and unaccompanied by any door or window misalignment. These can typically wait months without consequence and are addressed on a normal home maintenance schedule.
Structural cracks are wider than 1/4 inch, actively growing, arranged in a stair-step or diagonal pattern, and often paired with sticking doors, gaps around window frames, or visible bowing in the wall itself. These warrant assessment within weeks rather than months, since the underlying movement is ongoing and repairs applied before the cause stabilizes will fail again. It is worth noting that a cosmetic crack can become a structural signal if the underlying cause escalates, so periodic re-checking matters even for cracks you initially classified as minor.
Choosing and Applying the Right Repair Approach
Once you know the cause, the repair itself should match it. Hairline cosmetic cracks respond well to a thin bed of joint compound feathered out several inches beyond the crack, sanded smooth, primed, and painted. Cracks tied to ongoing seasonal movement do better with a flexible acrylic caulk that can absorb minor expansion and contraction without splitting again. Cracks caused by joint tape failure need the compromised section cut out, new fiberglass mesh tape applied, and two to three thin coats of compound built up rather than one thick pass.
Application and Cure Window
Joint compound needs roughly 24 hours to dry between coats under normal humidity, and rushing this window is one of the most common reasons repairs fail early. Sand lightly between coats rather than aggressively, since over-sanding can expose the tape edge and reintroduce a weak point. After the final coat cures and is sanded smooth, prime the full repair area before painting; skipping primer is a frequent cause of visible patches even when the crack itself is fixed correctly.
Spot Repair vs. Full Drywall Replacement
Most cracks, even structural ones once the underlying cause is addressed, can be repaired with a spot patch rather than replacing the entire panel. Full replacement becomes the right call only in specific situations.
- Spot repair is the right call when the crack is isolated, the surrounding drywall is intact, and the underlying cause has stabilized or been addressed
- Spot repair works for recurring joint-tape failures as long as you cut out the full compromised section rather than skimming over it
- Full replacement is the right call when water damage has softened or delaminated a broad section of panel around the crack
- Full replacement makes sense when multiple cracks have created a honeycomb pattern across a single panel, indicating the panel itself has lost structural integrity
- Full replacement is worth considering when a panel has been patched multiple times in the same spot and continues to fail
Special Considerations for Challenging Cracks
Older homes present a specific complication: drywall and plaster installed decades ago can be more brittle than modern material, and manufacturing standards for joint compound have changed enough that older repairs sometimes fail in ways newer installations do not. Homes with a documented history of foundation work need extra caution, since a crack reappearing after professional foundation repair could mean the repair didn't fully address the movement, or it could simply reflect residual settling that is expected for a period after the work.
Water-damaged drywall deserves particular care. A crack near a water stain, a musty smell, or any softness when you press the surface signals moisture intrusion behind the panel, which needs to be resolved before any cosmetic repair, since patching over an active leak wastes materials and hides a bigger problem. Homes with plaster-over-lath construction, common before the 1950s, crack differently than modern drywall and often need a different repair technique entirely, since the lath substrate behaves nothing like a drywall panel.
When a crack sits on an irreplaceable finish, a textured ceiling that would be difficult to match, or a wall with custom millwork nearby, the margin for error on a DIY repair shrinks considerably. A drywall repair professional brings the pattern-matching and texture-blending experience that keeps a patch invisible on finishes that are hard or impossible to replace.
Maintenance and Long-Term Care
Keeping indoor humidity in a stable range, generally between 30 and 50 percent, reduces the seasonal expansion and contraction that drives most cosmetic cracking. A whole-home dehumidifier or humidifier, depending on your climate, does more to prevent recurring hairline cracks than any repair technique.
- Maintain consistent indoor humidity year-round rather than letting it swing with the seasons
- Keep gutters and downspouts clear so water drains away from the foundation instead of saturating soil beneath it
- Grade soil around the foundation to slope away from the house
- Recheck any monitored crack every few months, even after it appears stable, since conditions change
- Repaint touched-up areas with the same sheen as the surrounding wall to keep patches visually seamless over time
Things to Consider Before You Start
Do you know which of the five causes applies to your crack, or are you guessing? A repair applied to the wrong cause will fail again, often faster than the original crack took to appear.
Have you monitored the crack long enough to know if it's growing? Two to four weeks of tracking gives you real data instead of a one-time snapshot.
Are doors or windows near the crack behaving normally? Misalignment nearby is one of the clearest signals that something structural is happening.
Is the crack on a finish you can't easily match, like a textured ceiling or a decorative wall? The stakes of a visible patch are higher there than on a plain flat wall.
If you can answer these confidently and the crack fits the cosmetic profile, a DIY repair is a reasonable weekend project. If any answer points toward ongoing movement or an irreplaceable finish, that is the side of the line where professional judgment earns its keep.
Why Homeowners Bring in Ace Handyman Services
Some cracks are simple enough to patch on a Saturday afternoon. Others carry enough ambiguity, or sit on a finish valuable enough, that homeowners decide the smarter move is to bring in help. Here is what that gets you.
- Peace of mind on textured ceilings, decorative walls, or other finishes that are difficult or impossible to match if a DIY patch goes wrong
- A one-year labor warranty backing the repair, so a recurrence within that window is addressed at no additional labor cost
- No need to source, learn, or return specialized taping tools, texture sprayers, or moisture meters for a single repair
- Background-checked, multi-skilled W-2 craftsmen, not gig-platform contractors, handling the work in your home
- A predictable weekday appointment window instead of losing a weekend to sanding, priming, and repainting
- Honest scope assessment; if your crack is genuinely cosmetic and a simple spot repair, that is what gets recommended and quoted, not an unnecessarily large job
- Cleanup included, so drywall dust and sanding debris don't become a second project after the first one
If your crack pattern still looks ambiguous after working through the diagnostic framework above, or if you would rather have a second set of eyes confirm the cause before committing to a repair, reach out to your local Ace Handyman Services office to get it assessed.
Frequently Asked Questions
What is the difference between drywall tape failure and foundation movement cracks?
Tape failure produces an isolated crack along a single seam, often five to ten years after installation, and returns after a patch because the substrate is still weak. Foundation movement produces diagonal or stair-step cracks radiating from corners, often paired with door or window misalignment, and reflects ongoing shifts in the structure itself rather than a finishing defect.
Why do drywall cracks appear in clusters or patterns rather than randomly?
Cracks cluster where stress concentrates first: corners, openings, and points where framing members meet. Settlement affects these stiff, load-bearing junctions before it affects the middle of an open wall, which is why a stair-step or clustered pattern signals a structural cause more strongly than a single isolated crack.
Can I paint over a drywall crack without repairing it first?
Paint alone will not bridge a crack for long. Even flexible paint products stretch only a small amount before splitting again, and painting over an unrepaired crack hides the surface without addressing the gap, so the crack typically reappears within one humidity cycle.
How long should I monitor a crack before deciding it needs professional attention?
Two to four weeks of monitoring with dated tape across the crack gives a reliable read on whether it is growing. If it grows measurably in that window, or if doors and windows nearby start misaligning during the same period, move to a professional assessment rather than waiting longer.
Do all older homes eventually develop structural drywall cracks?
Not necessarily. Age alone doesn't cause structural cracking; ongoing soil movement, drainage problems, or degrading foundation materials do. Many older homes settle fully within their first few decades and remain stable afterward, developing only cosmetic hairline cracks from normal humidity cycling for the rest of their life.
Is it normal for a new patch to look slightly different in texture from the surrounding wall?
A slight texture difference right after patching is common, especially on textured walls or ceilings, since matching an existing texture by hand takes practice. It typically becomes less noticeable once primer and paint are applied evenly, though heavily textured surfaces may need a professional texture match to disappear completely.