


A quartz countertop that once looked flawless can develop a hazy film, a yellow cast near the window, or a dull ring where a hot pan sat too long. It is unsettling because quartz has a reputation for being nearly indestructible, so any change in appearance feels like proof that something has gone permanently wrong.
How do you fix a faded quartz countertop? Fading and discoloration are not the same problem. Surface deposits like mineral buildup or soap scum usually lift with pH-neutral cleaners and patience. True fading, caused by UV exposure or chemical breakdown of the resin binder, is a structural change to the material and is rarely reversible through cleaning alone.
Some discoloration issues are simple enough to handle with a soft cloth and the right product. Others, especially anything tied to resin degradation or spreading discoloration, are better handled by a professional who can assess whether the surface needs repolishing or replacement. If you get partway through this process and the countertop still is not right, Ace Handyman Services can pick up where the DIY approach leaves off.
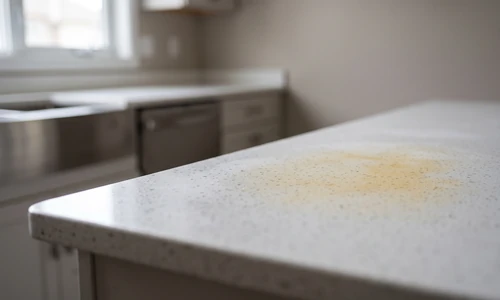
Quick Overview: What Fixing Quartz Discoloration Actually Involves
- Identify the discoloration type by appearance before touching any cleaner
- Rule out simple soap scum or hard water buildup first, since these mimic permanent stains
- Test any treatment on a small hidden area before applying it to the visible surface
- Apply the matched treatment method with correct dilution, contact time, and rinse protocol
- Allow proper drying time between steps if more than one treatment is needed
- Assess whether the discoloration lightened, stayed the same, or is showing signs of resin damage
- Set up zone-specific prevention habits so the issue does not recur
- Call in a fabricator or professional if the damage appears structural rather than cosmetic
Identifying Your Discoloration Type by Appearance
How do you tell what kind of discoloration you're dealing with? Look at the shape, location, and texture of the mark. Uniform lightening near windows points to UV fading. White chalky rings near faucets signal mineral deposits. Brown patches under cookware zones indicate heat damage. Overall dullness suggests chemical exposure or soap scum.
Mineral and Hard Water Deposits
These show up as a white or cloudy film around faucets, sink edges, and anywhere water regularly splashes and evaporates. Calcium and magnesium in tap water bond to the surface as the water dries, leaving a chalky residue. This is one of the most common complaints tied to quartz surface damage, and it is almost always reversible.
Heat Damage and Burn Marks
Heat damage looks like brown rings, darkened patches, or a faint scorch mark directly below where a hot pan, air fryer, or slow cooker sat. Quartz can withstand brief heat exposure, but sustained contact with high temperatures permanently alters the resin binder that holds the stone particles together. Once that resin has changed structurally, wiping it will not restore the original color.
Chemical Fading and Resin Damage
Strong chemicals, bleach, oven cleaners, and high or low-pH products can weaken the resin binder over repeated exposure. The result is an overall dullness, a fading of color depth, or a yellowed tint that spreads gradually rather than appearing overnight. This is a progressive form of quartz surface damage, meaning today's discoloration reflects cumulative exposure, not a single incident.
UV-Induced Yellowing and Fading
South- or west-facing countertops near large windows can develop a uniform yellowed quartz appearance over months or years. UV light breaks down the resin at a molecular level. This is structural, not a surface deposit, which is why cleaning products do nothing to reverse it.
Etching from Acidic Contact
Lemon juice, vinegar, tomato sauce, and wine can leave a localized dull or matte spot where the glossy finish once was. This is not staining in the traditional sense; it is a loss of surface polish caused by acid reacting with the surface. It often gets mistaken for discoloration when it is really a finish issue.
Soap Scum and Residue Buildup
A hazy film across the whole surface or concentrated in wet-use areas is often just accumulated soap, oils, and food residue rather than any form of damage. This is worth ruling out early since it resolves with basic quartz countertop maintenance and does not require aggressive treatment.
Assess Severity: Is This a DIY Fix or Professional Refinishing?
Reversible issues, mineral deposits, soap scum, and light surface film, respond to standard cleaning. Permanent damage, including heat scars, advanced UV yellowing, and deep etching, usually requires a fabricator's assessment. Watch for warning signs that point toward resin degradation rather than a simple deposit:
- Discoloration that spreads or intensifies despite repeated cleaning attempts
- A texture change where the surface feels rougher or less smooth than surrounding areas
- Loss of gloss across a wide area rather than a single spot
- Discoloration that appeared suddenly after a specific chemical exposure or heat event
Some damage that looks minor on the surface can indicate deeper resin failure underneath. If you are unsure which category your countertop falls into, a professional inspection through kitchen countertop installation and repair services can settle the question before you spend time on the wrong treatment.
Step-by-Step Repair Methods by Discoloration Type
Step 1: Removing Mineral Deposits and Hard Water Stains
What does vinegar do to quartz? Diluted white vinegar (one part vinegar to three parts water) can dissolve mineral deposits when left on the surface for two to three minutes, but it must be rinsed thoroughly with pH-neutral soap and water immediately after. Leaving vinegar on quartz longer than five minutes risks etching the resin.
Apply the diluted solution with a soft microfiber cloth, let it sit briefly, then wipe clean and rinse. Test on a hidden area first, such as the underside of an overhang, before working on the visible surface. Repeat only if needed; repeated daily vinegar use accelerates wear rather than preventing it.
Step 2: Treating Oil-Based Stains and Ink Discoloration
For wine, oil, or marker discoloration, apply 70% isopropyl alcohol to a soft cloth and gently work it into the affected area. Alcohol breaks down dye-based residue without introducing the pH extremes that can weaken the resin binder. Work in a ventilated space and wear gloves. Let the surface air-dry for 10 to 15 minutes, then check whether the gloss has returned to match the surrounding countertop.
Step 3: Removing Soap Scum and Surface Film
Mix baking soda with a small amount of water into a paste, apply it to the hazy area, and let it sit for 15 minutes before wiping with a soft cloth. Baking soda is mildly abrasive but safe for quartz when used gently; avoid scrubbing hard enough to create microabrasions in the finish. This method typically resolves buildup that has been mistaken for a permanent stain.
Step 4: Addressing Heat Damage and Burn Marks
DIY remedies will not remove true heat scars because the resin has already changed structurally. If the discoloration is light surface darkening rather than deep browning, a professional may be able to improve its appearance through careful polishing. Deeper, darker burn marks are typically permanent and are a case where professional assessment saves you from wasted effort.
Step 5: Chemical Restoration for Faded or Dull Areas
Damage from bleach, degreasers, or oven cleaners cannot be fully reversed at home, but a professional can sometimes restore lost gloss through polishing if the dullness is limited to the surface sheen. If the color itself has faded rather than just the shine, that change is generally permanent. A fabricator can tell you which situation you are dealing with.
Product Safety Guide: Which Common Cleaners Are Safe for Quartz
Windex contains ammonia, which can gradually dull quartz resin with repeated use. Diluted white vinegar is a safer alternative for mineral deposits, but it must be rinsed thoroughly within five minutes to avoid etching risk. Bleach and abrasive powders should be avoided entirely since they degrade the resin binder over time.
- pH-neutral dish soap and warm water: safe for daily use, no restrictions
- Diluted white vinegar: use with caution, rinse within five minutes
- 70% isopropyl alcohol: safe for oil and ink stains when ventilated
- Baking soda paste: safe when applied gently, avoid hard scrubbing
- Glass cleaners with ammonia: use with caution, avoid repeated daily use
- Bleach and oven cleaners: avoid entirely
- Bar Keepers Friend and abrasive powders: avoid on polished quartz finishes
Warranty note: most manufacturers cover discoloration from normal use but exclude damage caused by unapproved cleaners or DIY refinishing attempts, so check your warranty documentation before trying anything beyond basic soap and water.
Complete Treatment Sequence: Timing and Drying Protocols
When a countertop has more than one type of discoloration, order matters. Treat soap scum and surface film first since it is the mildest treatment, then move to mineral deposits, then address stains with alcohol last. Allow the surface to air-dry fully between each step; a countertop should feel completely dry to the touch, typically 20 to 30 minutes, before you apply the next treatment.
Choosing and Applying the Right Treatment
Application and Aftercare
Always apply treatments with a soft microfiber cloth rather than an abrasive pad, and rinse with plain water after any chemical application to neutralize residue. Once the surface is dry, run your hand across it. A properly treated area should feel smooth and match the sheen of the surrounding countertop. If it still feels slightly tacky or uneven, give it more air-dry time before judging the result.
Prevention by Kitchen Zone
Different areas of a quartz countertop face different risks, so prevention should not be one-size-fits-all.
- Sink zones: dry the area after each use to prevent mineral deposits from forming, and use a squeegee if your water is especially hard
- Cooktop zones: always use a trivet or heat pad, since even brief direct contact with hot cookware can start the resin degradation process
- Window-adjacent zones: consider UV-filtering window film if the countertop sits in direct afternoon sun for several hours daily
- General use areas: wipe up acidic spills like citrus, wine, and tomato sauce immediately rather than letting them sit
Full Cleaning vs. Spot Treatment
Not every discoloration issue requires treating the entire countertop. A full pH-neutral cleaning pass makes sense for a whole-surface haze from soap scum, while spot treatment is the right call for a single mineral ring or one heat mark.
- Choose spot treatment when the issue is confined to one clear area and the surrounding surface still looks normal
- Choose a full cleaning pass when haze or dullness appears across most of the countertop
- Choose professional assessment when spot treatment does not improve the area after two attempts
Special Considerations for Older or Heavily Used Countertops
Quartz installed more than five years ago may have accumulated layers of chemical exposure that make discoloration harder to diagnose, since multiple causes can overlap in the same spot. Older resin can also be more sensitive to aggressive cleaning than newer formulations. If your countertop is original to a home you recently purchased and you do not know its cleaning history, treat it conservatively and start with the mildest method before escalating.
Maintenance and Long-Term Care
What is the best way to maintain a quartz countertop long term? Clean spills immediately, stick to pH-neutral soap for daily use, and use trivets and cutting boards consistently. Avoid letting any cleaner sit longer than its recommended contact time, and rinse thoroughly after every treatment to prevent gradual resin wear.
- Wipe down the countertop daily with warm water and mild soap
- Dry sink-adjacent areas after each use to prevent mineral buildup
- Reapply UV protection measures seasonally if the countertop sits near a sunny window
- Keep a dedicated soft cloth for quartz to avoid cross-contamination with abrasive kitchen sponges
Things to Consider Before You Start
- Do you know what caused the discoloration? If you cannot identify the cause, testing treatments blindly risks making the damage worse.
- Is the countertop still under manufacturer warranty? Using unapproved products could void coverage you would otherwise have for professional repair.
- Has the discoloration changed shape or size recently? Spreading marks suggest something more serious than a surface deposit.
- Are you comfortable testing on a hidden area first? Skipping this step is the most common reason DIY treatments backfire.
If your answers point toward uncertainty on any of these, you are on the side of the line where a professional opinion saves time and protects the surface.
Why Homeowners Bring in Ace Handyman Services
A quartz countertop is not a surface most homeowners want to experiment on repeatedly, and there are good reasons DIYers eventually bring in a professional for this kind of repair.
- Peace of mind on a surface that is expensive to replace if a treatment goes wrong
- A one-year labor warranty on completed work
- No need to source, test, or return specialty cleaning products and polishing equipment
- Background-checked, multi-skilled W-2 craftsmen, not gig-based contractors
- A predictable weekday appointment window instead of losing a weekend to trial and error
- Honest guidance on whether your countertop needs full professional restoration or just a targeted spot treatment
- Cleanup included once the work is finished
If your countertop discoloration is not responding to cleaning or you suspect resin damage, reach out to your local Ace Handyman Services office to get an assessment before the problem spreads further. The same crews handle broader kitchen repair and refresh work when the countertop turns out to be one piece of a larger project.
Frequently Asked Questions
Can quartz be permanently stained?
Quartz itself is non-porous and resists penetrating stains, but the resin binder that holds it together can discolor permanently from heat, prolonged chemical exposure, or UV light. So while true staining is rare, permanent discoloration through resin damage is possible.
What does Windex do to quartz countertops?
Windex contains ammonia, which can gradually dull the resin finish with repeated use over time. Occasional use is unlikely to cause visible damage, but making it your daily cleaner increases the risk of a hazy, dulled appearance developing over months.
How long should I let a treatment sit before rinsing?
Most treatments, including diluted vinegar and baking soda paste, should sit for two to fifteen minutes depending on the product. Never exceed the recommended contact time, since prolonged exposure to acidic or abrasive products increases the risk of etching.
Will discoloration from sunlight ever go away on its own?
No. UV-induced yellowing is a structural change to the resin binder and does not reverse over time or with cleaning. The only way to address it cosmetically is through professional polishing or, in severe cases, section replacement.
How much does professional quartz countertop repair typically cost?
Spot repairs and polishing for isolated damage generally run in the low hundreds of dollars, while more extensive resurfacing or section replacement costs more depending on square footage and material match. Getting an assessment first helps you understand which category your countertop falls into.
Is it safe to use bleach on quartz to remove discoloration?
No. Bleach is one of the more damaging products for quartz surfaces because it breaks down the resin binder with repeated exposure, often making discoloration worse over time rather than better. Stick to pH-neutral cleaners for routine maintenance.