


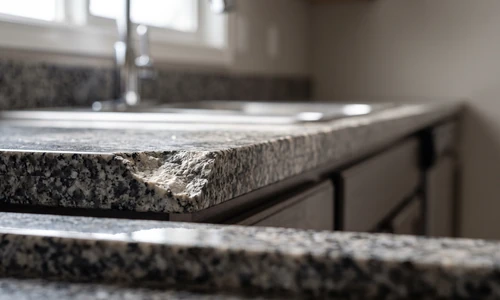
A crack across your granite countertop feels like a disaster the moment you see it, especially when that slab cost thousands of dollars to install. The good news is that most granite damage, from small chips near the sink to hairline cracks along a seam, falls well within the range of a confident DIY repair. This guide walks through how to diagnose what you are dealing with, what materials actually work, and the exact process for a repair that disappears into the stone instead of standing out.
Can a granite countertop be repaired? Yes. Small to moderate chips, cracks, and surface etching can be repaired with epoxy or resin kits designed for natural stone, and most homeowners get solid results on their first attempt. Damage that runs through the full thickness of the slab or affects structural support around a sink or cooktop cutout is the exception, and that calls for a closer look before you commit to a DIY fix.
Granite is forgiving to repair but unforgiving to guess on, so plenty of homeowners work through the early diagnostic steps themselves and then decide the color matching or the curing schedule is not worth the risk on a slab they cannot easily replace. Ace Handyman Services is worth keeping in your back pocket at any stage of this project, whether you want a second opinion on a crack before you touch it or you would rather hand the whole repair to someone who does this daily.
Quick Overview: What Granite Countertop Repair Actually Involves
- Identify the damage type: chip, crack, fissure, or etching, since each one calls for a different fix.
- Clean and dry the surface completely; skipping this step is the number one cause of failed epoxy bonds.
- Select a repair material matched to the damage: epoxy for chips and cracks, polishing compound for light etching.
- Mix hardener and resin, add color tint if you are matching the stone, and apply within the working window.
- Let the repair cure fully, typically 24 to 72 hours depending on the product and room temperature.
- Sand the cured epoxy flush with the surrounding stone, then polish to restore the sheen.
- Inspect the result under natural light and touch up color if needed before returning the surface to daily use.
Assessing Granite Damage Before You Begin
Not every mark on a granite countertop needs repair, and not every repair needs a professional. Start by figuring out exactly what you are looking at, because the label you put on the damage determines the entire path forward.
Chips, Cracks, Fissures, and Etching
How do I fix a chip on my granite counter? Assess the chip size, clean the area thoroughly, apply a color-matched epoxy into the void, let it cure fully, then sand the repair flush and polish to match the surrounding sheen. If you saved the original piece, epoxy can often reattach it instead of filling the gap from scratch.
Cracks are different from fissures, and mixing them up leads to unnecessary work or, worse, a repair that does not hold. A fissure is a natural, non-structural line that runs with the mineral grain of the stone; granite forms this way and fissures rarely need any repair at all. A crack is a break in the stone caused by impact, uneven support, or stress, and it will usually run deeper, feel rough to the touch, and sometimes shift slightly when pressed.
Etching shows up as a dull, cloudy patch, usually from an acidic spill like citrus juice or vinegar that reacted with the stone's surface. Light etching responds well to a granite polishing compound applied with a soft cloth in small circles. Heavier etching that has actually eaten into the surface texture may need a light epoxy fill followed by polishing, and etching that covers a wide area of the countertop is usually a sign that full refinishing, not a spot repair, is the better call.
Pre-Work Checks and Measurements
Before buying anything, measure the damage. A chip under a half inch across and a crack under 1/16 inch wide and 12 inches long are both squarely in DIY territory for most homeowners. Beyond those thresholds, check whether the damage sits near a sink cutout, a seam, or a support point, since structural stress in those zones changes the calculus. Photograph the damage in natural light from a few angles; you will use these photos later to test tint colors against the actual stone.
Essential Equipment and Materials for Granite Countertop Repair
Granite repair does not require a big equipment investment, but the material you choose matters more than most DIY guides admit.
Choosing the Right Repair Material
Epoxy resin is the standard choice for chips and cracks. It is durable, widely available in food-safe formulations, and bonds well to stone once the surface is properly prepped. UV-stable resin costs a bit more but resists yellowing over time, which matters on countertops near windows that get direct sunlight. Acrylic adhesive is better suited to re-gluing an original chip that broke off cleanly, since it sets faster and holds fine detail along a matched break line. For light surface etching, a marble and granite polishing powder used with a buffing pad restores shine without adding any filler material at all.
Other Materials You Will Need
- pH-neutral stone cleaner and lint-free cloths
- Isopropyl alcohol for a final degreasing pass
- Painter's tape to mask the repair area
- Fine-grit sandpaper (400 to 2000 grit progression) and a sanding block
- Color tint drops or powder pigment matched to the granite
- Small mixing cups, stir sticks, and a plastic putty knife
- Polishing compound and a soft buffing pad
- Disposable gloves and a well-ventilated workspace
If gathering the right combination of adhesives and tint feels like the part where this project could go sideways, a countertop installation and repair specialist already has the material knowledge built in and will not be guessing at the color match on the first try.
Preparing Your Granite Surface Before Repair
Preparation is where most DIY granite repairs succeed or fail, and it is also the step every generic guide glosses over. Clean the damaged area and a wide margin around it with a pH-neutral stone cleaner, then wipe dry with a lint-free cloth. Follow with a pass of isopropyl alcohol to strip any remaining oils, waxes, or sealant residue that would block epoxy adhesion.
Step-by-Step Granite Countertop Repair Process
Once the surface is clean, dry, masked, and free of debris, the repair itself follows six steps: mix the resin and hardener at the specified ratio, add tint to match the stone, apply the mixture into the damage with a putty knife, let it cure fully per the product's timeline, sand the cured area flush with the surrounding granite, and finish with a polish pass to restore the sheen.
Step 1: Mix the Resin and Hardener
Follow the manufacturer's ratio precisely. Most granite epoxy kits call for a specific resin-to-hardener ratio by volume or weight, and getting this wrong is one of the most common reasons a repair stays soft or tacky long after it should have cured. Mix in a disposable cup, stirring slowly to avoid introducing air bubbles that will show up as tiny craters once cured.
Step 2: Add Tint for Color Matching
Test on scrap material first. Add pigment in small increments, mixing thoroughly and checking the color against your damage photos in natural light before committing. Granite often has multiple undertones running through it, so a single flat tint rarely matches perfectly; blending two tint colors can get you much closer to the stone's actual pattern.
Step 3: Apply the Epoxy
Overfill slightly, then level. Press the tinted epoxy into the chip or crack with a plastic putty knife, working it fully into the void to avoid trapped air. Slightly overfill the repair, since epoxy shrinks a small amount as it cures, and a flush-to-surface application at this stage often ends up slightly recessed later.
Step 4: Cure Fully Before Touching
How long does granite epoxy repair take to cure? Most epoxy repair kits reach a workable set within 4 to 6 hours but need a full 24 to 72 hours to reach maximum hardness, depending on room temperature and humidity. Warmer conditions speed curing; anything below 65 degrees Fahrenheit can significantly extend the timeline, so check the product label for temperature guidance.
Step 5: Sand Flush
Work through the grits in order. Once fully cured, sand the raised epoxy down using a progression from coarser to finer grit, checking frequently with your palm to feel for a smooth transition between repair and stone. Rushing this step with only coarse grit leaves visible scratch marks that catch light differently than the surrounding polished granite.
Step 6: Polish to Match the Sheen
Buff in small circular passes. Apply a granite polishing compound with a soft pad, working in overlapping circles until the repaired area reflects light the same way as the rest of the countertop. This final step is what makes a repair genuinely disappear rather than just holding structurally.
Color Matching and Curing for Invisible Repairs
Getting the Tint Right
Granite's natural variation makes color matching genuinely difficult, which is exactly why so many DIY repairs end up visible even when the structural work is solid. Test tint combinations on a scrap piece of the same granite if you have an offcut from installation, and always evaluate the color under the same lighting the countertop actually sits in, since fluorescent kitchen lighting and natural window light read stone tones very differently.
Respecting the Cure Window
Do not place hot pans, cutting boards, or heavy items on a fresh repair until the full cure window listed on the product has passed, even if the surface feels hard to the touch after a few hours. Surface hardness and full cure strength are not the same thing, and loading the repair too early is a common reason chips reopen within the first month.
Spot Repair vs. Full Countertop Replacement
Not every damaged granite countertop needs to be repaired at all; sometimes replacement is the more sensible call, particularly on older slabs with multiple stress points or extensive etching across large areas.
Spot repair is the right call when:
- The damage is limited to one or two isolated chips or a single crack under the DIY size threshold
- The rest of the slab is in good condition with no other visible stress lines
- You are comfortable with a repair that may be very slightly visible on close inspection
Full replacement makes more sense when:
- Multiple cracks have appeared in different areas, suggesting a support or installation issue underneath
- Etching or staining covers a significant portion of the visible surface
- The slab is old enough that matching sealant, sheen, and color to newer repair products has become difficult
When to Call a Professional Instead
What size damage crosses the line from DIY to professional territory? Cracks wider than 1/16 inch or longer than 12 inches, damage near a sink cutout or support seam, and any crack that shifts when you press on it should get a professional assessment before you attempt a repair, since these often signal structural concerns beyond a surface fix.
Multiple repairs needed within a short timeframe is also a signal worth paying attention to. If you find yourself patching a third chip in six months, something underneath the countertop, whether it is uneven cabinet support or a shifting subfloor, likely needs attention before another cosmetic fix is worth doing. A professional visit at that point saves you from repeating the same repair indefinitely.
Food Safety and Long-Term Care of Repaired Granite
Is a repaired granite countertop still safe for food preparation? Yes, once an epoxy repair has fully cured and been sanded and polished smooth, it is as safe for food contact as the surrounding granite, provided you used a product with FDA or NSF food-contact certification. Check the product packaging for these certifications before you buy, since not every epoxy marketed for stone repair carries them.
Long-term care after a repair follows the same rules as caring for granite in general:
- Avoid placing hot pans directly on a repaired area for at least the first month after curing
- Continue your normal granite sealing schedule; repairs do not change how often the stone needs resealing
- Clean with pH-neutral products and avoid acidic cleaners that can etch both the stone and the repair
- Wipe up spills promptly, especially citrus, wine, and vinegar-based liquids
- Check the repair periodically for any lifting at the edges, which can signal a bonding issue worth revisiting
Common DIY Repair Mistakes and How to Avoid Them
- Skipping the alcohol wipe-down after cleaning, which leaves residue that blocks proper epoxy adhesion
- Mixing hardener and resin at the wrong ratio, resulting in a repair that never fully hardens
- Overloading the tint, which produces a repair color darker or muddier than the surrounding stone
- Sanding with only one grit instead of progressing through finer grits, leaving visible scratch patterns
- Putting the countertop back into full use before the manufacturer's stated cure time has passed
- Choosing a non-UV-stable product on a countertop that gets direct sunlight, leading to yellowing months later
Things to Consider Before You Start
- Do you have a scrap piece for color testing? Without one, you are matching tint against photos alone, which raises the odds of a visible mismatch.
- Can your kitchen tolerate a multi-day downtime? Full cure windows run up to 72 hours, and disturbing the repair early risks failure.
- Is the damage isolated, or part of a pattern? Repeated cracking in different spots points to an underlying support issue a spot repair will not solve.
- Are you working near a sink, cooktop, or seam? Damage in these zones carries more structural risk and less margin for error.
If your answers land on the side of confidence and a manageable timeline, this project is well within DIY reach. If they land on hesitation, particularly around an irreplaceable slab, that is the line where bringing in a professional stops being overkill and starts being the smarter move.
Why Homeowners Bring in Ace Handyman Services
A granite countertop is not a surface most homeowners want to experiment on twice. Ace Handyman Services gives you a professional option at any point in this process, whether that means a pre-repair consult or a full hand-off of the work.
- Peace of mind on a countertop that cannot simply be swapped out if a repair goes wrong
- A one-year labor warranty backing the work, not just the materials
- No need to source, test, or return specialty epoxy, tint, and polishing products yourself
- Background-checked, multi-skilled W-2 craftsmen, not a rotating cast of gig contractors
- A predictable weekday appointment window instead of losing a weekend to trial and error
- Honest scoping that will tell you when a simple polish or spot fill is enough, without upselling a bigger job
- Cleanup handled as part of the visit, including disposal of sanding dust and masking materials
Explore what a granite repair visit looks like through Ace Handyman Services, and reach out to your local Ace Handyman Services office when you are ready to move forward.
Frequently Asked Questions
What should you not use on granite countertops?
Avoid acidic cleaners like vinegar or citrus-based products, non-epoxy adhesives not designed for stone bonding, and sealants that are not UV-stable, since these can cause discoloration, weaken repairs, or lead to visible yellowing over time on both the stone and any prior repairs.
Can you glue a piece of granite back together?
Yes, if you saved the original broken piece, an epoxy or acrylic adhesive designed for stone can bond it back into place. The bond is generally strong and can be nearly invisible when the piece fits cleanly, though very thin or fragmented pieces are harder to replicate perfectly.
How much does a granite repair kit typically cost?
Most consumer-grade granite repair kits with epoxy, tint, and basic tools run in the range of a modest hardware store purchase, with more advanced kits featuring UV-stable resin and professional-grade tint sets costing more. Compare that against professional labor when weighing whether to DIY.
Will a granite repair be completely invisible?
A well-executed repair with proper tint matching and finish sanding can be nearly invisible under normal lighting, though close inspection under raking light sometimes reveals a slight difference in texture or sheen. Complex granite patterns with lots of color variation are harder to match than more uniform stone.
Can I repair a granite countertop myself if I have no prior experience?
Yes, small chips and hairline cracks are approachable for a first-time DIYer as long as you follow the preparation steps closely and respect the cure time. Larger cracks, structural concerns, or repairs near sink cutouts benefit from professional assessment first.
How often will I need to repeat a granite countertop repair?
A properly cured, food-safe epoxy repair on granite typically holds indefinitely under normal kitchen use. If a repair fails within the first year, it usually points to inadequate surface prep or an incorrect mixing ratio rather than a flaw in the repair method itself.