


Masonite siding held on through decades of exposure before earning a reputation for swelling, delaminating, and cracking at exactly the wrong moments. If you have found soft spots, popped nails, or a section that looks like it absorbed a season's worth of rain, you are staring at a common problem with a genuinely manageable fix in most cases. This guide covers the diagnostic side, the repair materials that work, the step-by-step patching and crack-sealing process, and the point where board replacement becomes the smarter move.
Can Masonite siding be repaired? Yes, within limits. Surface gouges, small holes, hairline cracks, and cosmetic paint failure respond well to epoxy filler and proper priming. Deep rot, structural softness, or damage spanning more than a few inches usually calls for board replacement instead of a patch.
Some homeowners handle every step of this themselves. Others get partway into a wall of siding, realize the moisture damage runs deeper than expected, and decide to bring in a second set of hands. Ace Handyman Services works with people at any stage of that process, whether you need a second opinion on scope or someone to finish the job with a warranty attached.
Quick Overview: What Masonite Siding Repair Actually Involves
- Inspect the siding for moisture stains, soft spots, cracking, and paint failure to identify damage type and severity
- Decide whether the damage is cosmetic (patchable) or structural (replacement territory)
- Gather tools: putty knife, orbital sander, moisture meter, epoxy filler, primer, exterior paint
- Clean and dry the damaged area completely before any filler goes on
- Mix and apply epoxy filler to holes and gouges, let it cure, then sand smooth
- Seal cracks and split edges to block future water infiltration
- Prime the repaired area with an appropriate exterior primer
- Paint to match, using two coats for full protection
- For boards beyond repair, remove and replace the individual section
- Set up a maintenance routine so small issues do not turn into board-replacement issues
Assessing Your Masonite Siding Damage: When Repair Is Viable
Masonite, also called hardboard siding, is a compressed wood-fiber product that was popular from the 1970s through the 1990s. It is no longer manufactured by its original maker, which means every repair decision carries a little more weight since matching boards can be difficult to source. The good news is that most damage you will encounter falls into a category that patches well.
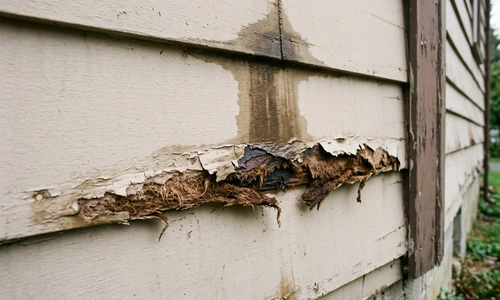
Look for water stains, dark discoloration, or streaking near the bottom edges of boards and around butt joints. Peeling paint that reveals swollen or spongy wood fiber underneath is a strong signal of moisture intrusion. Press on suspicious areas with a putty knife handle; if the board gives way or feels soft rather than solid, moisture has already worked into the fiber structure.
Identifying Moisture-Related Damage
Hardboard siding absorbs water readily once its factory seal is compromised, whether from age, hail impact, or a missed caulk line. Inspect visually for staining and swelling, then follow up with a tactile check by pressing along suspect boards. A moisture meter reading above 15 percent in the wood fiber indicates active moisture retention that will undermine any patch you apply until the source is addressed.
Structural vs. Cosmetic Damage: Repair Scope Decision
Cosmetic damage includes paint failure, small surface gouges, hairline cracks, and minor impact dings that have not penetrated past the surface layer. These respond well to filler and refinishing. Structural damage includes rot that has spread through more than a few square inches, boards that flex or bow when pressed, warping along the length of a board, or damage near the bottom edge where water pools longest.
Should Masonite siding be replaced? Replacement makes sense when rot has spread through the board's structure, when a section has absorbed water repeatedly over multiple seasons, or when the board has visibly warped or delaminated. Isolated surface damage on an otherwise sound board is worth repairing rather than replacing.
Essential Equipment and Materials for Masonite Siding Repair
Epoxy Filler vs. Bondo: Which Product for Masonite?
Two-part epoxy wood fillers outperform automotive body filler (commonly known by the brand name Bondo) for exterior hardboard repair. Epoxy offers a longer working time, better moisture resistance once cured, and stronger adhesion to the porous wood-fiber surface of Masonite. Bondo sets fast, which sounds convenient, but it shrinks slightly as it cures and can be harder to sand into a smooth, feathered edge on a curved or textured siding profile.
Progression of Materials by Damage Size
Small holes and surface gouges under an inch call for a straightforward epoxy filler application. Larger gouges or areas with some depth benefit from a two-step fill: an initial rough fill to build up the missing material, then a finish coat for smoothing. Cracks and split seams need a flexible exterior caulk rated for masonry or siding use, applied before any filler goes over the top, since rigid filler alone will not move with the board's natural expansion and contraction.
Other Materials You Will Need
- Putty knife (flexible blade, 2 to 3 inches wide)
- Orbital sander with 100 and 150 grit sandpaper
- Moisture meter
- Two-part epoxy wood filler
- Exterior-grade elastomeric caulk
- Oil-based or high-adhesion exterior primer
- Exterior acrylic latex paint matched to existing siding
- Wire brush or scraper for loose material removal
- Safety glasses and a dust mask for sanding
- Painter's tape for clean edge lines
If gathering the right filler, matching the primer to the substrate, and sourcing a replacement board that actually fits your siding profile feels like the part where things could go sideways, a siding repair specialist can scope the materials correctly the first time.
Step-by-Step Masonite Siding Repair Process
Step 1: Clean and Dry the Damaged Area
A dry substrate is non-negotiable for any patch to hold. Brush away loose paint chips, dirt, and any crumbling fiber with a wire brush or scraper. If the area has been wet, give it several dry, sunny days before proceeding, and confirm with a moisture meter that readings have dropped below 15 percent. Applying filler over damp wood fiber traps moisture underneath the patch, guaranteeing failure within a season or two.
Step 2: Remove Loose or Compromised Material
Use the putty knife or a small chisel to remove any soft, crumbling, or delaminated fiber down to solid material. Do not try to fill over spongy wood; the patch needs a firm base to bond to. This step often reveals that damage extends further than the visible surface suggested, which is useful information for the repair-versus-replace decision.
Step 3: Mix and Apply Epoxy Filler
How can I repair a hole in my Masonite siding? Clean the area thoroughly, mix a two-part epoxy filler per the manufacturer's ratio, and press it into the hole with a putty knife, slightly overfilling to allow for sanding. Let it cure fully per product instructions, typically 30 minutes to a few hours, then sand flush with the surrounding surface.
Mix only what you can use within the product's working time, usually 5 to 15 minutes depending on brand and temperature. Press the filler firmly into the void, working it into the edges so there are no air pockets. Build up slightly proud of the surface since sanding will bring it down flush. Let it cure completely before sanding; rushing this step tears the filler rather than smoothing it.
Step 4: Sand to a Smooth, Flush Finish
Start with 100 grit to knock down the bulk of the excess material, then move to 150 grit for a smooth finish that blends with the surrounding texture. Wipe away dust with a tack cloth before moving to primer. Wear a dust mask; sanded epoxy and old paint dust are not something you want to breathe repeatedly.
Step 5: Seal Cracks and Split Edges
Cracks form as hardboard expands and contracts with temperature and humidity swings, and they are a direct path for water intrusion if left alone. Clean out any debris from the crack, then run a bead of elastomeric exterior caulk along the full length, tooling it smooth with a wet finger or caulk tool. For wider splits, back-fill with epoxy filler first, then caulk over the top for a flexible, weatherproof seal. Rigid filler alone in a crack will eventually crack again as the board moves.
Choosing and Applying Primer and Paint
Application and Cure Window
Primer bridges the gap between the repaired surface and your topcoat, and it matters more on hardboard than on many other siding materials because the substrate is porous and moisture-sensitive. Choose an oil-based or high-adhesion latex exterior primer formulated for wood substrates. Apply an even coat over the entire patched area plus a couple of inches of surrounding original material to blend the sheen. Let it dry fully per label instructions, typically one to four hours, before painting.
Apply two coats of exterior acrylic latex paint matched to your siding's existing color, allowing recommended dry time between coats, usually four hours minimum. Painting in moderate temperatures, avoiding direct hot sun or near-freezing conditions, gives the best adhesion and the longest-lasting finish. A properly primed and painted repair should hold color and seal for several years before touch-up is needed.
Board Replacement vs. Patching
How do you repair siding without replacing it? Patching and epoxy filling address surface gouges, small holes, and hairline cracks without removing any boards, restoring both appearance and weather resistance. This works well for isolated cosmetic damage, but full board replacement remains necessary when rot, warping, or moisture penetration has compromised the board's structural integrity.
- Patching is the right call when: damage is under a few square inches, the board still feels rigid when pressed, there is no active moisture reading, and the damage does not span a joint or butt seam
- Full board replacement is the right call when: the board flexes or feels soft across a wide area, rot has spread along the board's length, moisture meter readings stay elevated after drying time, or the damage sits at a corner or bottom edge where water repeatedly collects
Replacing a board involves removing siding nails from the damaged board and the one above it, sliding the old board free, cutting a replacement to size, and reinstalling with new fasteners and properly lapped seams. Matching the exact profile and reveal of original Masonite can be difficult since it is discontinued; some homeowners substitute an engineered wood or fiber-cement board cut to match, which requires careful trim work to blend visually.
Special Considerations for Challenging Masonite Siding
Homes with original Masonite from the 1980s and 1990s often carry damage that has been developing quietly for years, since hardboard's fiber composition hides swelling until paint failure makes it visible. If your siding predates a known manufacturer recall era, inspect more aggressively at every seam and bottom edge, since these were common failure points across whole product lines.
Contaminated or repeatedly soaked boards near sprinkler lines, gutters that overflow, or grade that slopes toward the foundation will keep failing no matter how well you patch them until the water source is corrected first. Fixing the moisture path is not optional; it is part of the repair. If an entire wall shows the same staining pattern at the same height, that is a systemic issue, not isolated board damage, and it usually points to a flashing or gutter problem worth solving before touching the siding itself.
When damage runs across multiple boards or the original siding profile is no longer available in stores, a wind and storm repair team can help assess whether a broader section replacement makes more sense than patchwork fixes across an aging wall.
Maintenance and Long-Term Care
Inspect Masonite siding twice a year, in spring and fall, checking especially at bottom edges, corners, and butt joints where water tends to collect. Recaulk any gaps around windows, doors, and trim every two to three years, since caulk failure is often the first domino in a moisture damage chain. Keep paint film intact; touch up chips and scratches promptly rather than letting bare wood fiber sit exposed to weather.
- Clean gutters regularly so overflow does not run down siding surfaces
- Trim back vegetation and irrigation spray that keeps siding damp
- Repaint the full elevation every 7 to 10 years to maintain the protective film
- Address any soft spots or staining within the season you notice them, not the following year
Things to Consider Before You Start
- How extensive is the damage really? Pull back paint and probe with a putty knife before assuming a small stain means a small problem.
- Can you source a matching replacement board if needed? Discontinued Masonite profiles are not always easy to find, so know your fallback material before you start cutting.
- Do you have a dry stretch of weather ahead? Filler and paint both need dry conditions and cure time; rushing either step shortens the repair's lifespan.
- Is the moisture source already fixed? Patching over an active leak or drainage problem just delays the same failure.
If those answers point toward a straightforward patch and a free weekend, this is a reasonable DIY project. If the damage keeps spreading, spans multiple boards, or you are not confident diagnosing moisture source versus surface symptom, that is the line where bringing in help makes sense.
DIY Repair or Professional Service: Understanding Your Boundaries
Small patching, sanding, and priming on an otherwise sound board are well within reach for most homeowners with basic tools and patience. Board replacement, moisture source diagnosis across multiple walls, or matching a discontinued siding profile calls for professional judgment, since a mistake there compounds into repeat repairs. If you are unsure whether your damage is cosmetic or structural, a professional assessment can clarify the scope before you invest time and material into a patch that will not hold.
Why Homeowners Bring in Ace Handyman Services
- Peace of mind on siding that has already absorbed years of hidden moisture damage, where a miscalculated repair means paying for the fix twice
- A one-year labor warranty backing the repair work performed
- No need to source, test, or return epoxy fillers, moisture meters, or sanding equipment you will use once
- Background-checked, multi-skilled W-2 craftsmen, not day-labor subcontractors
- A predictable weekday appointment window instead of losing a weekend to trial and error
- Honest scoping that recommends a patch when a patch is the right call, not an upsell to full replacement
- Cleanup included, so sanding dust and old caulk debris do not become your problem afterward
If your Masonite siding damage has you weighing patch versus replacement, or you would rather hand off the sanding and priming altogether, reach out to your local Ace Handyman Services office to talk through the scope.
Frequently Asked Questions
How long does an epoxy filler repair on Masonite siding last?
A properly prepared, primed, and painted epoxy repair typically holds for 7 to 10 years, roughly matching the repaint cycle for the rest of the siding, as long as the underlying moisture source has been addressed.
What does it cost to repair a small section of Masonite siding?
Materials for a small patch, including epoxy filler, primer, and paint, typically run $30 to $75. A single board replacement including materials often falls between $75 and $200 depending on board sourcing and profile matching.
Can I paint over Masonite siding without repairing damage first?
No. Paint over swollen, cracked, or rotted hardboard will fail quickly since the underlying substrate keeps moving and absorbing moisture. Repair the physical damage first, then prime and paint for a lasting finish.
Is Masonite siding still manufactured today?
The original Masonite brand hardboard siding is discontinued, though similar engineered wood and fiber-cement products exist as substitutes for board replacement when exact matches are unavailable.
How do I know if my siding damage is from moisture or just cosmetic wear?
Press on the area with a putty knife handle. Solid resistance with only surface paint failure indicates cosmetic wear. Give, softness, or a moisture meter reading above 15 percent indicates active moisture damage that needs to dry before repair.
Should I caulk or fill a crack in Masonite siding first?
For narrow cracks, caulk alone works since it flexes with board movement. For wider splits, back-fill with epoxy filler first to restore rigidity, then run flexible caulk over the top to seal against water intrusion.