


A chip in the corner of your quartz countertop can feel like a disaster the moment you see it, especially if that counter cost thousands of dollars to install. The good news is that quartz responds well to repair in a way natural stone often does not, and most chips, nicks, and small cracks can be fixed without replacing the whole slab.
Can a quartz countertop be repaired? Yes. Quartz is engineered stone made from crushed stone bound with polyester resin, and that resin matrix allows repair adhesives to bond effectively. Shallow chips, edge nicks, and small cracks respond well to epoxy or acrylic fillers, while deep cracks and seam separations usually need professional attention.
Whether you tackle the repair yourself or decide the damage is more than a weekend fix, Ace Handyman Services is an option at any stage of the process. Some homeowners handle the small chip themselves and call in help only when a seam separates or a crack runs the full depth of the slab.
Quick Overview: What Quartz Repair Actually Involves
Before you buy a repair kit, understand the general arc of the project. Most straightforward chip and nick repairs follow this sequence:
- Assess the damage type and depth to determine if it is DIY-suitable
- Clean the damaged area thoroughly and let it dry completely
- Select a filler color that matches your quartz pattern
- Apply the epoxy or acrylic filler with a fine applicator, slightly overfilling
- Cure the filler per product instructions, typically 24 to 72 hours for full hardness
- Sand the cured repair flush with fine-grit sandpaper and feather the edges
- Inspect under different lighting angles to check color match
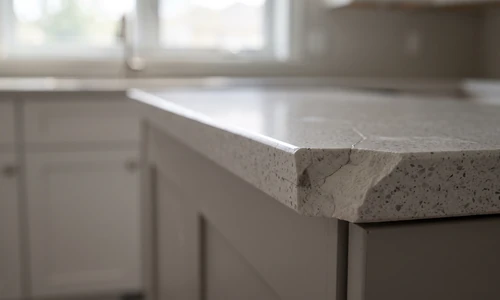
Assessing Quartz Countertop Damage Before You Begin
Not all damage is equal, and figuring out which category yours falls into determines whether a retail kit will work or whether you need a professional.
Shallow Edge Chips and Small Surface Nicks
Edge chips typically measure less than an inch wide and about 1/8 inch deep. They occur most often at counter corners and along the front edge where pots, pans, and heavy items get set down or slide off. These are the best candidates for DIY repair because the damaged surface area is small, the filler has plenty of adhesive contact, and color matching is more forgiving on edges where lighting and viewing angle are less direct than on the flat surface.
Deep Cracks and Through-Damage
A crack that runs through the full depth of the slab is a different problem entirely. These cracks can compromise structural integrity, particularly near sink cutouts or overhangs where the stone already carries stress. Epoxy fill alone will not restore lost strength in these situations. If you can see light through the crack or it extends more than two inches, treat it as a professional assessment case rather than a weekend project.
Seam Separations and Widespread Damage
Seams are the joints where two slabs meet during fabrication, and when they separate, the fix involves structural adhesive application at the joint, not a fill-and-polish approach. Retail repair kits are not designed for seam work. If you notice a gap opening at a seam line or damage spreading across a wide area, that points toward a fabricator or professional repair service rather than a tube of epoxy.
Why Quartz Countertops Can Be Repaired (And Why Natural Stone Cannot Always Be)
Quartz is roughly 90 percent crushed natural stone bound with about 10 percent polyester resin. That resin matrix is what makes repair possible in the first place: adhesives bond chemically to resin in a way they cannot bond to solid, monolithic stone like granite or marble. Natural stone relies on mechanical adhesion at the surface only, which tends to fail faster under stress or moisture.
Essential Equipment and Materials for Quartz Repair
Standard Epoxy-Based Kits vs. Light Cure Acrylic Kits
Epoxy kits use a two-part system that you mix and apply with a toothpick or fine applicator, then let cure at room temperature. They are the most common retail option, work for most chip and nick scenarios, and offer a range of color tints. One tradeoff worth knowing: some epoxies can yellow slightly over years of UV exposure near windows.
Light Cure Acrylic (LCA) is the alternative favored by professionals. It is non-toxic and considered safer for food-contact areas since it does not off-gas the way epoxy can during cure. LCA cures fast under UV light rather than air, which is exactly its limitation for DIY use: you need a UV lamp, not just patience. If your damage sits near a cutting surface and you want a food-safe filler, LCA is worth sourcing, but epoxy remains the more accessible choice for a first attempt.
Consumables and Application Progression
Regardless of which filler type you choose, plan for a fine-grit progression during finishing, generally starting around 120 grit and moving to 150 grit for the feather-edge blend. Have isopropyl alcohol or a manufacturer-recommended cleaner on hand for surface prep, since any residue left in the damaged area will weaken the bond.
Other Materials You Will Need
- Clean lint-free cloths
- Fine-tip applicator or toothpicks for filler placement
- Painter's tape to mask the surrounding area
- Fine-grit sandpaper (120 and 150 grit)
- A soft polishing cloth for final buffing
- Good task lighting to check color match from multiple angles
If sourcing the right filler chemistry for your countertop's color and the surrounding cabinetry, walls, and backsplash feels like the part where things could go sideways, a technician familiar with countertop installation and repair can evaluate the damage and either match the repair or advise on a smarter path forward.
Step-by-Step DIY Repair Process for Small Chips and Nicks
Step 1: Assess Damage Severity and Location
Confirm the damage is within DIY scope before opening any kit. Measure the chip or crack. If it is under an inch wide, shallow, and located away from a seam, it is a reasonable candidate for a retail repair. Anything deeper, longer, or near a seam moves toward the professional assessment path.
Step 2: Clean and Prepare the Surface
Wipe the damaged area with isopropyl alcohol and let it dry fully, usually five to ten minutes. Any dust, grease, or moisture trapped in the chip will weaken adhesion and can cause the filler to release later. Mask off the surrounding area with painter's tape so excess filler does not spread onto undamaged quartz.
Step 3: Select a Matching Color Filler
Most kits include several tint options that you can mix to approximate your countertop's base color and flecking. Test a small amount on a hidden area or a scrap piece first if your kit allows it. Color matching is the single biggest factor in whether a repair reads as invisible or visible, and darker quartz colors tend to show a patch more easily than lighter, more uniform patterns.
Step 4: Apply the Filler
Overfill slightly rather than trying to fill flush on the first pass. Use a toothpick or fine applicator to press filler into the chip, working it into every corner of the damaged area. Filler shrinks slightly as it cures, so a small mound above the surface gives you material to sand down rather than leaving a divot.
Step 5: Cure Per Product Instructions
Standard epoxy needs roughly 24 to 72 hours to reach full hardness, even if it feels dry to the touch much sooner. Sanding too early is one of the most common mistakes, since a soft cure will smear rather than sand cleanly. LCA cures far faster under UV light, often within minutes, but requires the correct lamp.
Step 6: Sand to a Flush Finish
Once fully cured, sand with 120-grit paper to bring the filler down close to flush, then switch to 150-grit to feather the edges into the surrounding surface. Work in light passes and check frequently. Finish with a soft polishing cloth to restore sheen, since sanding can leave the repaired spot duller than the surrounding gloss until buffed.
Choosing and Applying Fillers for Long-Term Results
Cure time is not optional, even when a filler feels hard within an hour. Rushing this step is the most common reason DIY repairs fail early. Give epoxy the full window listed on the packaging, keep the area free of cleaning chemicals during that window, and avoid setting hot items on or near the repair until it has fully hardened. Once cured, treat the repaired area the same as the rest of your countertop, with pH-neutral cleaners and no abrasive scrubbers.
Professional Repair vs. DIY: When to Skip the Kit
A retail kit handles a narrow range of damage well. Professional polishing and repair make sense for seam separations, structural cracks deeper than a quarter inch or longer than two inches, damage in highly visible areas where color matching is critical, or heat and chemical damage rather than impact damage. Professional work can also integrate a repair with a broader refinishing pass across the whole countertop, which tends to produce a more invisible result than a spot fix.
- DIY makes sense when: the chip is small, shallow, and located on an edge or less visible area; you are comfortable with a slight color variation; the damage is isolated with no signs of spreading.
- Professional repair makes sense when: the crack runs the full depth of the slab; a seam has separated; the damage sits in a highly visible spot near the sink or cooktop; multiple repairs in the same area suggest ongoing stress.
Special Considerations for Challenging Repairs
Some situations deserve extra caution regardless of how confident you feel with a kit. Older quartz installations, particularly darker colors or discontinued patterns, can be difficult to color-match since manufacturers periodically adjust resin formulations. Countertops near a sink cutout or under a cooktop carry more structural stress, so a crack in those zones is more likely to reopen even after a careful fill.
When a countertop is expensive, irreplaceable, or original to the home and a miscalculated repair would mean a visible scar for years, it is worth having someone experienced take a look first. A technician working within kitchen repair and refresh services can evaluate whether the damage is truly isolated or symptomatic of something larger before any filler goes on.
Repair Longevity, Maintenance, and When Repairs Fail
What is the lifespan of a quartz countertop repair? Standard DIY chip and nick repairs typically last three to seven years under normal use before touch-up or re-sanding is needed. Color matching can shift subtly over two to three years as filler ages and UV exposure affects tint, with darker fillers showing more noticeable change than lighter ones.
Cracks deeper than a quarter inch are the most likely to reopen, especially if the underlying stress that caused them in the first place (cabinet settling, an unsupported overhang) has not been addressed. Watch for hairline separation reappearing at the repair edge; that is the clearest early sign a fix is failing.
- Use pH-neutral cleaners on and around any repaired area
- Avoid Barkeeper's Friend and other abrasive powders, which micro-etch quartz over time
- Keep hot pans off the surface entirely, even near a repaired spot
- Wipe acidic spills (citrus, vinegar, wine) promptly rather than letting them sit
Preventing Future Quartz Countertop Damage
What ruins quartz countertops? Three factors do most of the damage: heavy impact from dropped objects, direct heat from hot cookware, and chemical etching from harsh cleaners like Barkeeper's Friend, bleach, or straight lemon juice. Each is preventable with basic habits rather than repair after the fact.
- Use cutting boards and trivets instead of setting items directly on the surface
- Keep hot pots and pans away from the counter edge entirely, using pads rather than the stone itself
- Skip abrasive powder cleaners; their soap-scrubber particles create micro-etching that no filler can address
- Wipe acidic or alkaline spills immediately rather than letting them dwell
Things to Consider Before You Start
- Is the damage truly isolated? A single small chip is different from a spreading pattern of nicks along the same edge.
- Does the color match matter to you? If the damaged spot faces guests at eye level, a visible patch may bother you more than one tucked near an appliance.
- Do you have time to respect the cure window? A rushed repair sanded too soon rarely holds as well as one given the full 24 to 72 hours.
- Is this crack structural or cosmetic? If you are not sure, that uncertainty itself is a signal to get a second opinion before applying filler.
Small, shallow, cosmetic damage sits comfortably on the DIY side of the line. Structural cracks, seam separations, and high-visibility repairs where color matching is critical sit on the other side.
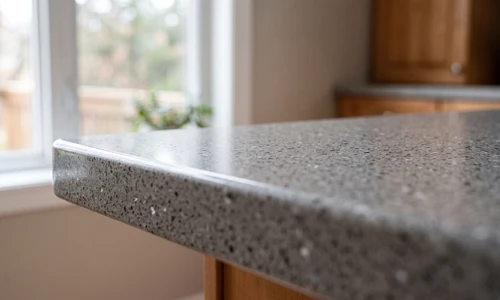
Why Homeowners Bring in Ace Handyman Services
Plenty of quartz chips get fixed successfully with a kit and a little patience. But when the countertop is expensive, irreplaceable, or the damage turns out to be more than it first appeared, homeowners bring in help for good reasons:
- Peace of mind on a surface that is expensive to replace if a DIY attempt goes wrong
- A one-year labor warranty backing the work
- No need to source, learn, or return specialty repair tools and UV curing equipment
- Background-checked, multi-skilled W-2 craftsmen, not gig-hired contractors
- A predictable weekday appointment rather than losing a weekend to trial and error
- Honest scoping: a technician will tell you when a simple fix is genuinely enough
- Cleanup included, so there is no sanding dust or masking tape residue left behind
If your quartz countertop damage has you second-guessing whether a retail kit is the right call, reach out to your local Ace Handyman Services office to talk through the options before you commit to a repair path.
Frequently Asked Questions
Can I repair a quartz countertop myself?
Yes, for shallow chips and small nicks under an inch wide. Deep cracks, seam separations, and damage in highly visible areas are better handled by a professional who can match color and restore structural integrity more reliably.
How much does it cost to repair a chip in a quartz countertop?
A DIY kit eliminates the cost of a service call but takes your time and carries some risk of visible color mismatch. Professional repair adds labor cost but typically delivers a more invisible result and addresses structural concerns a retail kit cannot.
What is the difference between epoxy and Light Cure Acrylic repair kits?
Epoxy cures at room temperature over 24 to 72 hours and is the more accessible DIY option. LCA cures almost instantly under UV light and is considered safer for food-contact surfaces, but it requires a UV lamp that most homeowners do not already own.
Will a repaired quartz countertop look completely invisible?
It depends on damage size, location, and color. Small edge chips on lighter quartz colors blend well. Larger repairs or dark, heavily patterned quartz are harder to match perfectly, and professional polishing generally produces a more seamless result than a retail kit.
Is quartz countertop repair permanent?
Most DIY repairs hold for three to seven years before needing a touch-up, with color matching potentially shifting slightly over time. Deeper structural cracks are more likely to reopen if underlying stress in the cabinetry or substrate is not resolved.
Can I use Barkeeper's Friend on my quartz countertop?
No. Its abrasive powder causes micro-etching on quartz's resin surface over time, and that etching cannot be repaired with a filler kit. Stick to pH-neutral cleaners for daily maintenance, especially around any previously repaired area.