


A leaking gutter joint rarely stays a small problem. Water finds the weak seam, drips down siding, pools near the foundation, and within a season you're looking at rot, mold, or a cracked foundation coating that costed nothing to prevent.
How to seal leaking gutter joints? Yes, most leaking gutter joints can be sealed successfully with the right preparation. Clean the joint thoroughly, dry it completely, apply a moisture-tolerant sealant like silicone in a continuous bead, smooth it into the seam, and allow full cure time before the gutter sees heavy rain again.
Some joints seal cleanly on the first try. Others reveal rust perforation, structural sag, or a seam that has failed three times already, and that's the point where a lot of homeowners either invest in better tools or bring in help. Gutter repair professionals see this exact fork in the road constantly, and Ace Handyman Services works with homeowners at any stage, whether you want a second opinion before you start or a crew to finish what you began.
Quick Overview: What Sealing a Gutter Joint Actually Involves
Sealing a leaking gutter joint is a short project with a long tail. The application itself takes under an hour per joint; the prep and the cure window take longer than most people expect.
- Diagnose the joint: Identify whether the leak is at a corner miter, a seam overlap, or a downspout connection, since each fails differently.
- Decide repair vs. replace: Localized seam failure gets sealed; widespread rust or sagging runs point toward replacement instead.
- Clean and dry the joint: Strip old sealant, rust, and debris, then let the metal or vinyl dry completely.
- Select the material: Choose silicone, butyl tape, or acrylic based on gutter material and moisture exposure.
- Apply the sealant: Lay a continuous bead or tape strip and smooth it into full contact with both surfaces.
- Cure fully before use: Wait the full cure window, not just the touch-dry window, before the next heavy rain.
- Inspect on a schedule: Check the joint quarterly during rainy seasons to catch cracking before it reopens.
Identifying the Type of Joint Leak Before You Begin
Not every leaking joint is the same problem wearing a different face. Corner miters, seam overlaps, and downspout connections each fail for different reasons, and treating them identically is how repairs come loose again within a season.
Differentiating Corner, Seam, and Downspout Failures
Corner joints take the most structural stress because two gutter sections meet at an angle, and thermal expansion pulls at that miter constantly. Seam overlaps, where two straight sections join, tend to fail from age and UV breakdown of the original factory sealant. Downspout connections leak most often from debris buildup forcing water sideways under pressure rather than straight down.
Pre-Work Checks and Conditions to Confirm
Before buying any sealant, confirm three things: the extent of rust or corrosion around the joint, whether the gutter still pitches correctly toward the downspout, and the forecast for the next 48 hours. Sealant applied to a joint with even light rust underneath will fail early, and sealant applied ahead of rain won't cure.
When to Seal vs. When to Replace the Gutter System
Should you seal gutter joints, or is it time to replace the section entirely? Seal when damage is localized to one or two joints and the surrounding gutter run is structurally sound. Replace when rust perforation covers more than roughly 30 percent of a run, when sections sag between hangers, or when multiple seams fail repeatedly despite proper sealing.
A single joint that drips after years of service is a maintenance item. A gutter that sags visibly, holds standing water, or shows rust-through in more than one spot is telling you the metal itself is compromised, and sealant only buys a season or two before the next failure. If you're already looking at a third re-seal on the same joint within two years, that repeated failure is diagnostic information, not bad luck.
If your assessment points to a localized joint, move into the step-by-step process below. If the damage looks widespread or structural, a gutter repair specialist can evaluate whether targeted section replacement makes more sense than repeated sealing.
Essential Equipment and Materials for Gutter Joint Sealing
The tool list is short, but the material choice is the decision that determines whether this repair lasts years or weeks.
Primary Decision: Silicone Sealant vs. Tape-Based Repair
Silicone sealant is the default recommendation for gutter joints because it flexes with thermal movement and resists standing water better than acrylic caulk. Butyl-rubber flashing tape is the alternative when you want a non-invasive fix without disassembling the joint, trading some longevity for speed and a cleaner application. Acrylic caulk exists on shelves but underperforms both for gutter use since it hardens fully and cracks under the seasonal expansion gutters experience.
Consumables and Progression Through the Repair
Plan for a wire brush or rust-removal pad, denatured alcohol or a mild degreaser for final surface prep, painter's tape to mask clean edges, a caulking gun sized for your sealant tube, and a smoothing tool or a gloved finger. Buy slightly more sealant than the math suggests; running out mid-bead on a long seam creates a visible, weaker seam line.
Other Materials You Will Need
- Wire brush or abrasive pad for rust and old sealant removal
- Denatured alcohol or manufacturer-recommended cleaner
- 100 percent silicone gutter sealant (metal-rated variant for steel or aluminum)
- Butyl-rubber flashing tape as a backup or primary option
- Painter's tape for clean bead lines
- Caulking gun and smoothing tool
- Stable ladder rated for the working height, plus a stabilizer if working near the roofline
- Work gloves and eye protection for debris removal
If sourcing and comparing sealant types feels like the part where the project could stall, that's a reasonable place to scope the job with a professional. Ace Handyman Services can assess the joint, recommend the material, and complete the repair in the same visit.
Step-by-Step Gutter Joint Sealing Process
Step 1: Clear and Clean the Joint
Contamination is the leading cause of sealant failure. Remove debris from inside the gutter near the joint, then wire-brush away old sealant residue, rust flakes, and mineral deposits from both surfaces. Skipping this step is behind a large share of repeat failures, since sealant bonds to the contamination layer instead of the metal underneath.
Step 2: Dry the Surface Completely
Sealant applied over damp metal traps moisture underneath and fails within weeks. Wipe the joint dry, then let it air-dry for several hours or use a fan to speed the process. In humid conditions, extend the dry window before moving forward.
Step 3: Wipe Down with Alcohol or Cleaner
A final pass with denatured alcohol removes oils and fine dust the wire brush left behind. Let it evaporate fully; any residual moisture undermines adhesion at the exact spot you're trying to reinforce.
Step 4: Mask the Application Area
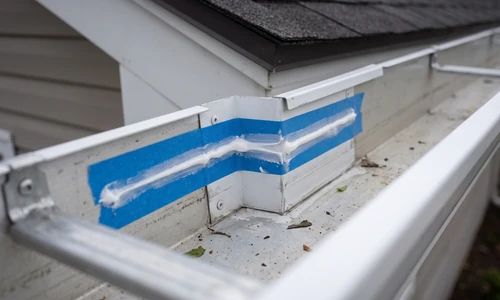
Run painter's tape along both sides of the joint, leaving only the seam exposed. This keeps the bead clean and controlled, which matters both for appearance and for keeping the sealant concentrated where it's structurally needed.
Step 5: Apply the Sealant Bead
Hold the caulking gun at roughly a 45-degree angle to the seam and run a continuous, unbroken bead the full length of the joint. Stopping and restarting mid-bead creates a weak point, so keep steady pressure and move in one pass.
Step 6: Smooth and Tool the Bead
While the sealant is still wet, smooth it into both surfaces with a gloved finger or a dedicated smoothing tool. This forces the material into full contact with the metal rather than sitting on top, which is where much of its moisture resistance comes from.
Step 7: Remove Tape and Let It Cure
Pull the painter's tape before the sealant skins over, ideally within the first few minutes, so it releases cleanly. Then leave the joint undisturbed for the full cure window before exposing it to heavy water flow.
Choosing and Applying the Right Sealant Material
What is the best sealant for gutter joints? Silicone sealant is generally the best choice because it tolerates continuous moisture, flexes with thermal expansion, and resists UV breakdown better than acrylic caulk. It's the right call for seam overlaps and corner miters exposed to standing water and direct sun.
Silicone typically takes around 24 hours to skin over and roughly 72 hours to reach a full water-safe cure at 70°F with moderate humidity; cold or damp conditions extend that window significantly. Applied correctly, silicone gutter sealant commonly lasts 15 to 20 years, though annual inspection extends that lifespan further. It does not accept paint once cured, which matters if you're planning to repaint gutters afterward; seal after painting, not before.
Material Compatibility Across Gutter Types
Aluminum and steel gutters pair well with metal-rated silicone. Vinyl gutters need a vinyl-safe sealant formula, since some silicone formulations contain solvents that degrade vinyl over time. Copper gutters call for a sealant explicitly rated for copper, because certain silicone chemistries react with the metal and cause discoloration or premature breakdown. Always confirm the label lists your specific gutter material before purchasing.
Tape-Based Sealing vs. Full Silicone Repair
Can you seal a gutter joint without disassembling it? Yes. Butyl-rubber flashing tape presses directly over a clean, dry joint from the outside, avoiding the disassembly some sealant applications require, though it generally needs reapplication sooner than a properly cured silicone bead.
Tape makes sense as a fast, contained fix; full silicone sealing makes sense as the longer-term solution.
- Tape is the right call when: you need a same-day fix ahead of forecasted rain, the joint is a temporary patch before a fuller repair, or you want to avoid wet sealant entirely.
- Full sealant is the right call when: you want a repair measured in years rather than months, the joint sees constant moisture exposure, or you're addressing a joint that's already failed once with tape.
Special Considerations for Challenging Gutter Joints
Older galvanized steel gutters and heritage copper systems complicate an otherwise straightforward repair. Galvanized steel that has started rusting from the inside out often looks intact on the surface while the metal underneath has thinned; sealant on a compromised substrate buys very little time. Copper gutters on older homes carry both material cost and aesthetic value, and an incompatible sealant can leave a visible discoloration ring that's difficult to reverse.
Contaminated joints, where a previous repair used the wrong sealant type entirely, need full removal of that old material before any new application, since mismatched sealants often won't bond to each other. On irreplaceable or historically significant gutter systems, the cost of a failed DIY attempt is higher than the cost of getting it right the first time, and that's a reasonable moment to bring in a gutter cleaning and service professional who can assess the full system before any sealant goes on.
Maintenance and Long-Term Care
How long does gutter sealant last before it needs reapplication? Properly applied silicone sealant on a clean, dry joint typically lasts 15 to 20 years, while tape-based repairs often need reapplication within a few years. Regular inspection extends both, since catching a hairline crack early prevents a full reseal later.
- Inspect sealed joints quarterly during heavy rain seasons and at least annually in drier climates.
- Clean gutters of leaves and debris at least twice a year to prevent the standing water that stresses seams.
- Spot-reseal any new hairline cracks immediately rather than waiting for a full leak to return.
- Check downspout connections separately, since they often loosen from debris pressure before the seams do.
- Keep a simple log of when each joint was last sealed to track which repairs are approaching their expected lifespan.
Things to Consider Before You Start
- Can you safely access the joint? Ladder work at roofline height near a wet gutter edge carries real fall risk, and that risk doesn't shrink because the repair itself is simple.
- Is this the first failure or the third? Repeated failure on the same joint usually points to a substrate problem sealant alone won't fix.
- Do you have the dry window this repair needs? A 72-hour cure window with no rain forecast is a real planning constraint, not a suggestion.
- Is the gutter material one you can confidently match to a sealant? Copper and vinyl both carry compatibility risks that aluminum and steel don't.
If those questions raise more doubt than confidence, that's the line between a solid weekend fix and a job better handed to someone who does this daily.
Why Homeowners Bring in Ace Handyman Services
Ace Handyman Services gives homeowners a professional option at any point in this process, whether that's a full repair or a second opinion before buying materials.
- Peace of mind on a system where a failed seal means water damage to fascia, siding, or foundation, not just a cosmetic issue.
- A one-year labor warranty backing the repair, so a joint that fails again isn't a repeat expense.
- No need to source, learn, or return specialty ladders, stabilizers, or sealant guns you'll rarely use again.
- Background-checked, multi-skilled W-2 craftsmen, not gig contractors pieced together for a single job.
- A predictable weekday appointment window instead of losing a weekend to ladder work and cure-time planning.
- Honest scoping that recommends a quick tape fix or spot repair when a full resealing isn't actually necessary.
- Cleanup included, so old sealant scraps and packaging don't become your problem after the crew leaves.
If you'd rather have a professional assess the joint, the material, and the surrounding gutter run before committing to a repair, reach out to your local Ace Handyman Services office at Ace Handyman Services to schedule an appointment.
Frequently Asked Questions
How do I stop a dripping gutter joint quickly?
Clean the joint of debris, dry it thoroughly, and apply a bead of silicone sealant along the seam as an immediate triage step. This won't replace a full repair on a heavily corroded joint, but it stops active dripping while you plan the complete fix.
Is silicone or acrylic caulk better for gutter joints?
Silicone is better for gutter joints because it stays flexible through seasonal temperature swings and resists standing water, while acrylic caulk hardens fully and tends to crack under that same movement, leading to faster repeat leaks.
Why do gutter joints leak more often than the rest of the gutter run?
Joints concentrate structural stress at the exact point two sections meet, and factory sealant at that seam breaks down from UV exposure and thermal expansion faster than the surrounding metal, making seams the first failure point in most gutter systems.
Can I seal a gutter joint from outside without taking it apart?
Yes, both silicone sealant and butyl flashing tape apply directly to the exterior of a clean, dry joint without disassembly. Tape offers the fastest non-invasive fix, while an external silicone bead offers a longer-lasting result without removing the gutter section.
What does it cost to reseal a few gutter joints yourself?
Materials typically run in the range of a caulking gun, a tube or two of gutter-rated silicone, and basic prep supplies, often totaling well under a hundred dollars for a handful of joints, though ladder rental adds cost if you don't already own one.
What should I do if a sealed gutter joint starts leaking again?
Check whether the sealant is cracking, peeling, or simply being bypassed by water flow, since each points to a different cause. Cracking suggests material fatigue, peeling suggests an adhesion failure from inadequate prep, and bypass suggests the application missed part of the seam, all of which call for full removal and re-application rather than a quick patch on top.